Virtual network service endpoints enable you to limit network access to some Azure service resources to a virtual network subnet. You can also remove internet access to the resources. Service endpoints provide direct connection from your virtual network to supported Azure services, allowing you to use your virtual network’s private address space to access the Azure services. Traffic destined to Azure resources through service endpoints always stays on the Microsoft Azure backbone network.
In this lab, you will:
- Task 1: Create a virtual network
- Task 2: Enable a service endpoint
- Task 3: Restrict network access for a subnet
- Task 4: Add additional outbound rules
- Task 5: Allow access for RDP connections
- Task 6: Restrict network access to a resource
- Task 7: Create a file share in the storage account
- Task 8: Restrict network access to a subnet
- Task 9: Create virtual machines
- Task 10: Confirm access to storage account
Prerequisites for this labs : Azure Account / Download Labs Files here
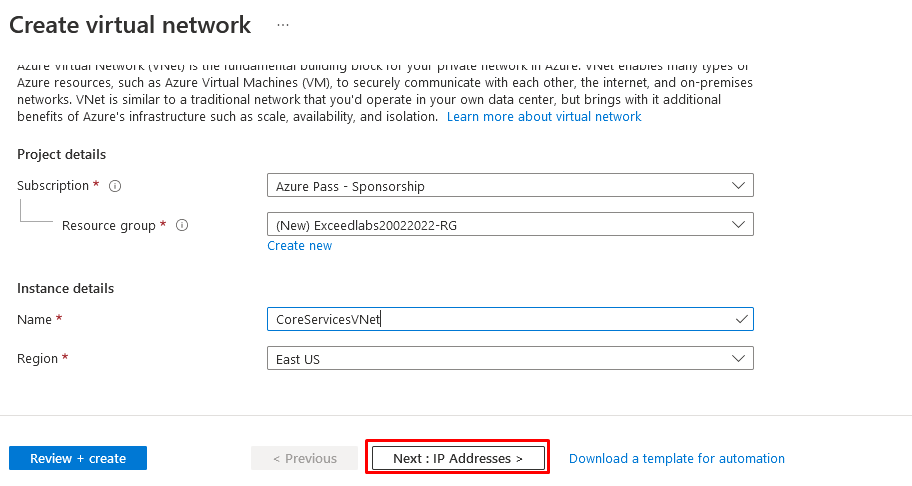
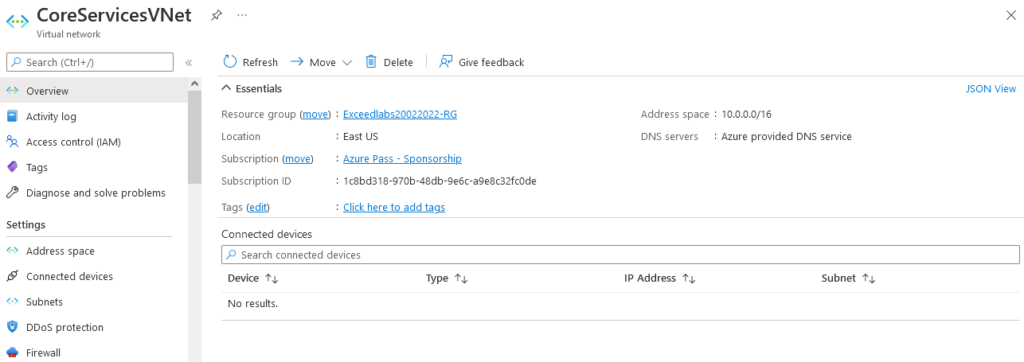
Task 1: Create a virtual network
- Login to the Azure Portal.
- On the Azure Portal home page, search for virtual network and then select Virtual network from the results.
- Select + Create.
- Enter, or select, the following information:
| Setting | Value |
| Subscription | Select your subscription |
| Resource group | (New) Exceedlabs20022022-RG |
| Name | CoreServicesVNet |
| Location | Select East US |
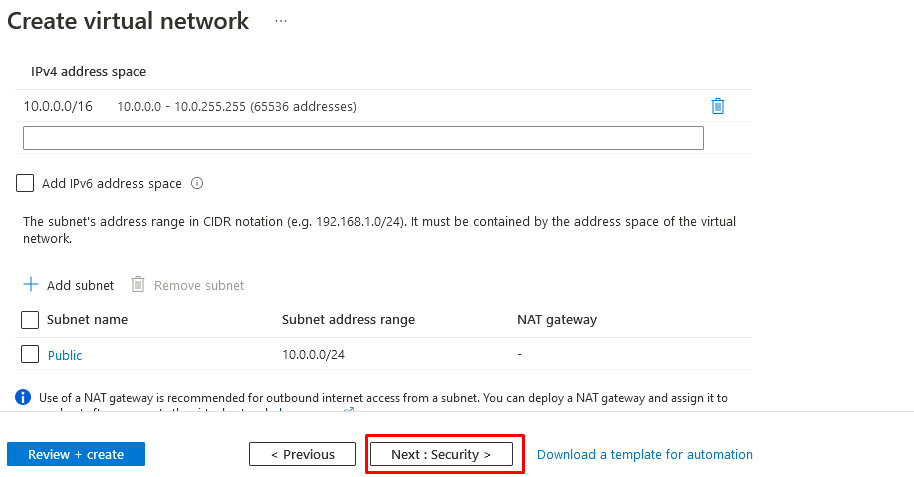
- Select the IP Addresses tab and enter the following values (select default to change the subnet name):
| Setting | Value |
| Address space | 10.0.0.0/16 |
| Subnet Name | Public |
| Subnet Address range | 10.0.0.0/24 |
Select the Security tab and enter the following values:
| Setting | Value |
| BastionHost | Disabled |
| DDoS protection | Disabled |
| Firewall | Disabled |
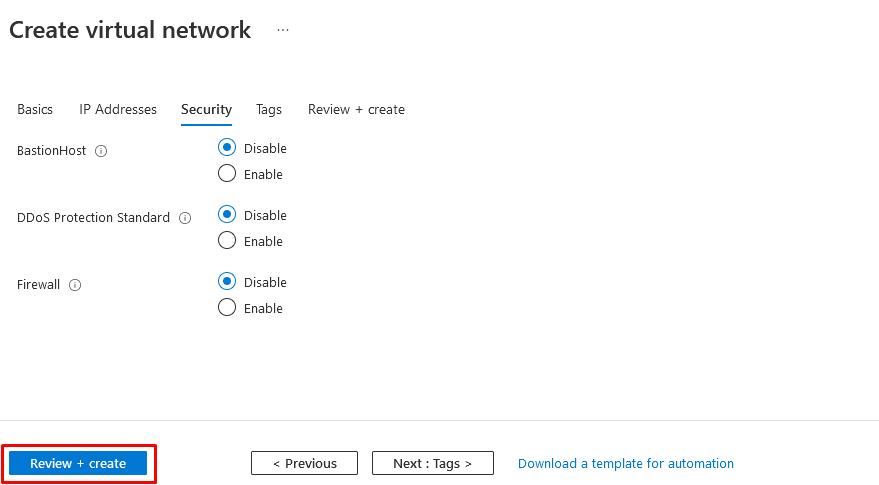
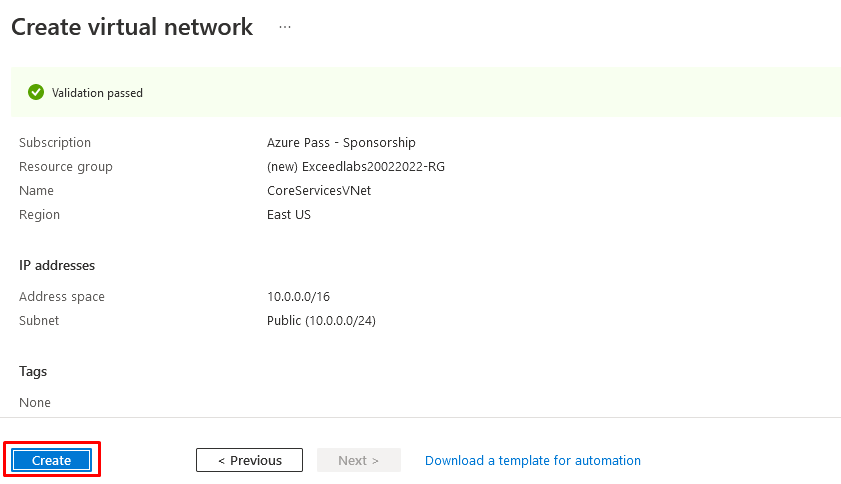
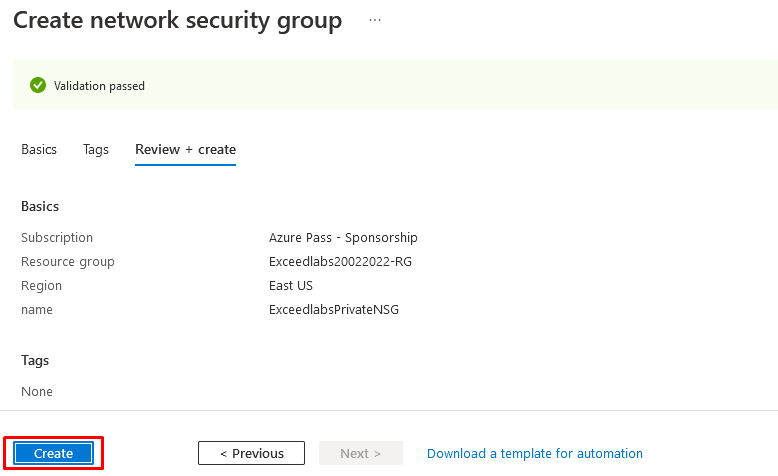
Click Review + Create. Once the resource is validated select Create.
Task 2: Enable a service endpoint
Service endpoints are enabled per service, per subnet. Create a subnet and enable a service endpoint for the subnet.
- In the Search resources, services, and docs box at the top of the portal, enter CoreServicesVNet. When CoreServicesVNet appears in the search results, select it.
- Add a subnet to the virtual network. Under Settings, select Subnets, and then select + Subnet, as shown in the following picture:
- Under Add subnet, select or enter the following information:
| Setting | Value |
| Name | Private |
| Address range | 10.0.1.0/24 |
| Service endpoints: Services | Select Microsoft.Storage |
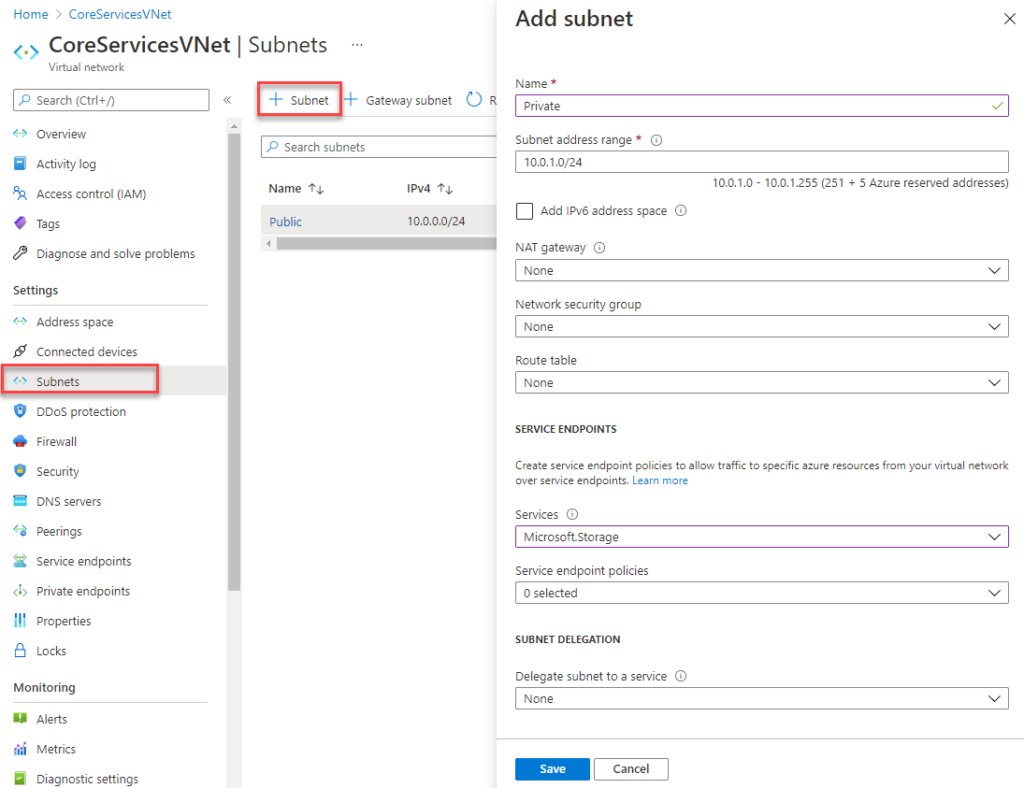
- Select Save.
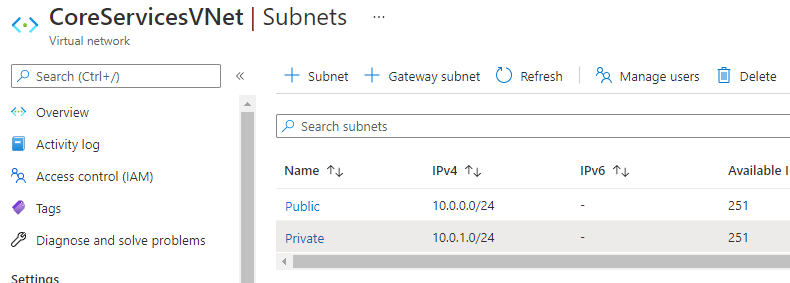
You should now have two subnets configured:
Task 3: Restrict network access for a subnet
By default, all VMs in a subnet can communicate with all resources. You can limit communication to and from all resources in a subnet by creating a network security group and associating it to the subnet.
- In the Search resources, services, and docs box at the top of the portal, enter security group. When Network Security groups appears in the search results, select it.
- In Network security groups, select + Create.
- Enter or select, the following information:
| Setting | Value |
| Subscription | Select your subscription |
| Resource group | Exceedlabs20022022-RG |
| Name | ExceedlabsPrivateNSG |
| Location | Select East US |
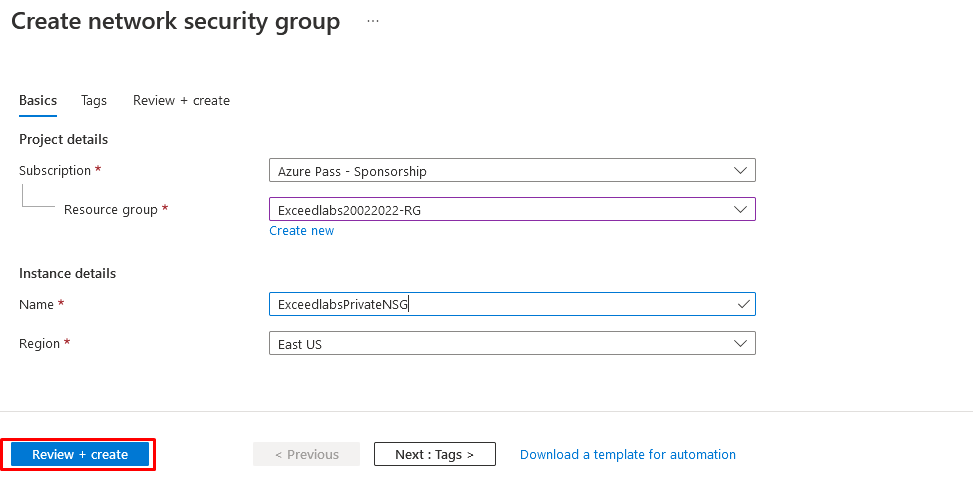
select Review + create, then click Create:
- After the ExceedlabsPrivateNSG network security group is created, select Go to resource.
- Under Settings, select Outbound security rules.
- Select + Add.
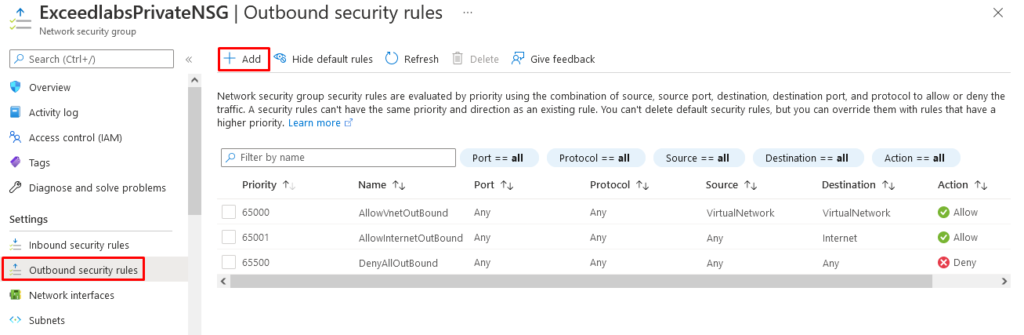
- Create a rule that allows outbound communication to the Azure Storage service. Enter, or select, the following information:
| Setting | Value |
| Source | Select VirtualNetwork |
| Source port ranges | * |
| Destination | Select Service Tag |
| Destination service tag | Select Storage |
| Service | Custom |
| Destination port ranges | * |
| Protocol | Any |
| Action | Allow |
| Priority | 100 |
| Name | Allow-Storage-All |
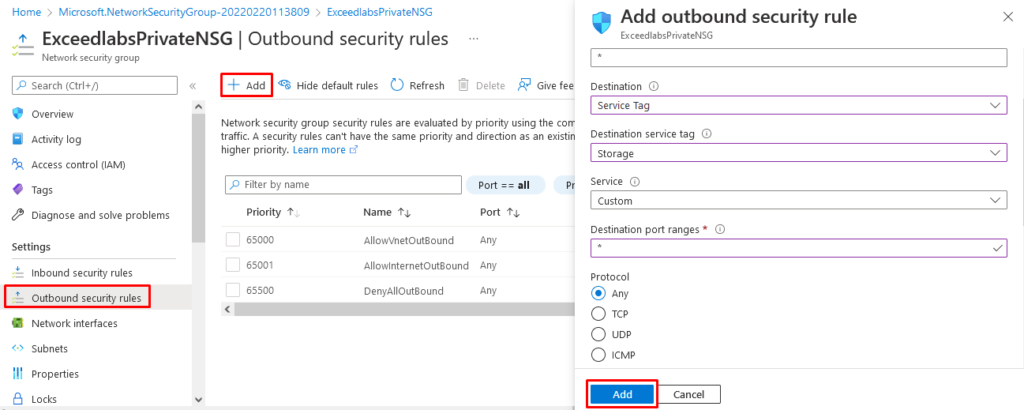
Select Add:
Task 4: Add additional outbound rules
Create another outbound security rule that denies communication to the internet. This rule overrides a default rule in all network security groups that allows outbound internet communication.
- Select +Add under Outbound security rules.
- Enter, or select, the following information:
| Setting | Value |
| Source | Select VirtualNetwork |
| Source port ranges | * |
| Destination | Select Service Tag |
| Destination service tag | Select Internet |
| Service | Custom |
| Destination port ranges | * |
| Protocol | Any |
| Action | Deny |
| Priority | 110 |
| Name | Deny-Internet-All |
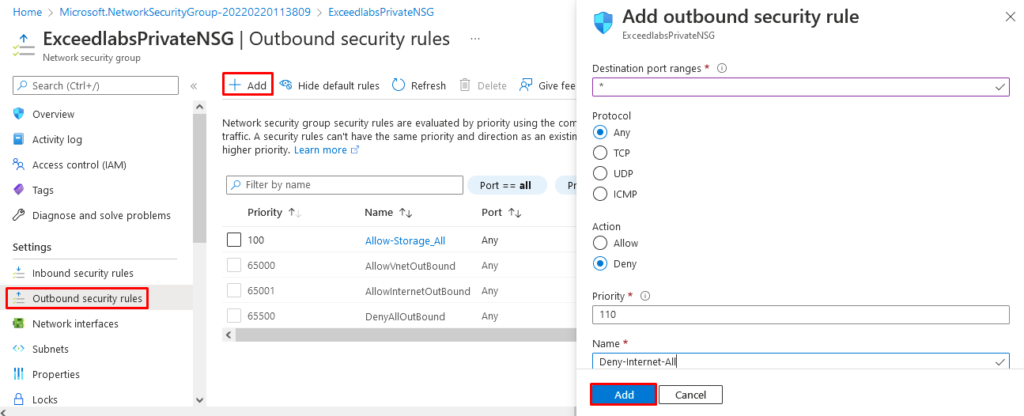
Select Add.
Task 5: Allow access for RDP connections
Create an inbound security rule that allows Remote Desktop Protocol (RDP) traffic to the subnet from anywhere. The rule overrides a default security rule that denies all inbound traffic from the internet. Remote desktop connections are allowed to the subnet so that connectivity can be tested in a later step.
On ExceedlabsPrivateNSG Outbound security rules, under Settings, select Inbound security rules.
- Select + Add.
- In Add inbound security rule, enter the following values::
| Setting | Value |
| Source | Any |
| Source port ranges | * |
| Destination | Select VirtualNetwork |
| Service | Custom |
| Destination port ranges | 3389 |
| Protocol | Any |
| Action | Allow |
| Priority | 120 |
| Name | Allow-RDP-All |
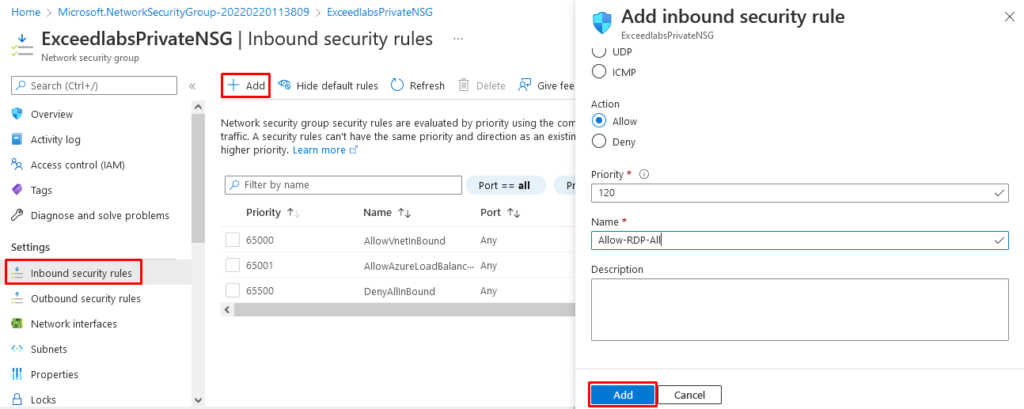
- And then select Add.
Warning: RDP port 3389 is exposed to the Internet. This is only recommended for testing. For production environments, we recommend using a VPN or private connection.
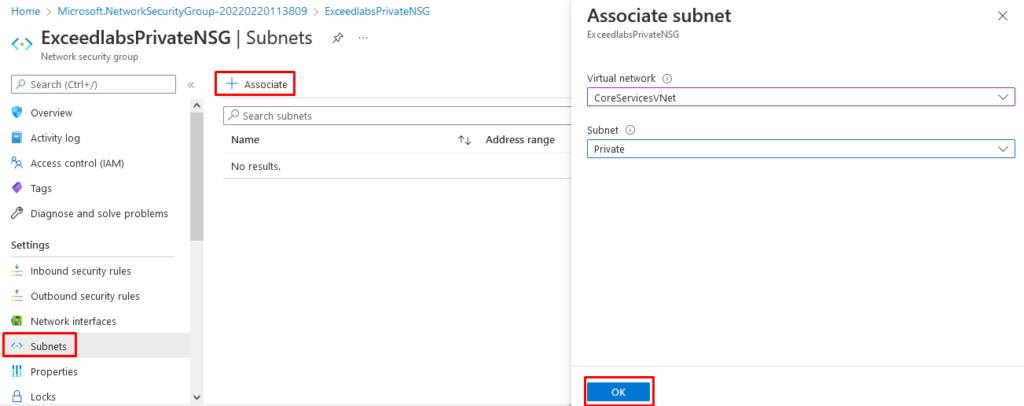
- Under Settings, select Subnets.
- Select + Associate.
- Under Associate subnet, select Virtual network and then select CoreServicesVNet under Choose a virtual network.
- Under Choose subnet, select Private, and then select OK.
Task 6: Restrict network access to a resource
The steps necessary to restrict network access to resources created through Azure services enabled for service endpoints varies across services. See the documentation for individual services for specific steps for each service. The remainder of this lab includes steps to restrict network access for an Azure Storage account, as an example.
- In the Azure portal, select Storage accounts.
- Select +Create.
- Enter, or select, the following information and accept the remaining defaults:
| Setting | Value |
| Subscription | Select your subscription |
| Resource group | Exceedlabs20022022-RG |
| Name | Enter exceedlabsstoragenm (where xx are your initials to make it unique) |
| Performance | Standard StorageV2 (general purpose v2) |
| Location | Select East US |
| Replication | Locally-redundant storage (LRS) |
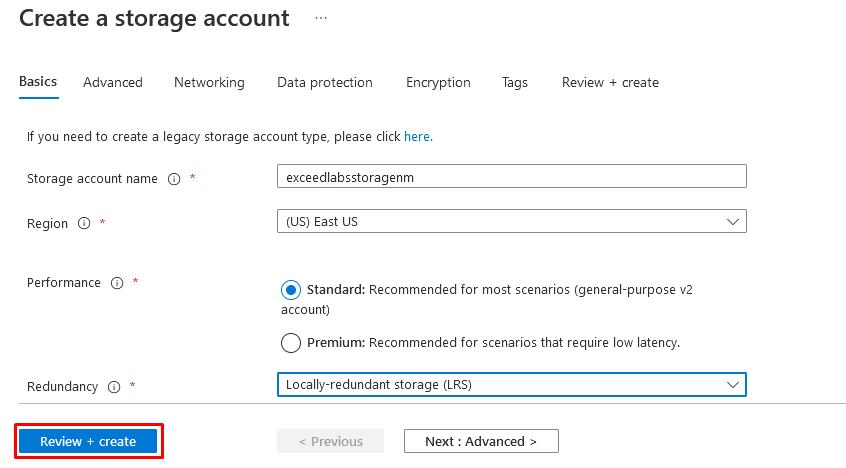
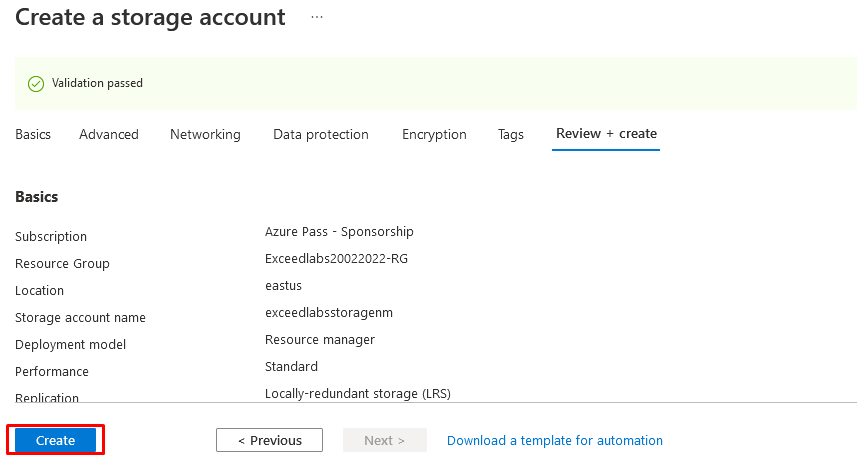
select Review + create, then click Create.
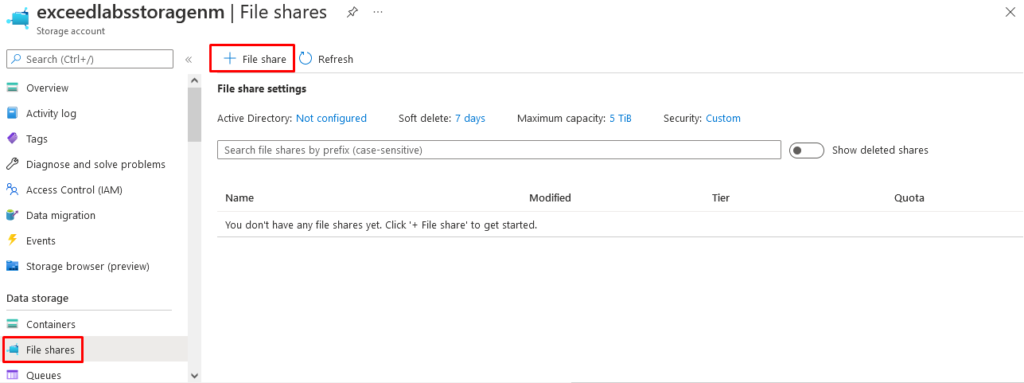
Task 7: Create a file share in the storage account
- After the storage account is created, enter the name of the storage account in the Search resources, services, and docs box, at the top of the portal. When the name of your storage account appears in the search results, select it.
- Select File shares, as shown in the following picture:
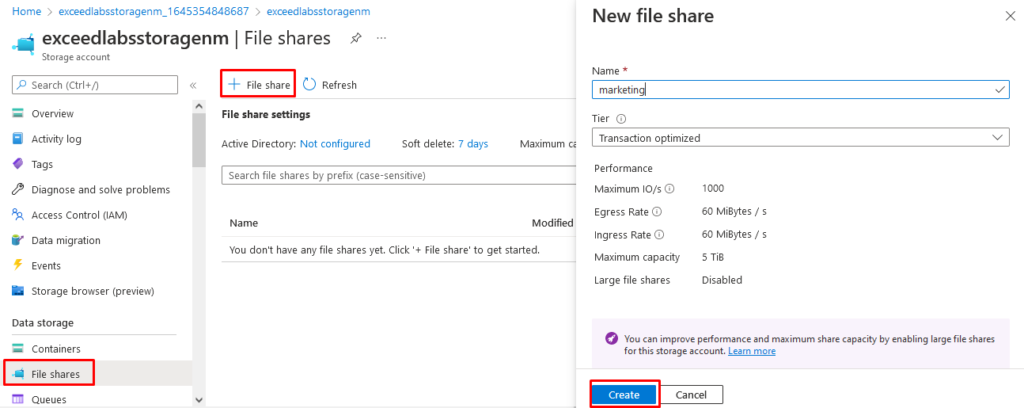
- Select + File share.
Enter marketing under Name, and then select Create.
Task 8: Restrict network access to a subnet
By default, storage accounts accept network connections from clients in any network, including the internet. Deny network access from the internet, and all other subnets in all virtual networks, except for the Private subnet in the CoreServicesVNet virtual network.
- Under Security + networking for the storage account, select Networking.
- Select Selected networks.
- Select +Add existing virtual network.
- Under Add networks, select the following values:
| Setting | Value |
| Subscription | Select your subscription. |
| Virtual networks | Select CoreServicesVNet. |
| Subnets | Select Private. |
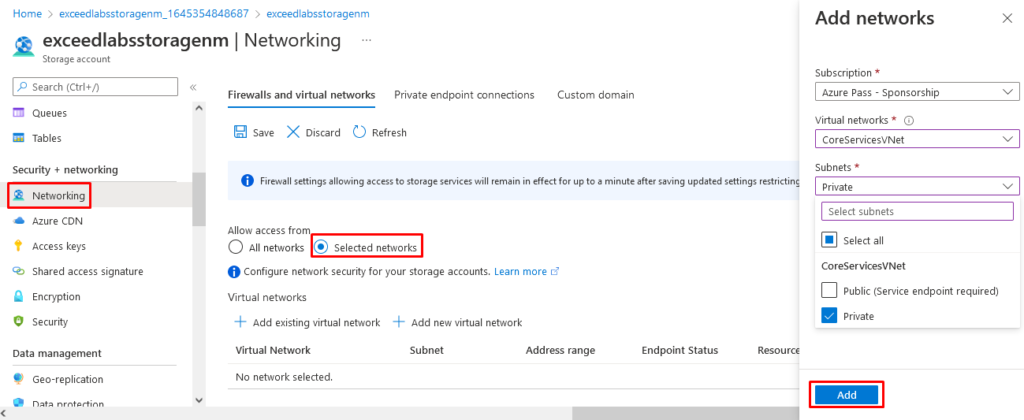
Select Add.
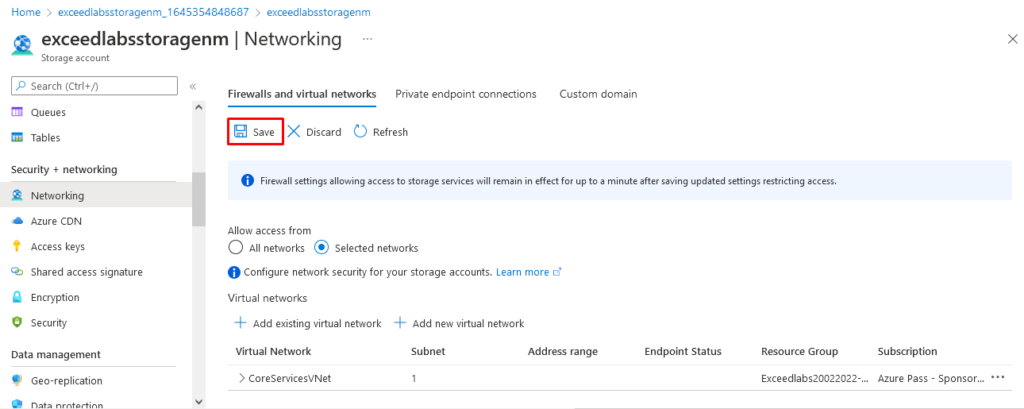
- Select Save.
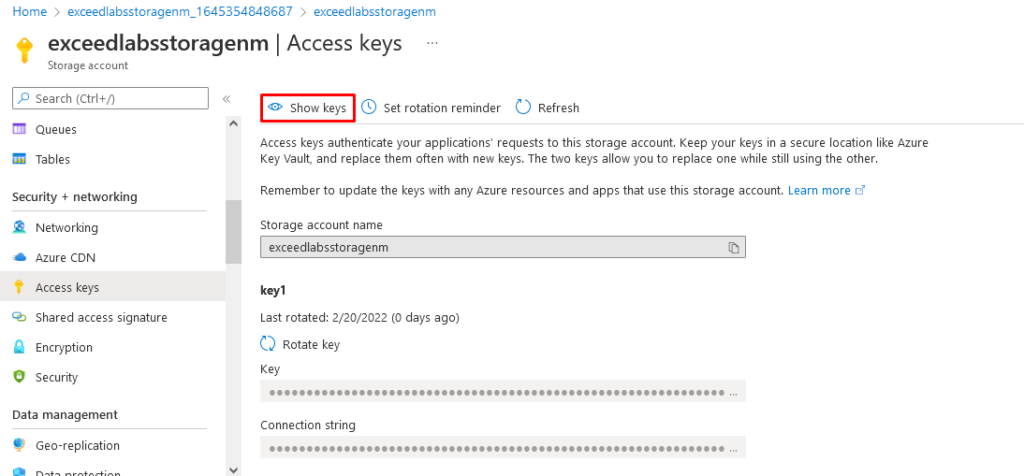
- Under Security and Networking for the storage account, select Access keys.
- Select Show Keys. Note the Key value, as you’ll have to manually enter it in a later step when mapping the file share to a drive letter in a VM.
Task 9: Create virtual machines
To test network access to a storage account, deploy a VM to each subnet.
- In the Azure portal, open the PowerShell session within the Cloud Shell pane.
- In the toolbar of the Cloud Shell pane, select the Upload/Download files icon, in the drop-down menu, select Upload and upload the following files VMs.json and VMs.parameters.json into the Cloud Shell home directory from the source folder F:\Allfiles\Labs\M07.
- Deploy the following ARM templates to create the VMs needed for this lab:
code
$RGName = "Exceedlabs20022022-RG"

New-AzResourceGroupDeployment -ResourceGroupName $RGName -TemplateFile VMs.json -TemplateParameterFile VMs.parameters.json
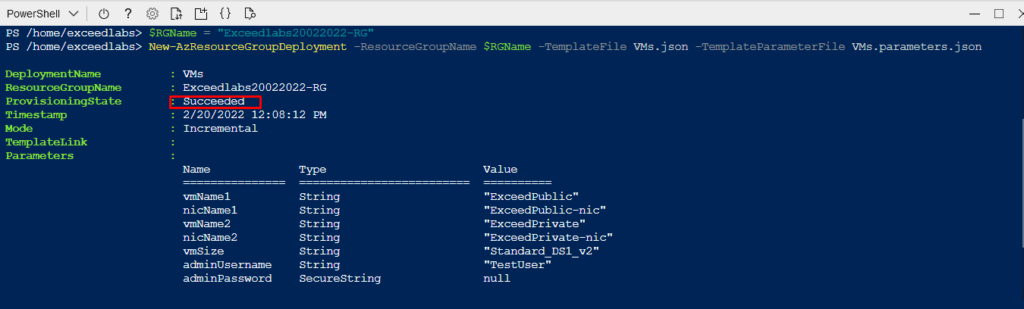
When the deployment is complete, go to the Azure portal home page, and then select Virtual Machines.
Task 10: Confirm access to storage account
- Once the ExceedlabsPrivate VM finishes creating, open the blade for the VM by selecting Go to resource. Select the Connect button, then select RDP.
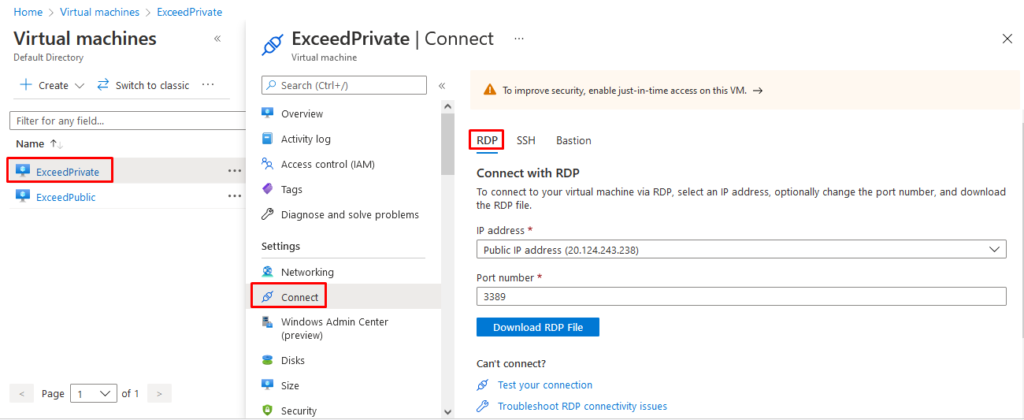
- After selecting the Connect button and RDP, select the Download RDP File button. A Remote Desktop Protocol (.rdp) file is created and downloaded to your computer.
- Open the downloaded rdp file. If prompted, select Connect. Enter the user name and password you specified when creating the VM. You may need to select More choices, then Use a different account, to specify the credentials you entered when you created the VM.
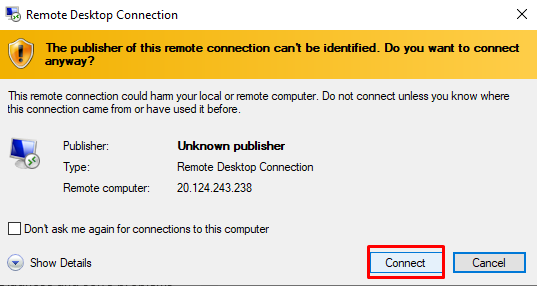

- Select OK.
- You may receive a certificate warning during the sign-in process. If you receive the warning, select Yes or Continue to proceed with the connection.
- On the ExceedlabsPrivate VM, map the Azure file share to drive Z using PowerShell. Before running the commands that follow, replace , (i.e. exceedlabsstoragenm) and my-file-share (i.e marketing) with values you supplied and retrieved in the Create a storage account task.
$connectTestResult = Test-NetConnection -ComputerName exceedlabsstoragenm.file.core.windows.net -Port 445
if ($connectTestResult.TcpTestSucceeded) {
    # Save the password so the drive will persist on reboot
    cmd.exe /C "cmdkey /add:`"exceedlabsstoragenm.file.core.windows.net`" /user:`"localhost\exceedlabsstoragenm`" /pass:`"daGYbO8F394VABIvr2qJDcdP56KD6eExXBtKdUwcAd2EXU7XTqTg0EJPC3zwbTCdLCyW3W9l0HBs+ASte3qarA==`""
    # Mount the drive
    New-PSDrive -Name Z -PSProvider FileSystem -Root "\\exceedlabsstoragenm.file.core.windows.net\marketing" -Persist
} else {
    Write-Error -Message "Unable to reach the Azure storage account via port 445. Check to make sure your organization or ISP is not blocking port 445, or use Azure P2S VPN, Azure S2S VPN, or Express Route to tunnel SMB traffic over a different port."
}
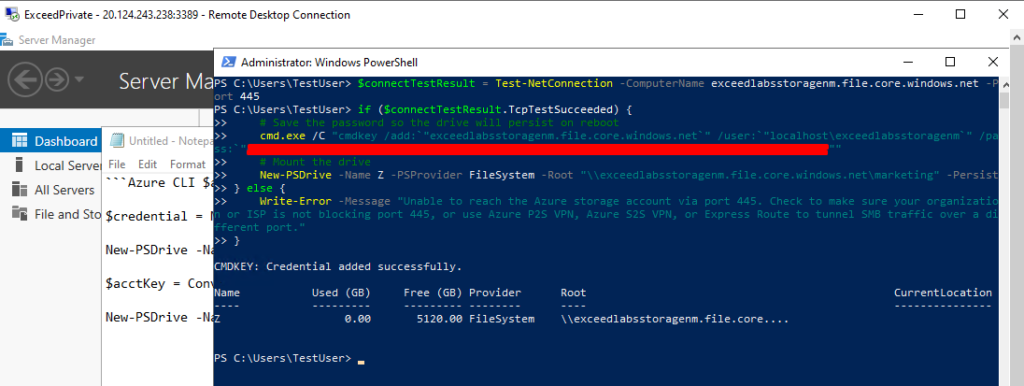

code
The Azure file share successfully mapped to the Z drive.
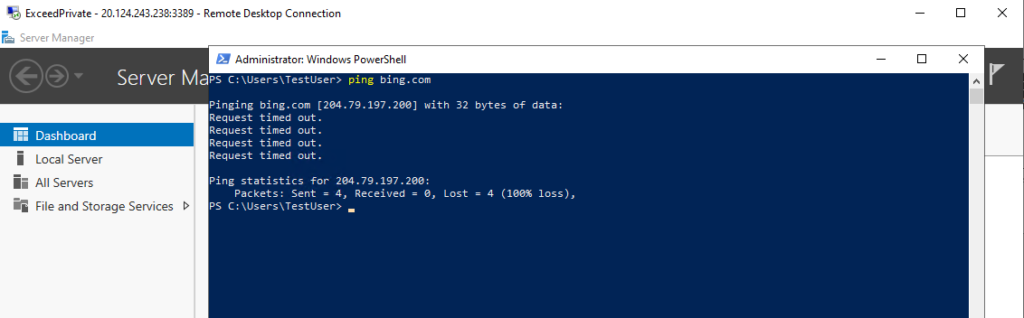
Confirm that the VM has no outbound connectivity to the internet from a command prompt:
ping bing.com
You receive no replies because the network security group associated to the Private subnet does not allow outbound access to the internet.
Close the remote desktop session to the ExceedPrivate VM.
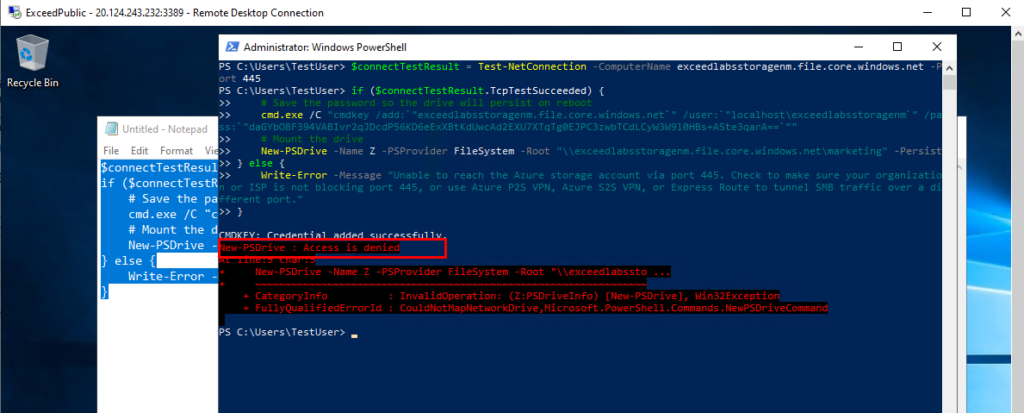
### Confirm access is denied to storage account
Enter ExceedPublic In the **Search resources, services, and docs** box at the top of the portal.
When **ExceedPublic** appears in the search results, select it.
Complete steps 1-6 in the Confirm access to storage account task for the ExceedPublic VM.
After a short wait, you receive a New-PSDrive : Access is denied error. Access is denied because the ExceedlabsPublic VM is deployed in the Public subnet. The Public subnet does not have a service endpoint enabled for Azure Storage. The storage account only allows network access from the Private subnet, not the Public subnet.
Confirm that the public VM does have outbound connectivity to the internet from a command prompt:
ping bing.com

Close the remote desktop session to the ExceedPublic VM.
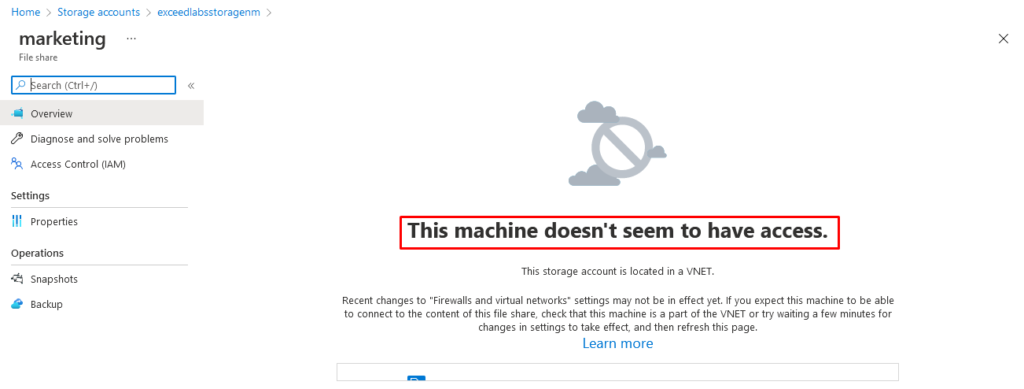
From your computer, browse to the Azure portal.
Enter the name of the storage account you created in the **Search resources, services, and docs** box. When the name of your storage account appears in the search results, select it.
Select **File shares** then select the **marketing** file share.
You receive the error shown in the following screenshot:

Access is denied, because your computer is not in the Private subnet of the CoreServicesVNet virtual network.
Congratulations! You have restricted network access to PaaS resources with virtual network service endpoint.
Reminder: Don’t forget to delete or shutdown all unused Azure resources after your labs for cost saving
Leave a Reply