In this lab, you will step through creation of a release dashboard and the use of REST API to retrieve Azure DevOps release data, which you can make this way available to your custom applications or dashboards.
The lab leverages the Azure DevOps Starter resource, which automatically creates an Azure DevOps project that builds and deploys an application into Azure.
After you complete this lab, you will be able to:
- create a release dashboard
- use REST API to query release information
Review the installed applications
Find the taskbar on your Windows 10 desktop. The taskbar contains the icons for the applications that you’ll use in this lab:
- Microsoft Edge
Set up an Azure DevOps organization
If you don’t already have an Azure DevOps organization that you can use for this lab, create one by following the instructions available at Create an organization or project collection.
Prepare an Azure subscription
- Identify an existing Azure subscription or create a new one.
- Verify that you have a Microsoft account or an Azure AD account with the Owner role in the Azure subscription. For details, refer to List Azure role assignments using the Azure portal.
Lab 1: Create a release dashboard
In this Lab, you will create a release dashboard in an Azure DevOps organization.
Task 1: Create an Azure DevOps Starter resource
In this task, you will create an Azure DevOps Starter resource in your Azure subscription. This will automatically create a corresponding project in your Azure DevOps organization.
- On your lab computer, start a web browser, navigate to the Azure Portal and sign in with the user account that has the Owner or Contributor role in the Azure subscription you will be using in this lab.
- In the Azure portal, search for and select the DevOps Starter resource type and, on the DevOps Starter blade, click + Create.

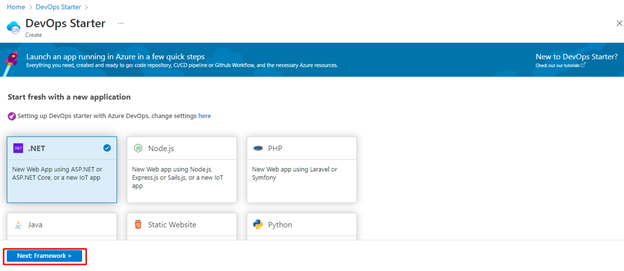
On the DevOps Starter blade, on the Start fresh with a new application pane, select the .NET tile and on the tops next to Setting up DevOps starter with GitHub, change settings, click here and select Azure DevOps , Done and Next: Framework >.

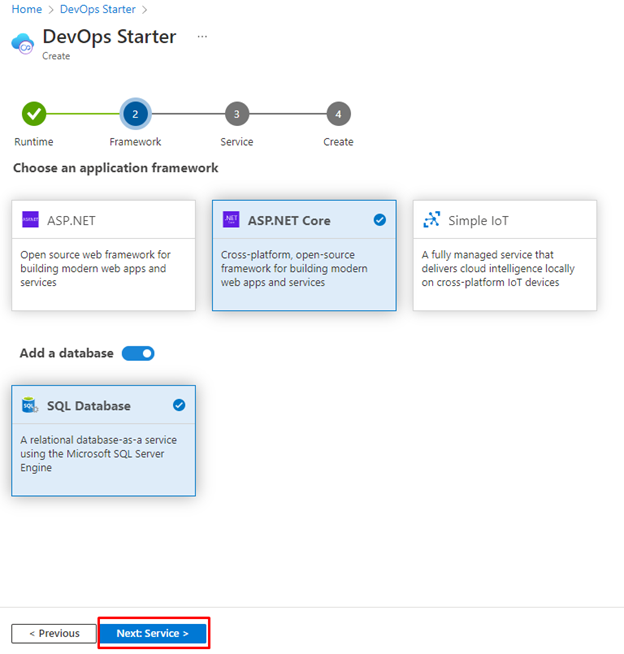
On the DevOps Starter blade, on the Choose an application framework pane, select the **ASP.NET Core** tile, move the **Add a database** slider to the **On** position, and click **Next: Service >**.
On the DevOps Starter blade, on the Select an Azure service to deploy the application pane, ensure that the Windows Web App tile is selected and click Next: Create >.

- On the DevOps Starter blade, on the Almost there pane, specify the following settings:
| Setting | Value |
| Project name | Creating a Release Dashboard |
| Azure DevOps Organization | the name of the Azure DevOps organization you intend to use in this lab |
| Subscription | the name of the Azure subscription you are using in this lab |
| Web app name | any globally unique string between 2 and 60 characters consisting of letters, digits, and hyphens, starting and ending with either a letter or a digit |
| Location | the name of Azure region into which you intend to deploy an Azure web app and an Azure SQL database |
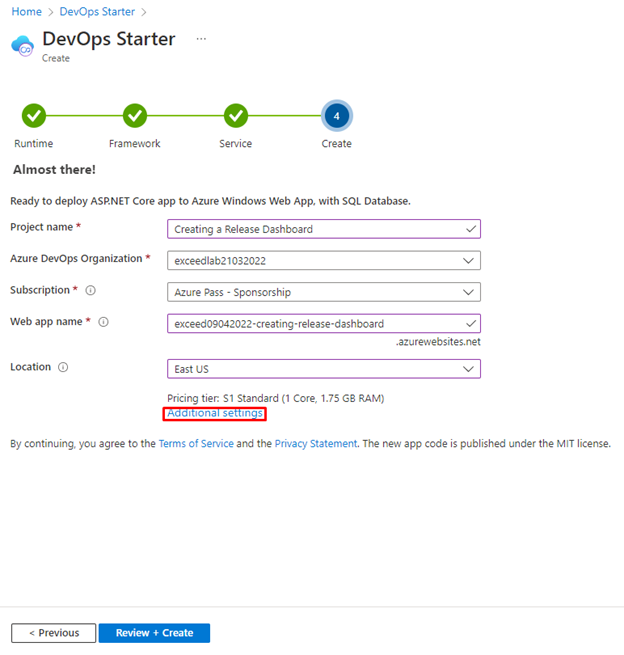
- On the DevOps Starter blade, on the Almost pane, click Additional settings.
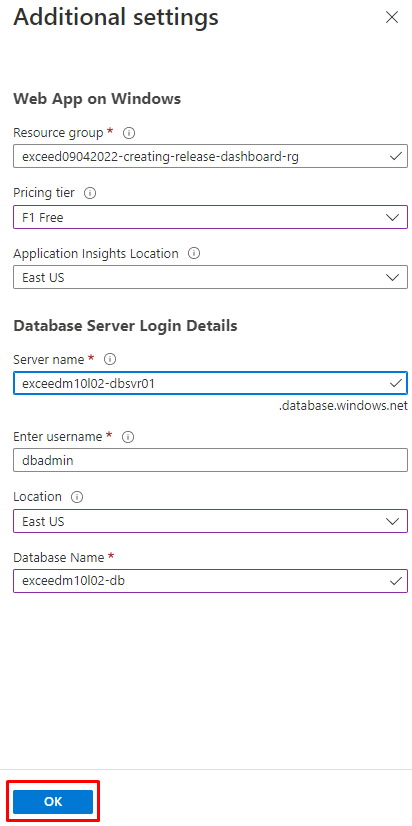
- On the Additional settings pane, specify the following settings and click OK.

| Setting | Value |
| Resource group | exceedm10l02-rg |
| Pricing tier | F1 Free |
| Application Insights Location | the name of the same Azure region that you chose for the location of the Azure web app |
| Server name | any globally unique string between 3 and 63 characters consisting of letters, digits, and hyphens, starting and ending with either a letter or a digit |
| Enter username | dbadmin |
| Location | the name of the same Azure region that you chose for the location of the Azure web app |
| Database Name | exceedm10l02-db |
Back on the DevOps Starter blade, on the Almost there pane, click Done and then Review + Create.

Note: Wait for the deployment to complete. The provisioning of the DevOps Starter resource should take about 2 minutes.
- Once you receive the confirmation that the DevOps Starter resource was provisioned, click the Go to resource button. This will redirect the browser to the DevOps Starter blade.
- On the DevOps Starter blade, track the progress of CI/CD pipeline until it completes successfully.

Note: The creation of the corresponding Azure web app and Azure SQL database might take about 5 minutes. The process automatically creates an Azure DevOps project that includes a ready-to-deploy repository as well as the build and release pipelines. The Azure resources are created as part of the automatically triggered deployment pipeline.
Task 2: Create Azure DevOps releases
In this task, you will create several Azure DevOps releases, including one that will result in a failed deployment.
- In the web browser displaying the Azure portal, on the DevOps Starter page, in the toolbar, click Project homepage. This will automatically open another browser tab displaying the Creating a Release Dashboard project in the Azure Devops portal. If prompted to sign in, authenticate with your Azure DevOps organization credentials.
Note: First, you will create a new release which will deploy successfully.
- In the Azure DevOps portal, in the vertical menu on the left side, click Repos, in the list of folders in the repository, navigate to the Applications\aspnet-core-dotnet-core\Pages folder and click the Index.cshtml entry.

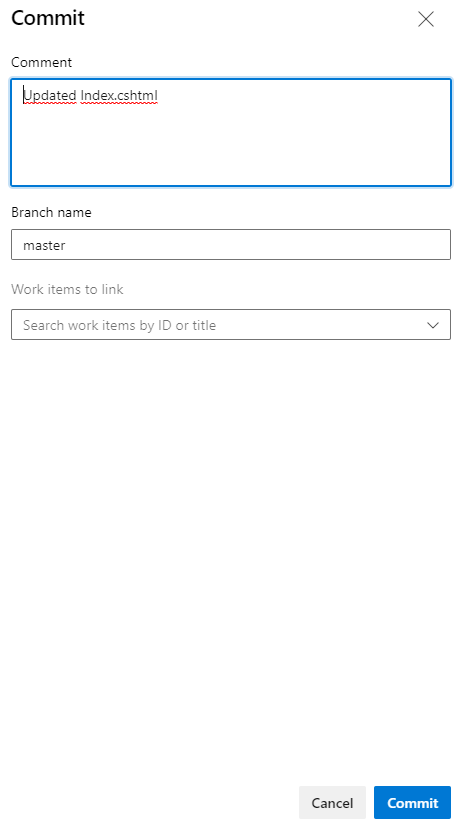
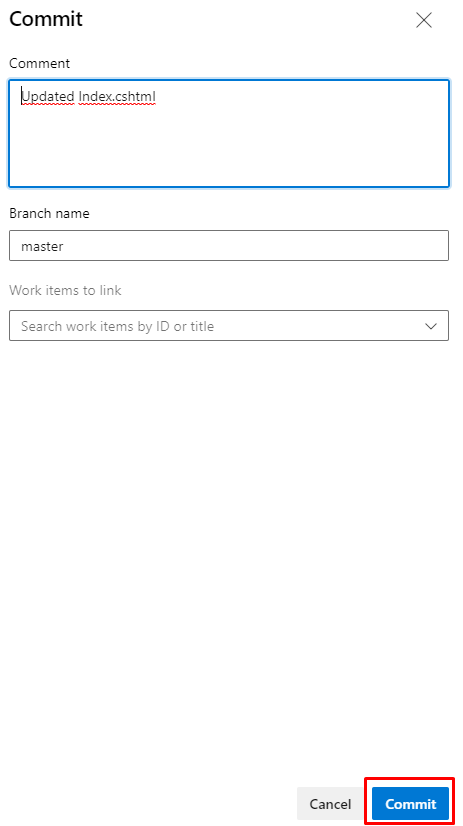
On the Index.cshtml pane, click Edit, in line 20, replace <div class=”description line-2″> Your ASP.NET Core app is up and running on Azure</div> with <div class=”description line-2″> Your ASP.NET Core app v1.1 is up and running on Azure</div> click Commit, and, on the Commit pane, click Commit again. This will automatically trigger the build pipeline.
- In the Azure DevOps portal, in the vertical navigational pane on the left side, click Pipelines.
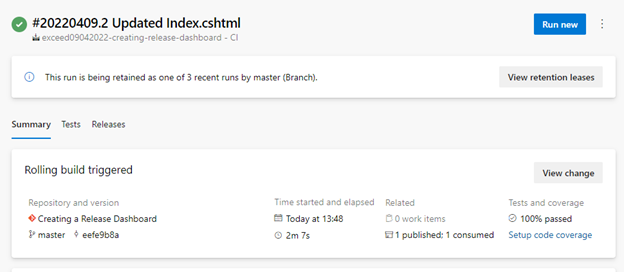
- On the Recent tab of the Pipelines pane, click the exceed09042022-creating-release-dashboard – CI entry, on the Runs tab of the exceed09042022-creating-release-dashboard – CI pane, select the most recent run, on the Summary tab of the run, in the Jobs section, click Build and monitor the job until its successful completion.
Once the job completes, in the Azure DevOps portal, in the vertical navigational pane on the left side, in the Pipelines section, click Releases.

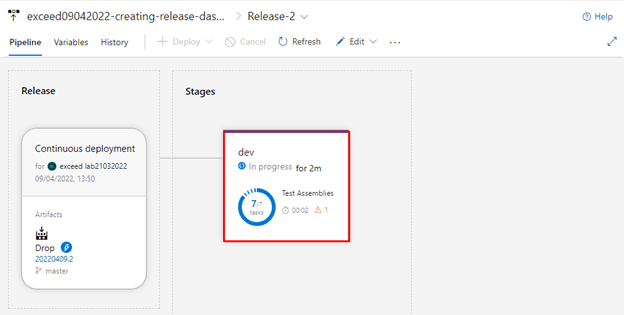
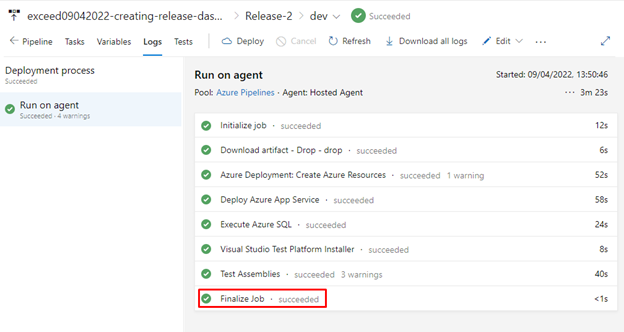
On the exceed09042022-creating-release-dashboard – CD pane, on the Releases tab, click the Release-2 entry, on the Pipeline tab of the Release-2 pane click the dev stage, on the dev pane, click View logs, and monitor progress of the deployment until its successful completion.
Note: Now, you will create a new release which deployment will fail. The failure will be caused by built-in assemblies test, which consider the change associated with the new release to be invalid.
- In the Azure DevOps portal, in the vertical menu on the left side, click Repos, in the list of folders in the repository, navigate to the Applications\aspnet-core-dotnet-core\Pages folder and click the Index.cshtml entry.
- On the Index.cshtml pane, click Edit, in line 4, replace ` ViewData[“Title”] = “Home Page – ASP.NET Core”;with ViewData[“Title”] = “Home Page v1.2 – ASP.NET Core”;` click Commit, and, on the Commit pane, click Commit again. This will automatically trigger the build pipeline.
- In the Azure DevOps portal, in the vertical navigational pane on the left side, click Pipelines.
- On the Recent tab of the Pipelines pane, click the exceed09042022-creating-release-dashboard – CI entry, on the Runs tab of the exceed09042022-creating-release-dashboard – CI pane, select the most recent run, on the Summary tab of the run, in the Jobs section, click Build and monitor the job until its successful completion.

- Once the job completes, in the Azure DevOps portal, in the vertical navigational pane on the left side, in the Pipelines section, click Releases.
- On the exceed09042022-creating-release-dashboard – CD pane, on the Releases tab, click the Release-3 entry, on the Pipeline tab of the Release-3 pane click the dev stage, on the dev pane, click View logs, and monitor progress of the deployment until its failure during the Test Assemblies stage.

Task 3: Create an Azure DevOps release dashboard
In this task, you will create a dashboard and add to it release-related widgets.
- In the Azure DevOps portal, in the vertical menu on the left side, click Overview, in the Overview section, click Dashboards, and click Add a widget.

On the Add Widget pane, scroll down through the list of widgets, select the Deployment status entry and click Add.
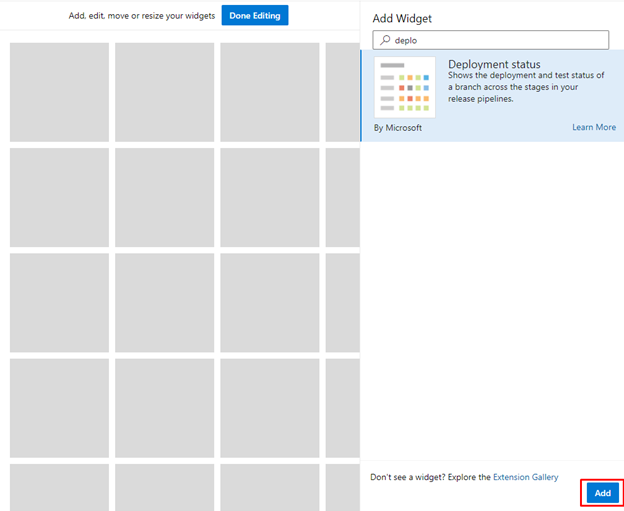
Use the procedure described in the previous step to add the Release Health Details, Release Health Overview, and Release Pipeline Overview widgets.

Note: Install Release Health Details and Release Health Overview from the marketplace Team Project Health
- Use the mouse to drag the Release Pipeline Overview to the right of the Deployment status widget to avoid the need for scrolling vertically through the dashboard and click Done Editing.
- Back on the dashboard pane, in the rectangle representing the Deployment status widget, click Configure widget.

- On the Configuration pane, specify the following settings (leave all others with their default values) and click Save.
| Setting | Value |
| Build pipeline | exceedm10l02 – CI |
| Linked release pipelines | exceed09042022-creating-release-dashboard – CD; exceed09042022-creating-release-dashboard – CD\dev |

- Back on the dashboard pane, hover over the upper right corner of the rectangle representing the Release Health Overview widget to reveal the ellipsis sign representing the More actions menu, click it, and, in the dropdown menu, click Configure.
- On the Configuration pane, specify the following settings (leave all others with their default values) and click Save.
| Setting | Value |
| Select release definition(s) | exceed09042022-creating-release-dashboard – CD |

- Back on the dashboard pane, hover over the upper right corner of the rectangle representing the Release Health Details widget to reveal the ellipsis sign representing the More actions menu, click it, and, in the dropdown menu, click Configure.
- On the Configuration pane, specify the following settings (leave all others with their default values) and click Save.
| Setting | Value |
| Definition | exceed09042022-creating-release-dashboard – CD |
- Back on the dashboard pane, hover over the upper right corner of the rectangle representing the Release Pipeline Overview widget to reveal the ellipsis sign representing the More actions menu, click it, and, in the dropdown menu, click Configure.
- On the Configuration pane, specify the following settings (leave all others with their default values) and click Save.
| Setting | Value |
| Release pipeline | exceed09042022-creating-release-dashboard – CD |
- Back on the dashboard pane, click Refresh to update the content displayed by the widgets.
Note: The links on widgets allow you to navigate directly to the corresponding panes in the Azure DevOps portal.
Lab 2: Query release information via REST API
In this Lab, you will query release information via REST API by using Postman.
Task 1: Generate an Azure DevOps personal access token
In this task, you will generate an Azure DevOps personal access token that will be used to authenticate from the Postman app you will install in the next task of this Lab.
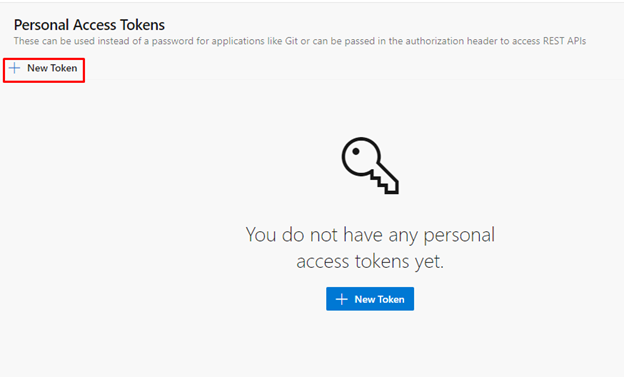
- On the lab computer, in the web browser window displaying the Azure DevOps portal, in the upper right corner of the Azure DevOps page, click the User settings icon, in the dropdown menu, click Personal access tokens, on the Personal Access Tokens pane, and click + New Token.

- On the Create a new personal access token pane, click the Show all scopes link and, specify the following settings and click Create (leave all others with their default values):
| Setting | Value |
| Name | Creating a Release Dashboard lab |
| Scope | Release |
| Permissions | Read |
| Scope | Build |
| Permissions | Read |

- On the Success pane, copy the value of the personal access token to Clipboard.
Note: Make sure you record the value of the token. You will not be able to retrieve it once you close this pane.
- On the Success pane, click Close.
Task 2: Query release information via REST API by using Postman
In this task, you will query release information via REST API by using Postman.
- On the lab computer, start a web browser and navigate to the Postman download page, click Download the App button, in the dropdown menu, click Windows 64-bit, click the downloaded file and run the installation. Once the installation completes, the Postman desktop app will start automatically.

- In the Create Postman Account pane, provide your email address, a username and password and click Create free account.
Note: You will receive an email from Postman to activate your Postman account to complete the process of account provisioning.
- Once you signed in, within the Postman desktop app window, in the upper left corner, click +New, on the Create New pane, click Request, in the SAVE REQUEST pane, in the Request name text box, type Get-Releases, click + Create Collection, in the Name your collection text box, type Azure DevOps exceedm10l02 queries, click the check mark on the right side, and then click the button Save to Azure DevOps exceedm10l02 queries.

- Open another web browser window and navigate to the Releases – List Microsoft Docs page and review its content.
- Switch back to the Postman desktop app, in the Launchpad pane in the upper right section of the app window, click the Authorization tab header, in the TYPE dropdown list, select the Basic Auth entry and, in the Password textbox, paste the value of the token you copied in the previous task (do not set the value of the Username text box).

- In the Launchpad pane in the upper right section of the app window, ensure that GET appears in the dropdown list, in the Enter request URL textbox, type the following and click Send (replace the value of the <organization_name> with the name of your Azure DevOps organization) in order to list all releases:
CodeCopy
https://vsrm.dev.azure.com/exceedlab21032022/Creating%20a%20Release%20Dashboard/_apis/release/releases?api-version=6.0
- Review the output listed on the Body tab in the lower right section of the app window and verify that it includes the listing of the releases you created in the previous Lab of this lab.
- Switch to the web browser window displaying the content of Microsoft Docs and navigate to the Deployments – List Microsoft Docs page and review its content.
- In the Launchpad pane in the upper right section of the app window, ensure that GET appears in the dropdown list, in the Enter request URL textbox, type the following and click Send (replace the value of the <organization_name> with the name of your Azure DevOps organization) in order to list all deployments:
CodeCopy
https://vsrm.dev.azure.com/exceedlab21032022/Creating%20a%20Release%20Dashboard/_apis/release/deployments?api-version=6.0- Review the output listed on the Body tab in the lower right section of the app window and verify that it includes the listing of the deployments you initiated in the previous Lab of this lab.
- In the Launchpad pane in the upper right section of the app window, ensure that GET appears in the dropdown list, in the Enter request URL textbox, type the following and click Send (replace the value of the <organization_name> with the name of your Azure DevOps organization) in order to list all deployments:
CodeCopy
https://vsrm.dev.azure.com/exceedlab21032022/Creating%20a%20Release%20Dashboard/_apis/release/deployments?DeploymentStatus=failed&api-version=6.0
Review the output listed on the Body tab in the lower right section of the app window and verify that it includes only the failed deployment you initiated in the previous Lab of this lab.
Leave a Reply