Azure Files offers fully managed file shares in the cloud that are accessible via the industry standard Server Message Block (SMB) protocol or Network File System (NFS) protocol. Azure Files file shares can be mounted concurrently by cloud or on-premises deployments. SMB Azure file shares are accessible from Windows, Linux, and macOS clients
There are two steps to creating Azure file shares. The first step is to create a storage account by choosing the correct options. The second step involves creating the file shares themselves.
In this Lab, you’ll see how to use Azure CLI commands to create the storage account you need. You’ll learn how to authenticate with Azure and persist credentials to allow the company’s satellite offices to maintain connections to the file shares.
Prerequisites for this labs : Azure Account
Create a resource group to host your resources
New-AzResourceGroup -Name rg-exceed13102021 -Location "East US"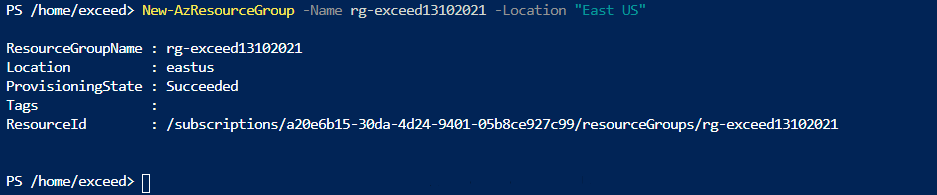
Create a storage account with the Azure CLI
Note: The chosen storage account name must be unique and not already taken
az storage account create --name saexceed13102021 --resource-group rg-exceed13102021 --sku Standard_GRS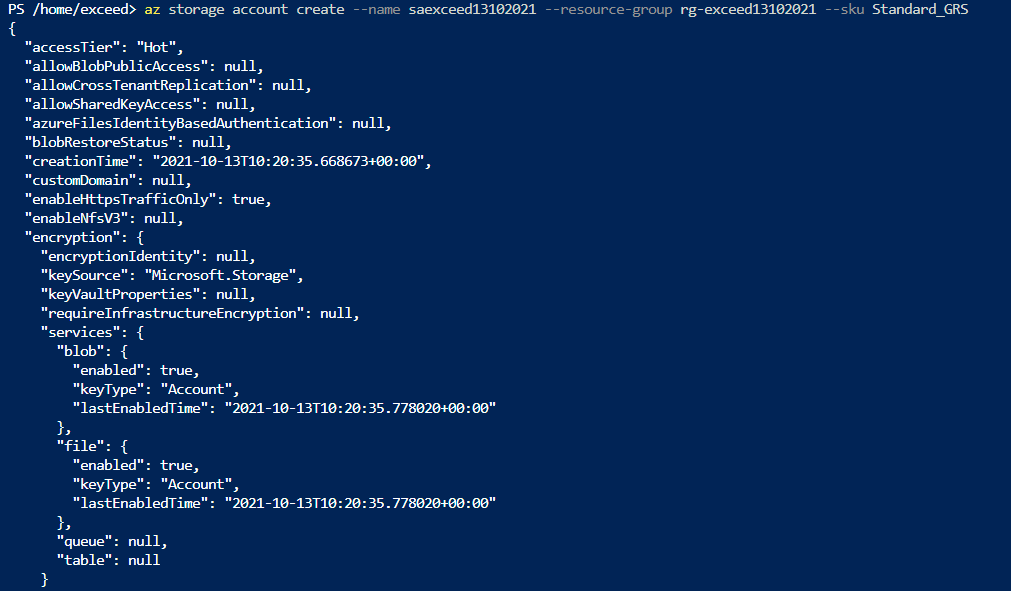
Get the storage account key

Click on Show Keys and copy the key
Create a file share
az storage share create --account-name saexceed13102021 --account-key ## --name fsexceed13102021
The only required argument to this command is –name, but it won’t enable you to create a share on its own. You also need to provide the storage account information. There are two ways you can provide the information to the command:
- By using the –account-name and either an –account-key or a –sas-token argument.
- By using a storage account connection string with –connection-string.
There are interesting optional arguments that you might find useful in some situations. The first argument controls the size of the share in gigabytes. If you need this restriction, use the –quota argument. The second argument lets you control the timeout for calls to the service in seconds with –timeout.
The defaults for these arguments are acceptable in our scenario. So, the full command takes the following form:
Connect to an Azure file share with SMB
With the Azure file share created, you connect to it from a Windows, Linux, or macOS computer. There are guides for each operating system online, and links to them are in the summary Lab. This module assumes you’re going to be working with Windows machines.
The Azure portal makes it easy to connect to your new share by providing the PowerShell commands to run.
Create a VM and connect with RDP protocol
Create a Windows Server VM to simulate an on-premises machine running in the finance company’s datacenter or branch office.
- Using Cloud Shell, create a Windows VM with the Azure CLI. When you’re prompted for a password, enter a complex password of your choice, and note it for reference later.
az vm create --resource-group rg-exceed13102021 --name 2019FileServer --image Win2019Datacenter --admin-username azureuser
- When the virtual machine has been created, sign in to the Azure portal with the account you used to activate the sandbox.
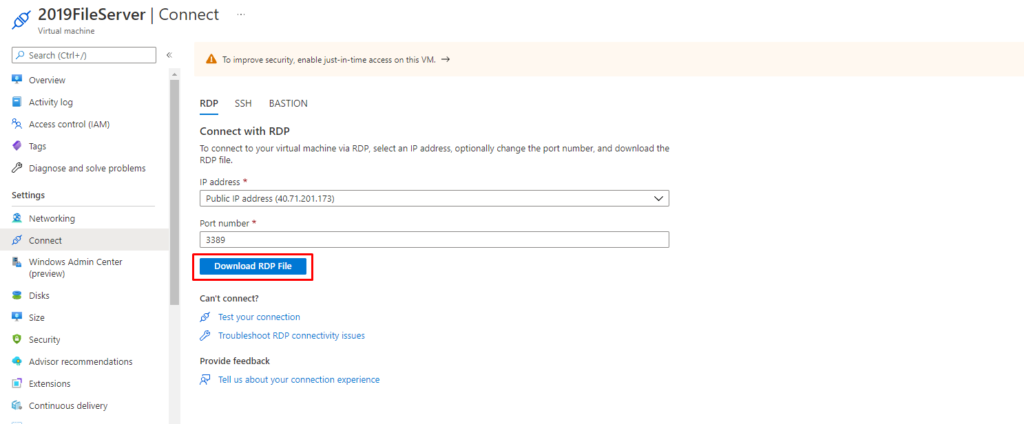
- On the home page, under All services, select Virtual machines, and then select the 2019FileServer VM you created in step 1 of this task. The 2019 FileServer Virtual machine pane appears.
- On the command bar, select Connect > RDP, and then select Download RDP File.
- When the RDP file has downloaded, select it to run. In the Remote Desktop Connection dialog box, select Connect.
On the Windows Security Enter your credentials dialog box, select More choices, and then scroll down and select Use a different account. In the Email address field, enter azureuser, in the Password field, enter the password you created earlier, and then select OK.
If you’re prompted to verify the remote connection, select Yes.
Map drives to the Azure file shares
- In the Azure portal, in the top Search resources, services, and docs search box, search for and select Storage accounts.
- Select the storage account that you created, which should be named saexceed13102021 followed by random numbers. That storage account pane appears.
- In the middle menu pane, under Data storage, select File shares.
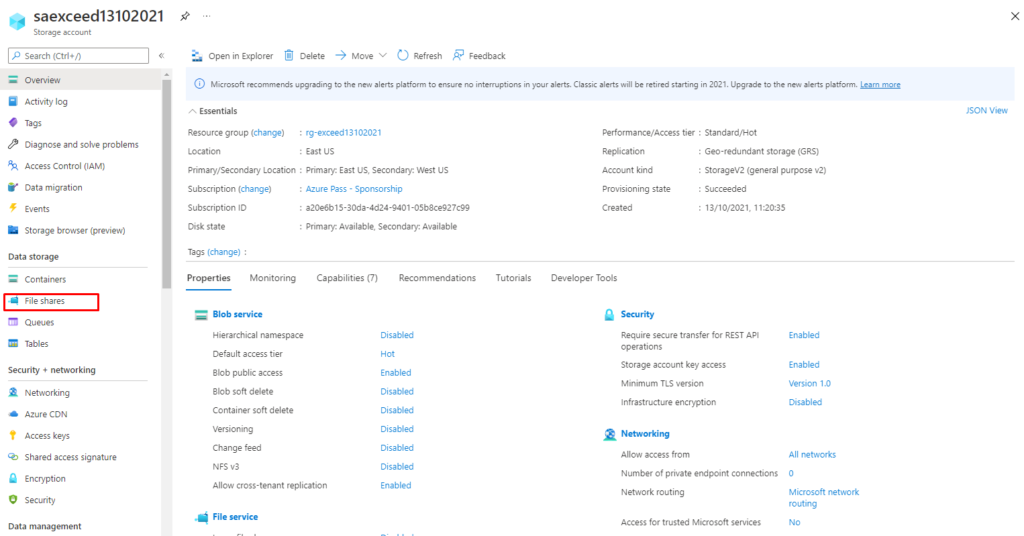
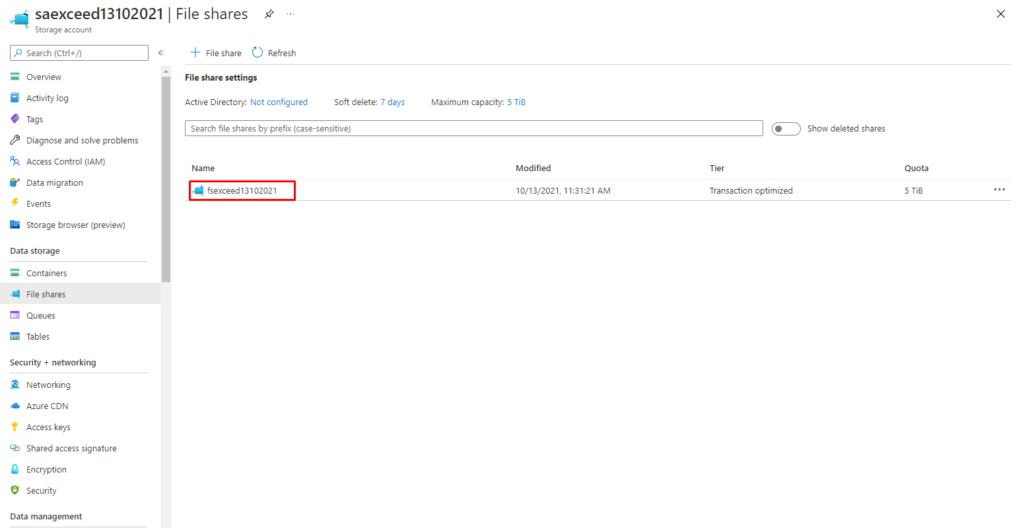
The File shares pane for your storage account appears with two file shares.
In the file shares list, select fsexceed13102021. The fsexceed13102021file share pane appears.
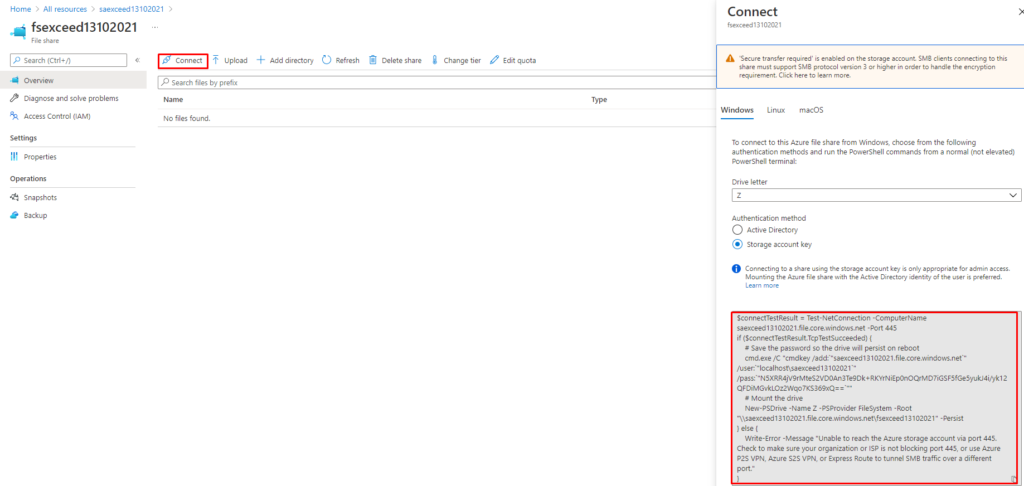
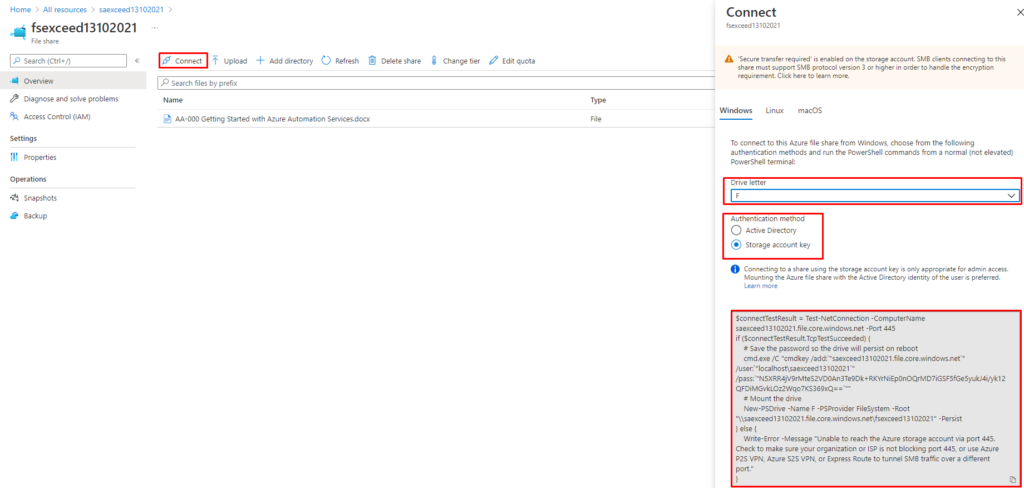
- In the command bar, select Connect. The Connect pane appears.
- In the Drive letter dropdown list, select the F.
- Under Authentication method, ensure Storage account key is selected, and then copy the PowerShell script that appears in the text box.
On your virtual machine, in the system tray, select Start, scroll to Windows PowerShell (Admin), or if you don’t see (Admin), then right-click Windows PowerShell and select Run as Administrator.

- In the PowerShell console title bar, right-click the PowerShell icon, and select Properties. On the Options tab, ensure that Use Ctrl+Shift+C/V as Copy/Paste is selected, and then select OK. Now you can use accelerator keys Ctrl+Shift+V to paste content into your VM PowerShell console.
- At the command prompt in the PowerShell console, paste the script you copied from the Azure portal, and press Enter.
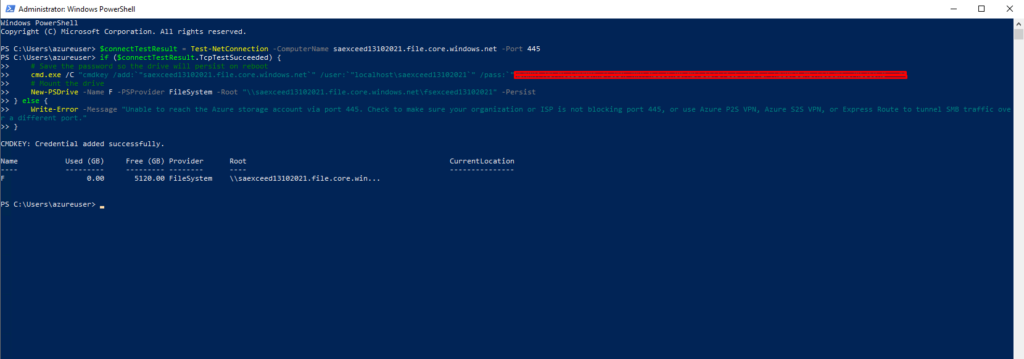
In the Azure portal, go back to the File shares pane, and select reportexceed13102021.
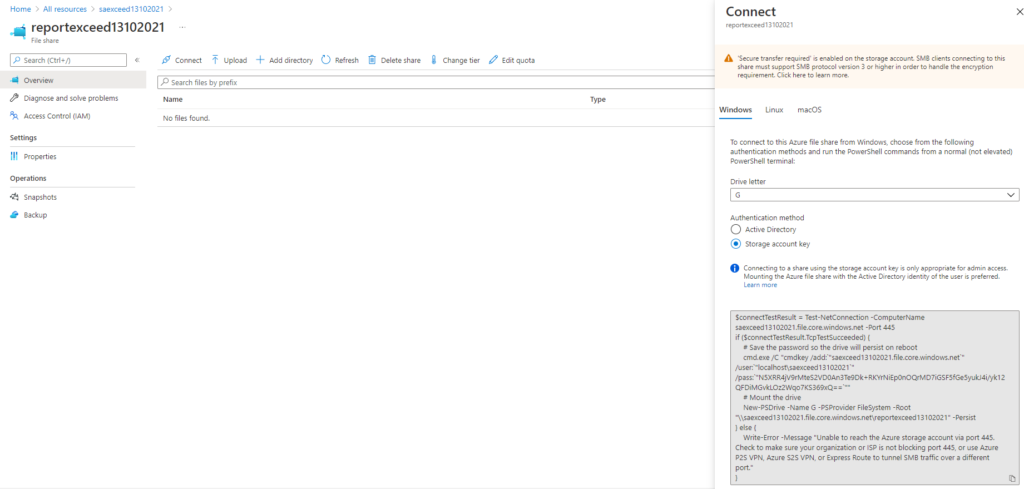
- On the command bar, select Connect. The Connect reports pane appears.
- In the Drive letter dropdown list, select the G.
- Under Authentication method, ensure Storage account key is selected, and then copy the PowerShell script that appears in the text box.
- In the RDP PowerShell window, paste Ctrl+Shift+V the script you copied, and then press Enter.
Test the mounted drive
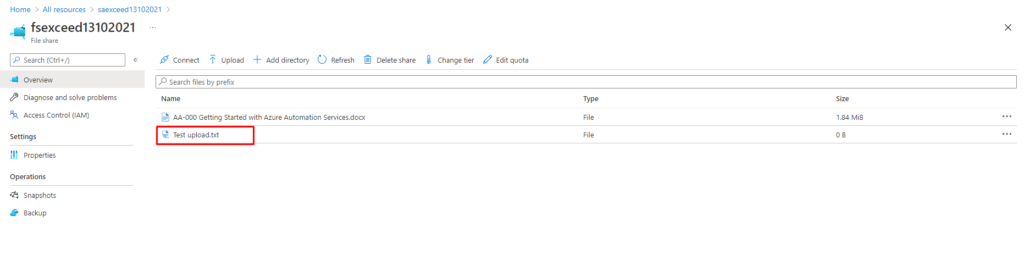
- In the RDP connection, open File Explorer, and select This PC.
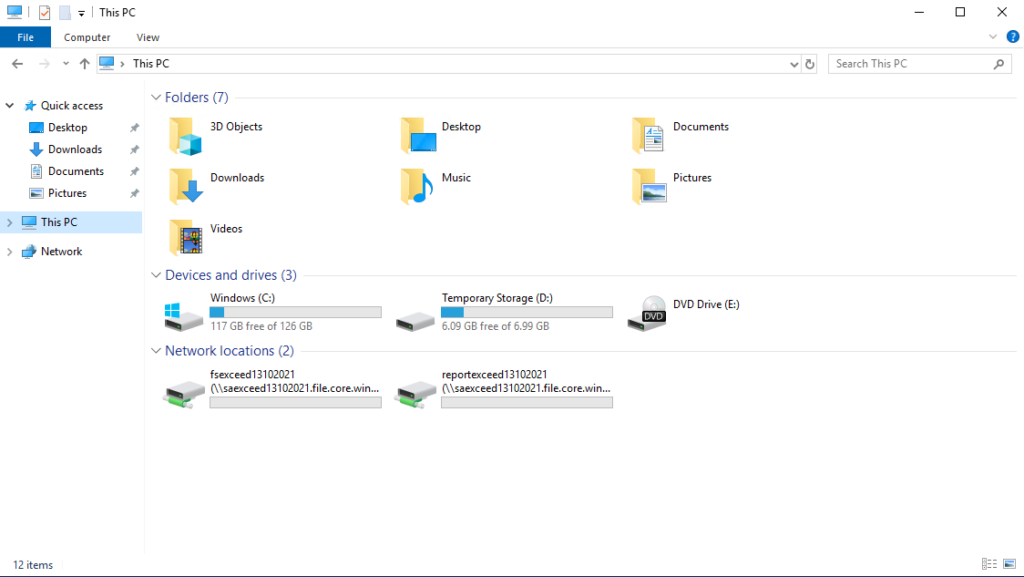
- Select the fsexceed13102021 drive named F.
- Right-click the main window, and select New > Text Document.
- Save the file, naming test upload.
- Return to the Azure portal in your browser, go back to the File shares pane, and select fsexceed13102021. You should see the file in the portal.
Secure access to files stored in Azure Files
In this Lab, you’ll investigate ways to secure access to Azure file shares from on-premises machines. You’ll check to ensure that data is encrypted in transit to Azure. With secure access in place, you’ll look at how the finance company can use Azure AD to control access to the file shares. As an extra level of protection for the shared files, you’ll also explore the snapshot feature.
Enable secure file transfer
- In the Azure portal you should still have open from the previous exercise, select the storage account you created, named saexceed13102021.
- In the middle menu pane, under Settings, select Configuration. The Configuration pane appears for your storage account.
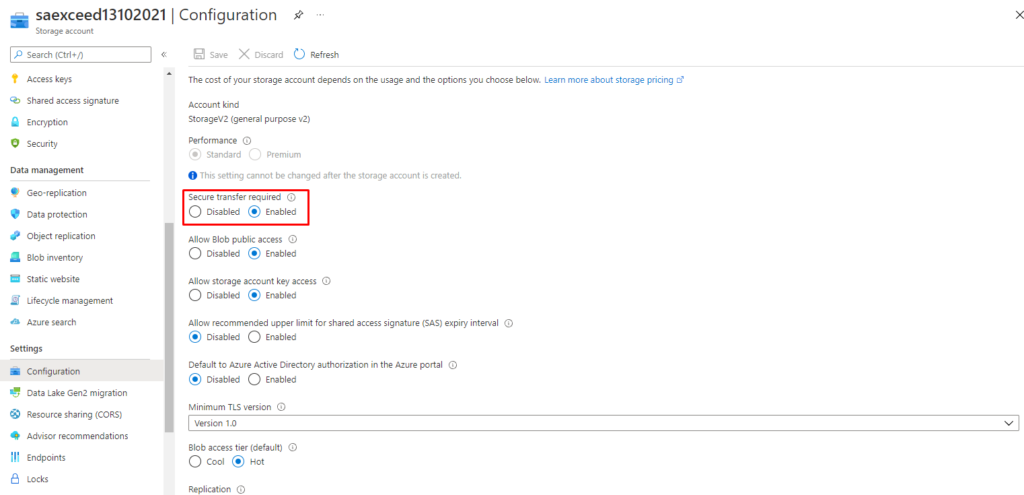
Ensure that Secure transfer required is enabled.
Add a firewall rule to restrict access to an IP address
- In the middle menu pane, under Security + networking, select Networking. The Networking pane appears for your storage account with the Firewalls and virtual networks tab highlighted.

- Under Allow access from, select Selected networks.
- Under Firewall, in the address range input, note the public IP address of your VM. You can see this address in the title bar of the remote desktop connection.
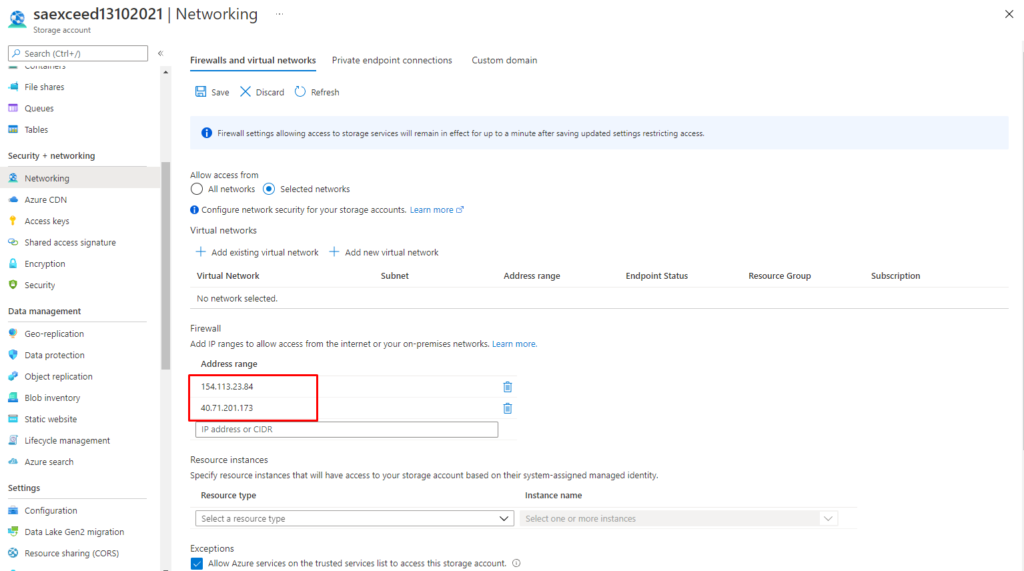
On the top menu bar, select Save.
Test security of the file share
- In the middle menu pane, under Security + networking, select Networking. The Firewalls and virtual networks tab is highlighted.
- Select the Add your client IP address check box, and in the top menu bar, select Save.
- In the middle menu pane, select Overview, and under Data storage, select File shares.
- Select the fsexceed13102021 file share. The fsexceed13102021 pane appears for your file share. You can now browse the file share in your local browser.
Note
You might need to go to the reports share because the error page could be cached for the fsexceed13102021 file share.
- Use the browser on your computer to download AzCopy by going to https://aka.ms/downloadazcopy-v10-windows.
- Connect to your VM by using the remote desktop connection.
- Open the file share in the Azure portal, upload the azcopy.exe file so it is available on the VM.
- On the VM, drag the file to the desktop for easy use.
- Select the azcopy zip file.
- On the menu, select Compressed Folder Tools, and then select Extract all.
- In the Extract Compressed (Zipped) Folders window, select Extract.
- Select Start, then select the Windows PowerShell folder, and then select Windows PowerShell.
- Move to the folder that contains AzCopy.
cd C:\Users\azureuser\Downloads\azcopy_windows_amd64_10.12.2\azcopy_windows_amd64_10.12.2 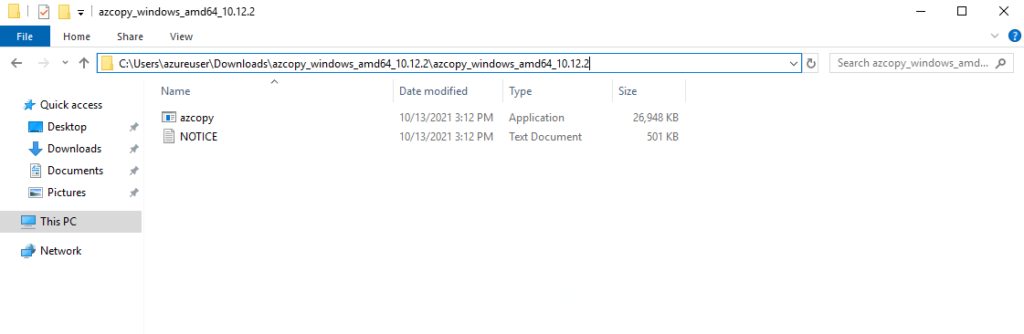
Run AzCopy to copy the files to Azure by first signing in

.\azcopy.exe login --tenant-id XXXXXXXXXXXXXXXXXXXXXXXXXXXXXXXX

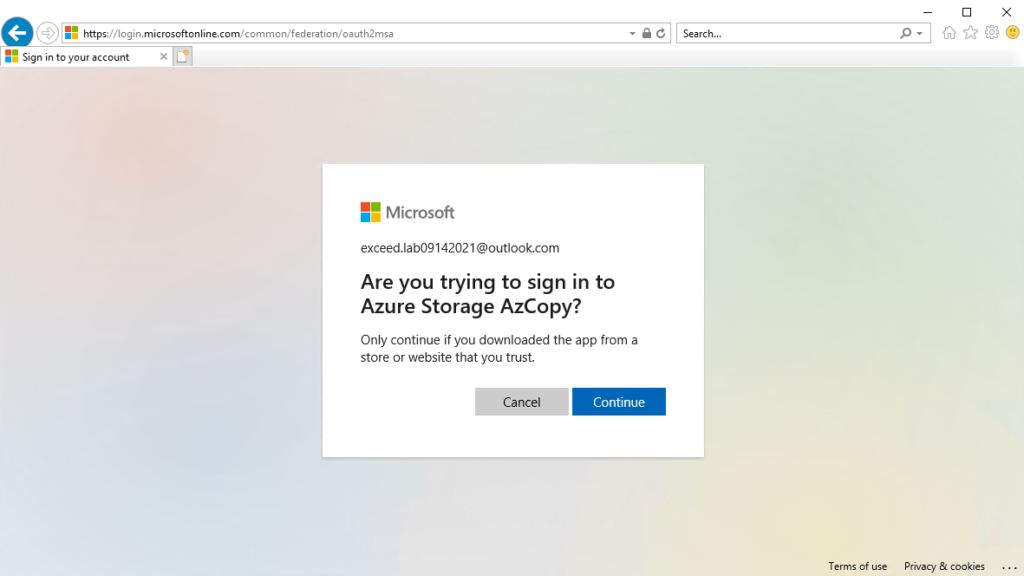
Click on Continue
Copy local files to Azure
- Create some local example test files using PowerShell.
1..100 | % { New-Item -Path F:\ -Name "$_.txt" -Value (Get-Date).toString() -ItemType file}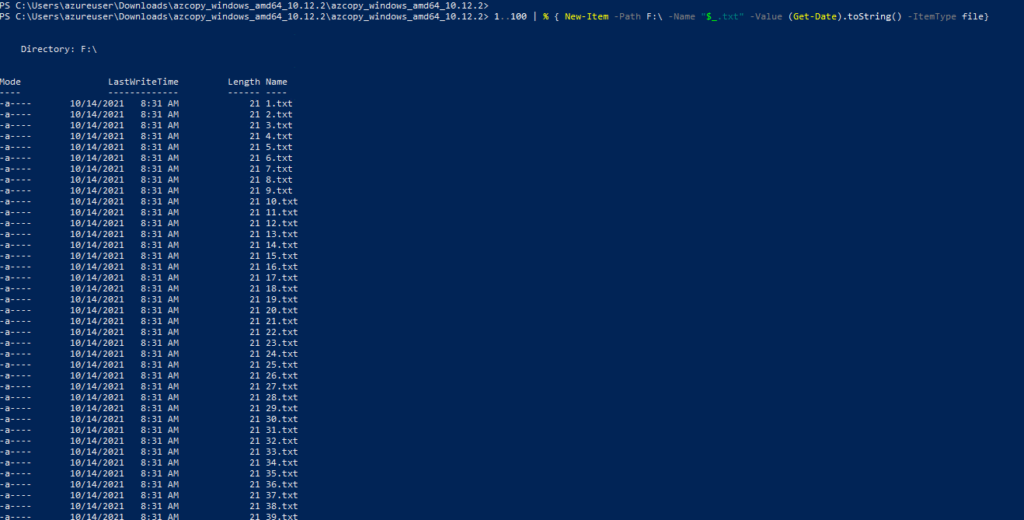
In the Azure portal you should still have open, select the storage account you previously created, named fsexceed13102021
- In the middle menu pane, under Security + networking, select Shared access signature.
- Select the allowed resource types using the shared access signature
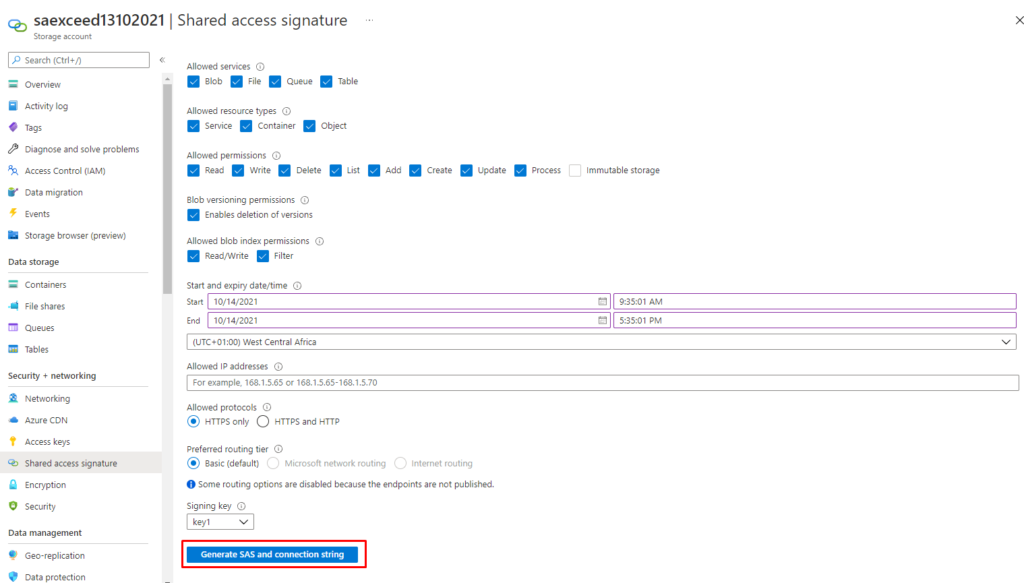
- At the bottom of the pane, select Generate SAS and connection string.
- Copy the File service SAS URL.
- Paste the connection string into Notepad, and add a path to the data share. Change the string by adding
fsexceed13102021/to the path from:
https://saexceed13102021.file.core.windows.net/?sv=2020-08-04&ss=bfqt&srt=sco&sp=rwdlacuptfx&se=2021-10-14T16:35:01Z&st=2021-10-14T08:35:01Z&spr=https&sig=%2FGnvOLk7LIJqJ7CK1lCziO5RqL9c9KRw6KLnFY7edcY%3DTo
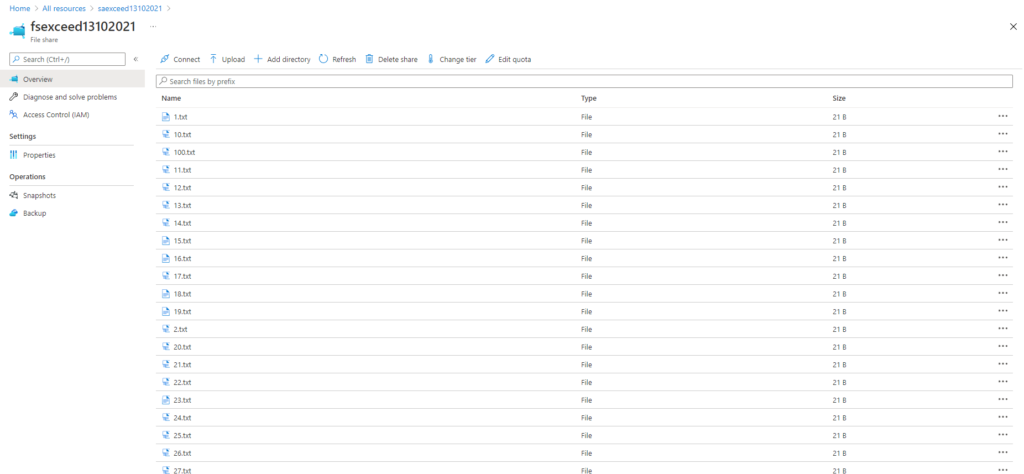
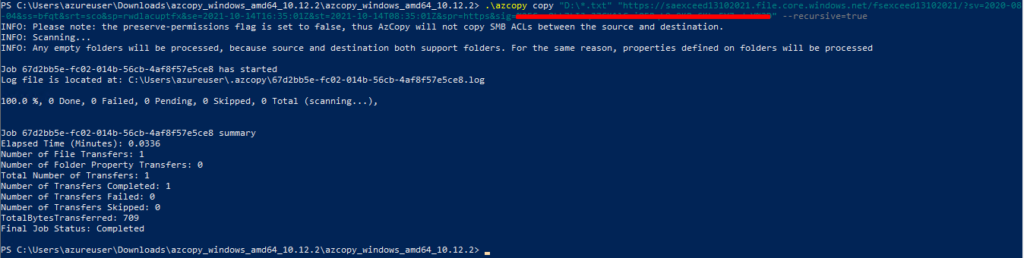
https://saexceed13102021.file.core.windows.net/fsexceed13102021/?sv=2020-08-04&ss=bfqt&srt=sco&sp=rwdlacuptfx&se=2021-10-14T16:35:01Z&st=2021-10-14T08:35:01Z&spr=https&sig=%2FGnvOLk7LIJqJ7CK1lCziO5RqL9c9KRw6KLnFY7edcY%3DUse this new SAS connection string in the AzCopy command to copy the files to Azure. Run this command in the PowerShell window.
Create a share snapshot
- In the Azure portal you should still have open, select the storage account you previously created, named saexceed13102021.
- In the middle menu pane, under Data storage, select File shares. The Storage account File shares pane appears.
- Select the fsexceed13102021 share.
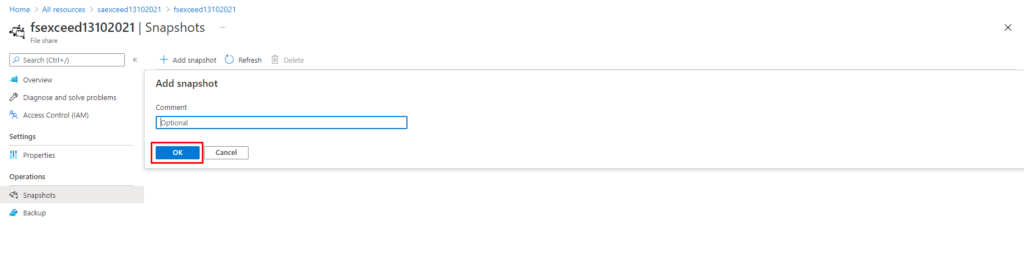
- In the Operations section, select Snapshots.
- Select Add snapshot, and then select OK.
- Return to your VM, and open File Explorer.
- Browse to the fsexceed13102021 share mounted on the F drive, right-click any of the text files, and select Properties.
- In the File properties window, select Previous Versions, and note the listed snapshots created on the file share.
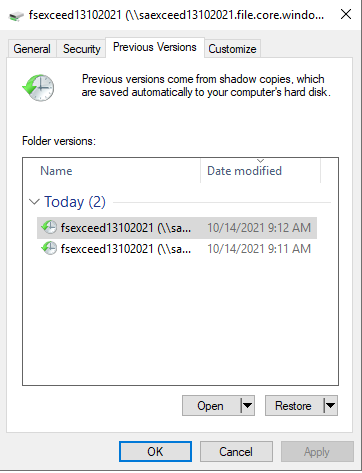
From here, you can select Open to open the previous version to browse the files at that snapshot. Otherwise, you can select Restore to restore files from a snapshot.
Summary
In this lab the company you’re working with has moved an application to Azure that generates reports and data exports for users and other systems to consume. They wanted to consolidate the files they produce into a native cloud service. With Azure file shares, the company can continue to use the SMB protocol to access these files securely.
You used Azure storage accounts, and the fully managed cloud shares it provides, to re-create the on-premises file shares used by the company. You then added extra levels of security to these shares to restrict access and create snapshots.
Azure file shares are simpler to use because organizations can continue to use their existing tools. The speed of adoption is fast because Azure provides PowerShell commands that can be deployed to add Azure file shares to Windows machines. Azure file shares are a simple, secure, and resilient way to manage shared files in the cloud.
Reminder: Don’t forget to delete or shutdown all unused Azure resources after your labs for cost saving
Leave a Reply