In this lab, you will create an Azure Resource Manager (ARM) template and modularize it by using the linked template concept. You will then modify the main deployment template to call the linked template and updated dependencies, and finally deploy the templates to Azure.
After you complete this lab, you will be able to:
- Create Resource Manager template
- Create a Linked template for storage resources
- Upload Linked Template to Azure Blob Storage and generate SAS token
- Modify the main template to call Linked template
- Modify main template to update dependencies
- Deploy resources to Azure using linked templates
Review applications required for this lab
Identify the applications that you’ll use in this lab:
- Microsoft Edge
- Visual Studio Code. This will be installed as part of prerequisites for this lab.
Prepare an Azure subscription
- Identify an existing Azure subscription or create a new one.
- Verify that you have a Microsoft account or an Azure AD account with the Owner role in the Azure subscription and the Global Administrator role in the Azure AD tenant associated with the Azure subscription.
Lab 0: Configure the lab prerequisites
In this Lab, you will set up the prerequisites for the lab, which include Visual Studio Code.
Task 1: Install and configure Git and Visual Studio Code
In this task, you will install Visual Studio Code. If you have already implemented this prerequisite, you can proceed directly to the next task.
- If you don’t have Visual Studio Code installed yet, from your lab computer, start a web browser, navigate to the Visual Studio Code download page, download it, and install it.
Lab 1: Author and deploy Azure Resource Manager templates
In this lab, you will create an Azure Resource manager template and modularize it by using a linked template. You will then modify the main deployment template to call the linked template and updated dependencies, and finally deploy the templates to Azure.
Task 1: Create Resource Manager template
In this task, you will use Visual Studio Code to create a Resource Manager template
- From your lab computer, start Visual Studio Code, in Visual Studio Code, click the File top level menu, in the dropdown menu, select Preferences, in the cascading menu, select Extensions, in the Search Extensions textbox, type Azure Resource Manager (ARM) Tools, select the corresponding search result, and click Install to install the Azure Resource Manager Tools

- In a web browser, connect to https://github.com/Azure/azure-quickstart-templates/blob/master/quickstarts/microsoft.compute/vm-simple-windows/azuredeploy.json. Click on Raw option for the file. Copy the contents of the code window and paste it into Visual Studio Code editor.
Note: Rather than creating a template from scratch we will use one of the Azure Quickstart Templates named Deploy a simple Windows template VM. The templates are downloadable the templates from GitHub – vm-simple-windows.
- On your lab computer, open File Explorer and create the following local folders that will serve to store templates:
- C:\templates
- C:\templates\storage
- Switch back to Visual Studio Code window with our azuredeploy.json template, click the File top level menu, in the dropdown menu, click Save as, and save the template as azuredeploy.json in the newly created local folder C:\templates.
- Review the template to get a better understanding of its structure. There are five resource types included in the template:
- Microsoft.Storage/storageAccounts
- Microsoft.Network/publicIPAddresses
- Microsoft.Network/virtualNetworks
- Microsoft.Network/networkInterfaces
- Microsoft.Compute/virtualMachines
- In Visual Studio Code, save the file again, but this time choose C:\templates\storage as the destination and storage.json as the file name.
Note: We now have two identical JSON files: C:\templates\azuredeploy.json and C:\templates\storage\storage.json.
Task 2: Create a Linked template for storage resources
In this task, you will modify the templates you saved in the previous task such that the linked storage template storage.json will create a storage account only, while its execution will be invoked by the first template. The linked storage template needs to pass a value back to the main template, azuredeploy.json, and this value will be defined in the outputs element of the linked storage template.
- In the storage.json file displayed in the Visual Studio Code window, under the resources section, remove all the resource elements except the storageAccounts resource. It should result in a resource section looking as follows:
CodeCopy
"resources": [
  {
    "type": "Microsoft.Storage/storageAccounts",
    "name": "[variables('storageAccountName')]",
    "location": "[parameters('location')]",
    "apiVersion": "2021-04-01",
    "sku": {
       "name": "Standard_LRS"
    },
    "kind": "Storage"
  }
],
Rename the name element of storageAccount from variables to parameters
CodeCopy
"resources": [
  {
    "type": "Microsoft.Storage/storageAccounts",
    "name": "[parameters('storageAccountName')]",
    "location": "[parameters('location')]",
    "apiVersion": "2021-04-01",
    "sku": {
       "name": "Standard_LRS"
    },
    "kind": "Storage",
    "properties": {}
  }
],
Next, remove the entire variables section and all variable definitions:
CodeCopy
"variables": {
  "storageAccountName": "[concat('bootdiags', uniquestring(resourceGroup().id))]",
  "nicName": "myVMNic",
  "addressPrefix": "10.0.0.0/16",
  "subnetName": "Subnet",
  "subnetPrefix": "10.0.0.0/24",
  "virtualNetworkName": "MyVNET",
  "networkSecurityGroupName": "default-NSG"
},
- Next, remove all parameter values except location and add the following parameter code, resulting in the following outcome:
CodeCopy
"parameters": {
  "location": {
    "type": "string",
    "defaultValue": "[resourceGroup().location]",
    "metadata": {
      "description": "Location for all resources."
    }
  },
    "storageAccountName":{
    "type": "string",
    "metadata": {
      "description": "Azure Storage account name."
    }
  }
},
- Next, update the output section to define a storageURI output value. The storageUri value is required by the virtual machine resource definition in the main template. You pass the value back to the main template as an output value. Modify the output so it looks like the below.
CodeCopy
"outputs": {
  "storageUri": {
    "type": "string",
    "value": "[reference(parameters('storageAccountName')).primaryEndpoints.blob]"
  }
}
- Last, make sure schema version is 2019-04-01 (ignore warnings/errors if shown in VS Code) :
CodeCopy
{
       "$schema": "https://schema.management.azure.com/schemas/2019-04-01/deploymentTemplate.json#",
       "contentVersion": "1.0.0.0",
       "parameters": {
         "storageAccountName":{
           "type": "string",
           "metadata": {
             "description": "Azure Storage account name."
           }
- Save the storage.json template. The linked storage template should now look as follows:
CodeCopy
 {
   "$schema": "https://schema.management.azure.com/schemas/2019-04-01/deploymentTemplate.json#",
   "contentVersion": "1.0.0.0",
   "metadata": {
     "_generator": {
       "name": "bicep",
       "version": "0.4.1.14562",
       "templateHash": "8381960602397537918"
     }
   },
   "parameters": {
     "location": {
       "type": "string",
       "defaultValue": "[resourceGroup().location]",
       "metadata": {
         "description": "Location for all resources."
       }
     },
     "storageAccountName": {
       "type": "string",
       "metadata": {
         "description": "Azure Storage account name."
       }
     }

   },
   "functions": [],
   "variables": {
   },
   "resources": [
     {
       "type": "Microsoft.Storage/storageAccounts",
       "apiVersion": "2021-04-01",
       "name": "[parameters('storageAccountName')]",
       "location": "[parameters('location')]",
       "sku": {
         "name": "Standard_LRS"
       },
       "kind": "Storage"
     }
   ],
   "outputs": {
     "storageUri": {
       "type": "string",
       "value": "[reference(parameters('storageAccountName')).primaryEndpoints.blob]"
     }
   }
 }
Task 3: Upload Linked Template to Azure Blob Storage and generate SAS token
In this task, you will upload the linked template you created in the previous task to Azure Blob Storage and generate SAS token to provide access to it during subsequent deployments.
Note: When linking to a template, the Azure Resource Manager service must be able to access it via either http or https. In order to accomplish this, you will upload the linked storage template, storage.json, to blob storage in Azure. Then you will generate a digitally signed URL that provides a limited access to that corresponding blob. You will perform these steps by using Azure CLI in Azure Cloud Shell. Alternatively, you could manually create a blob container via the Azure Portal, upload the file and generate a URL or use either Azure CLI or Azure PowerShell modules installed on your lab computer.
- On the lab computer, start a web browser and navigate to the Azure Portal, and sign in with the user account that has at least the Contributor role in the Azure subscription you will be using in this lab.
- In the Azure portal, in the toolbar, click the Cloud Shell icon located directly to the right of the search text box.
Note: Alternatively, you can navigate to Azure Cloud Shell directly.
- If prompted to select either Bash or PowerShell, select PowerShell.
Note: If this is the first time you are starting Cloud Shell and you are presented with the You have no storage mounted message, select the subscription you are using in this lab, and select Create storage.
- From a PowerShell session in the Cloud Shell pane, run the following to create a blob storage container, upload the template file you created in the previous task, and generate a SAS token that you will reference in the main template to access the linked template.
- First, copy and paste the following lines of code to set a value for the Azure region you want to deploy to. The command will wait for your input as shown in the prompt.
CodeCopy
# Provide the name of the closest Azure region in which you can provision Azure VMs
$location = ‘eastus’
- Second, copy and paste the following code into the same Cloud Shell session to create a blob storage container:
CodeCopy
# This is a random string used to assign the name to the Azure storage account
$suffix = Get-Random
$resourceGroupName = 'exceedm13l01-RG'
$storageAccountName = 'exceedm13blob' + $suffix
# The name of the Blob container to be created
$containerName = 'linktempblobcntr'
# A file name used for downloading and uploading the linked template
$fileName = 'storage.json'
# Create a resource group
New-AzResourceGroup -Name $resourceGroupName -Location $location
# Create a storage account
$storageAccount = New-AzStorageAccount `
-ResourceGroupName $resourceGroupName `
-Name $storageAccountName `
-Location $location `
-SkuName 'Standard_LRS'
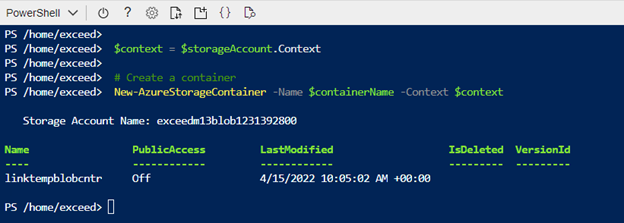
$context = $storageAccount.Context
# Create a container
New-AzureStorageContainer -Name $containerName -Context $context
- In the Cloud Shell pane, click the Upload/download files icon and, in the dropdown menu, click Upload. In the Open dialog box, navigate to and select C:\templates\storage\storage.json and click Open.
CodeCopy
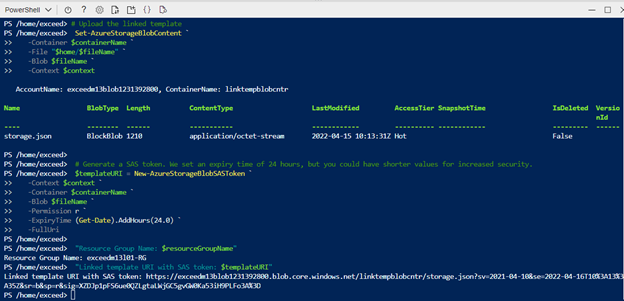
# Upload the linked template
 Set-AzureStorageBlobContent `
   -Container $containerName `
   -File "$home/$fileName" `
   -Blob $fileName `
   -Context $context

 # Generate a SAS token. We set an expiry time of 24 hours, but you could have shorter values for increased security.
 $templateURI = New-AzureStorageBlobSASToken `
   -Context $context `
   -Container $containerName `
   -Blob $fileName `
   -Permission r `
   -ExpiryTime (Get-Date).AddHours(24.0) `
   -FullUri

 "Resource Group Name: $resourceGroupName"
 "Linked template URI with SAS token: $templateURI"
Note: Make sure to record the final output generated by the script. You will need it later in the lab.
Note: The output values should resemble the following:
CodeCopy
Resource Group Name: exceedm13l01-RG
      Linked template URI with SAS token: https://exceedm13blob1677205310.blob.core.windows.net/linktempblobcntr/storage.json?sv=2018-03-28&sr=b&sig=B4hDLt9rFaWHZXToJlMwMjejAQGT7x0INdDR9bHBQnI%3D&se=2020-11-23T21%3A54%3A53Z&sp=r
Note: For scenarios requiring increased level of security, you could generate a SAS token dynamically during main template deployment and assign the SAS token a shorter validity period.
- Close the Cloud Shell pane.
Task 4: Modify the main template to call the linked template
In this task, you will modify the main template to reference the linked template you uploaded to Azure Blob Storage in the previous task.
Note: To account for the changes we made to the templates structure by modularizing all the storage elements, we now need to modify the main template to call the new storage resource definition.
- In Visual Studio Code, click the File top level menu, in the dropdown menu, select Open File, in the Open File dialog box, navigate to C:\templates\azuredeploy.json, select it, and click Open.
- In the azuredeploy.json file, in the resource section remove the storage resource element
CodeCopy
{
  "type": "Microsoft.Storage/storageAccounts",
  "name": "[variables('storageAccountName')]",
  "location": "[parameters('location')]",
  "apiVersion": "2021-04-01",
  "sku": {
    "name": "Standard_LRS"
  },
  "kind": "Storage"
},
- Next, add the following code directly in the same location where the newly deleted storage resource element was:
Note: Make sure to replace the <linked_template_URI_with_SAS_token> placeholder with its actual value that you recorded at the end of the previous task.
CodeCopy
{
  "name": "linkedTemplate",
  "type": "Microsoft.Resources/deployments",
  "apiVersion": "2018-05-01",
  "properties": {
      "mode": "Incremental",
      "templateLink": {
          "uri":"<linked_template_URI_with_SAS_token>"
      },
      "parameters": {
          "storageAccountName":{"value": "[variables('storageAccountName')]"},
          "location":{"value": "[parameters('location')]"}
      }
   }
},
- Review the following details in the main template:
- A Microsoft.Resources/deployments resource in the main template is used to link to another template.
- The deployments resource has a name called linkedTemplate. This name is used for configuring dependency.
- You can only use Incremental deployment mode when calling linked templates.
- templateLink/uri contains the linked template URI.
- Use parameters to pass values from the main template to the linked template.
- Save the template.
Task 5: Modify main template to update dependencies
In this task, you will modify the main template to account for remaining dependencies that need to be updated.
Note: Since the storage account is defined in the linked storage template, you need to update the Microsoft.Compute/virtualMachines resource definition.
- In the resource section in the virtual machines element, update the dependsOn element by replacing:
CodeCopy
"dependsOn": [
  "[resourceId('Microsoft.Network/networkInterfaces/', variables('nicName'))]",
  "[resourceId('Microsoft.Storage/storageAccounts/', variables('storageAccountName'))]"
]
with
CodeCopy
"dependsOn": [

  "[resourceId('Microsoft.Network/networkInterfaces/', variables('nicName'))]",
  "linkedTemplate"
]
- In the resources section under the Microsoft.Compute/virtualMachines element, reconfigure the properties/diagnosticsProfile/bootDiagnostics/storageUri element to reflect the output value you defined in the linked storage template by replacing:
CodeCopy
"diagnosticsProfile": {
  "bootDiagnostics": {
    "enabled": true,
    "storageUri": "[reference(resourceId('Microsoft.Storage/storageAccounts/', variables('storageAccountName'))).primaryEndpoints.blob]"
  }
with
CodeCopy
"diagnosticsProfile": {
  "bootDiagnostics": {
    "enabled": true,
    "storageUri": "[reference('linkedtemplate').outputs.storageUri.value]"
  }
- Save the updated main deployment template.
Task 6: Deploy resources to Azure by using linked templates
Note: You can deploy templates in several ways, such as directly from the Azure Portal, by using Azure CLI or PowerShell installed locally or from the Azure Cloud Shell. In this lab, you will use Azure CLI from the Azure Cloud Shell.
Note: To use Azure Cloud Shell, you will upload the main deployment template, azuredeploy.json into your Cloud Shell’s home directory. Alternatively, you could also upload it to Azure Blob Storage, just as you did upload the linked template, and reference it by using its URI rather than local file system path.
- On the lab computer, in the web browser displaying the Azure Portal, click the Cloud Shell icon to open Cloud Shell.
Note: If you have the PowerShell session from earlier in this Lab still active, you can use this without switching to Bash (next step). The following steps can be run in both a PowerShell and Bash session of Cloud Shell. If you are opening a new Cloud Shell session, follow the instructions.
- In the Cloud Shell pane, click PowerShell, in the dropdown menu, click Bash and, when prompted, click Confirm.
- In the Cloud Shell pane, click the Upload/download files icon and, in the dropdown menu, click Upload.
- In the Open dialog box, navigate to and select C:\templates\azuredeploy.json and click Open.
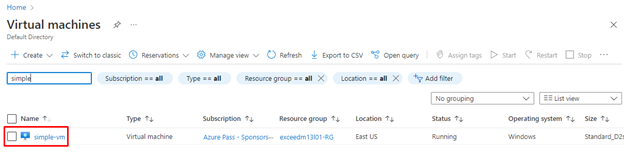
- From a Bash session in the Cloud Shell pane, run the following to perform a deployment by using a newly uploaded template:
CodeCopy
az deployment group create --name exceedm13l01deployment --resource-group exceedm13l01-RG --template-file azuredeploy.json- When prompted to provide the value for ‘adminUsername’, type Student and press the Enter key.
- When prompted to provide the value for ‘adminPassword’, type Pa55w.rd1234 and press the Enter key. (Password typing will not be shown)
- If you receive errors when running the above command to deploy the template, try the following:
- If you have multiple Azure subscriptions ensure you have set the subscription context to the correct one where the resource group is deployed.
- Ensure that the linked template is accessible via the URI you specified.
Note: As a next step, you could now modularize the remaining resource definitions in the main deployment template, such as the network and virtual machine resource definitions.
Note: If you are not planning on using the deployed resources, you should delete them to avoid associated charges. You can do so simply by deleting the resource group exceedm13l01-RG.
Review
In this lab, you learned how to create an Azure Resource manager template, modularize it by using a linked template, modify the main deployment template to call the linked template and updated dependencies, and finally deploy the templates to Azure.
Reminder: Don’t forget to delete or shutdown all unused Azure resources after your labs for cost saving
Leave a Reply