Azure Kubernetes Service (AKS) is the quickest way to use Kubernetes on Azure. Azure Kubernetes Service (AKS) manages your hosted Kubernetes environment, making it straightforward to deploy and manage containerized applications without requiring container orchestration expertise. It also enhances agility, scalability, and availability of your containerized workloads. Azure DevOps further streamlines AKS operations by providing continuous build and deployment capabilities.
In this lab, you will use Azure DevOps to deploy a containerized ASP.NET Core web application MyHealthClinic (MHC) to an AKS cluster.
After you complete this lab, you will be able to:
- Create an Azure DevOps team project with a .NET Core application using the Azure DevOps Demo Generator tool.
- Use Azure CLI to create an Azure Container registry (ACR), an AKS cluster and an Azure SQL database
- Configure containerized application and database deployment by using Azure DevOps
- Use Azure DevOps pipelines to build to automatically deploy containerized applications
Review applications required for this lab
Identify the applications that you’ll use in this lab:
- Microsoft Edge
Set up an Azure DevOps organization.
If you don’t already have an Azure DevOps organization that you can use for this lab, create one by following the instructions available at Create an organization or project collection.
Prepare an Azure subscription
- Identify an existing Azure subscription or create a new one.
- Verify that you have a Microsoft account or an Azure AD account with the Owner role in the Azure subscription and the Global Administrator role in the Azure AD tenant associated with the Azure subscription. For details, refer to List Azure role assignments using the Azure portal and View and assign administrator roles in Azure Active Directory.
Lab 0: Configure the lab prerequisites
In this Lab, you will set up the prerequisites for the lab, which consist of a preconfigured team project based on an Azure DevOps Demo Generator template.
Task 1: Configure the team project
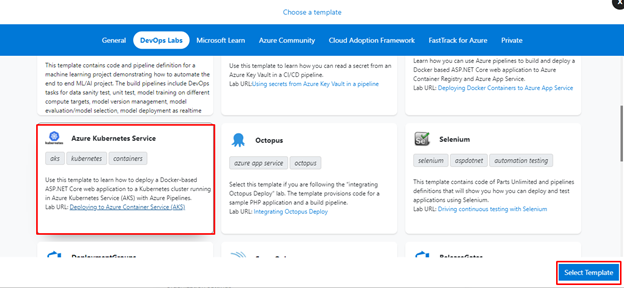
In this task, you will use Azure DevOps Demo Generator to generate a new project based on the Azure Kubernetes Service template.
- On your lab computer, start a web browser and navigate to Azure DevOps Demo Generator. This utility site will automate the process of creating a new Azure DevOps project within your account that is prepopulated with content (work items, repos, etc.) required for the lab.
Note: For more information on the site, see https://docs.microsoft.com/en-us/azure/devops/demo-gen .
- Click Sign in and sign in using the Microsoft account associated with your Azure DevOps subscription.
- If required, on the Azure DevOps Demo Generator page, click Accept to accept the permission requests for accessing your Azure DevOps subscription.
- On the Create New Project page, in the New Project Name textbox, type Deploying a multi-container application to AKS, in the Select organization dropdown list, select your Azure DevOps organization, and then click Choose template.
- In the list of templates, in the toolbar, click DevOps Labs, select the Azure Kubernetes Service template and click Select Template.
- Back on the Create New Project page, if prompted to install a missing extension, select the checkbox below the Replace Tokens and Kubernetes extension labels and click Create Project.
Note: Wait for the process to complete. This should take about 2 minutes. In case the process fails, navigate to your DevOps organization, delete the project, and try again.
- On the Create New Project page, click Navigate to project.
Lab 1: Deploy a containerized ASP.NET Core web application to an AKS cluster by using Azure DevOps
In this Lab, you will deploy a containerized ASP.NET Core web application to an AKS cluster by using Azure DevOps.
Task 1: Deploy Azure resources for the lab
In this task, you will use Azure CLI to perform deployment of the Azure resources required for this lab, including:
| Azure resources | Description |
| Azure Container Registry | Functions as a private store of Docker images |
| AKS | Serves as an orchestrator of containers running Docker images |
| Azure SQL Database | Provides persistent store for containerized workloads running on AKS |
- From the lab computer, start a web browser, navigate to the Azure Portal, and sign in with the user account that has at least the Contributor role in the Azure subscription you are using in this lab.
- In the Azure portal, in the toolbar, click the Cloud Shell icon located directly to the right of the search text box.
- If prompted to select either Bash or PowerShell, select Bash.
Note: If this is the first time you are starting Cloud Shell and you are presented with the You have no storage mounted message, select the subscription you are using in this lab, and select Create storage.
- From the Bash session in the Cloud Shell pane, run the following to identify the latest version of Kubernetes available in the Azure region you will be using in this lab ( replace the <Azure_region> placeholder with the name of the Azure region where you intend to deploy resources in this lab):
CodeCopy
LOCATION='eastus'Note: possible locations can be found by running the following command<Azure_region> : az account list-locations -o table, use the value with no spaces in the Name property.
CodeCopy
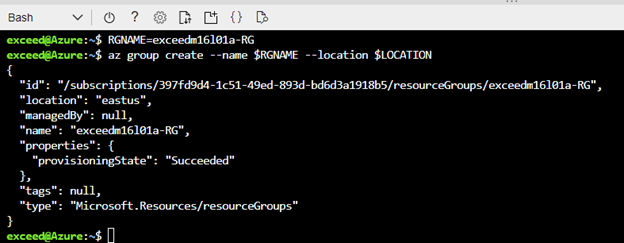
VERSION=$(az aks get-versions --location $LOCATION --query 'orchestrators[-1].orchestratorVersion' --output tsv); echo $VERSION- From the Bash session in the Cloud Shell pane, run the following to create a resource group that will host the AKS deployment:
CodeCopy
RGNAME=exceedm16l01a-RG
az group create --name $RGNAME --location $LOCATION
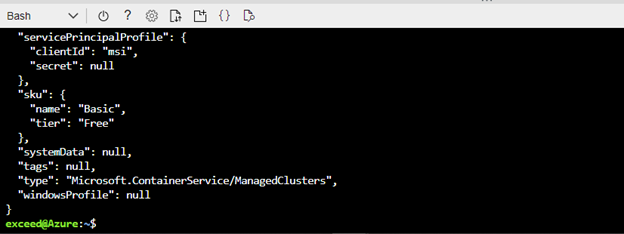
- From the Bash session in the Cloud Shell pane, run the following to create an AKS cluster using the latest version available:
CodeCopy
AKSNAME='exceedm16aks'$RANDOM$RANDOM
az aks create --location $LOCATION --resource-group $RGNAME --name $AKSNAME --enable-addons monitoring --kubernetes-version $VERSION --generate-ssh-keys
Note: Wait for the deployment complete before you proceed to the next task. AKS deployment might take about 5 minutes.
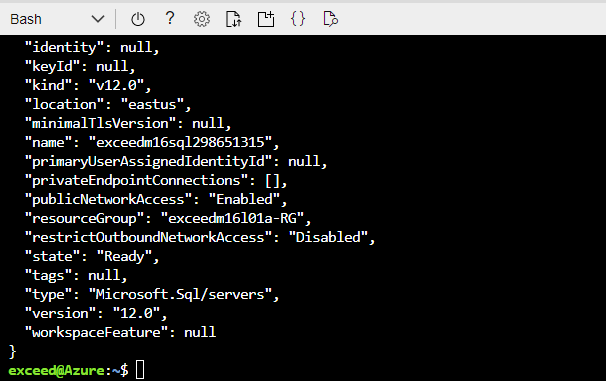
- From the Bash session in the Cloud Shell pane, run the following to create the logical server to host the Azure SQL database you will be using in this lab:
CodeCopy
SQLNAME='exceedm16sql'$RANDOM$RANDOM
az sql server create --location $LOCATION --resource-group $RGNAME --name $SQLNAME --admin-user sqladmin --admin-password P2ssw0rd1234
- From the Bash session in the Cloud Shell pane, run the following to allow access from Azure to the newly provisioned logical server:
CodeCopy
az sql server firewall-rule create --resource-group $RGNAME --server $SQLNAME --name allowAzure --start-ip-address 0.0.0.0 --end-ip-address 0.0.0.0
- From the Bash session in the Cloud Shell pane, run the following to create the Azure SQL database you will be using in this lab:
CodeCopy
az sql db create --resource-group $RGNAME --server $SQLNAME --name mhcdb --service-objective S0 --no-wait
- From the Bash session in the Cloud Shell pane, run the following to create the Azure Container registry you will be using in this lab:
CodeCopy
ACRNAME='exceedm16acr'$RANDOM$RANDOM
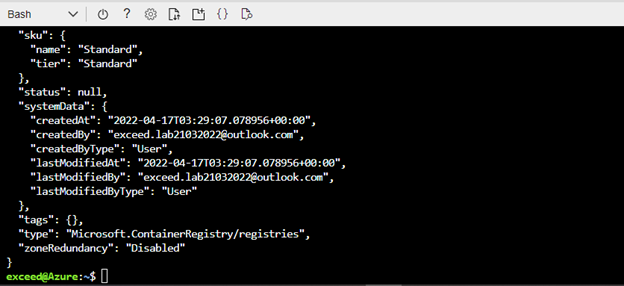
az acr create --location $LOCATION --resource-group $RGNAME --name $ACRNAME --sku Standard
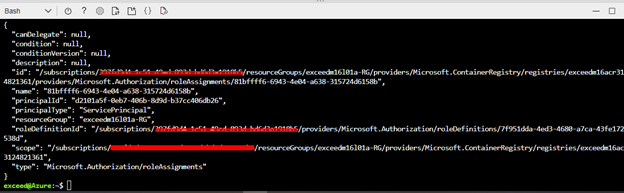
- From the Bash session in the Cloud Shell pane, run the following to grant the AKS-generated managed identity to access to the newly created ACR:
CodeCopy
# Retrieve the id of the service principal configured for AKS
CLIENT_ID=$(az aks show --resource-group $RGNAME --name $AKSNAME --query "identityProfile.kubeletidentity.clientId" --output tsv)

# Retrieve the ACR registry resource id
ACR_ID=$(az acr show --name $ACRNAME --resource-group $RGNAME --query "id" --output tsv)

# Create role assignment
az role assignment create --assignee $CLIENT_ID --role acrpull --scope $ACR_ID
Note: For more information regarding this assignment, refer to the Authenticate with Azure Container Registry from Azure Kubernetes Service
- From the Bash session in the Cloud Shell pane, run the following to display the name of logical server hosting the Azure SQL database you created earlier in this task:
CodeCopy
echo $(az sql server list --resource-group $RGNAME --query '[].name' --output tsv)'.database.windows.net'
- From the Bash session in the Cloud Shell pane, run the following to display the name of the login server of the Azure Container registry you created earlier in this task:
CodeCopy
az acr show --name $ACRNAME --resource-group $RGNAME --query "loginServer" --output tsvNote: Record both values. You will need them in the next task.

- Close the Cloud Shell pane.
Task 2: Configure the build and release pipelines
In this task, you will configure the build and release pipelines in the Azure DevOps project you generated earlier in this lab, by mapping Azure resources, including the AKS cluster and Azure Container registry to the build and release definitions.
- On your lab computer, switch to the web browser window displaying the Azure DevOps portal with the Deploying a multi-container application to AKS project open, in the vertical menu bar at the far left of the Azure DevOps portal, click Repos.
Note: You will first modify the references to the Docker image.
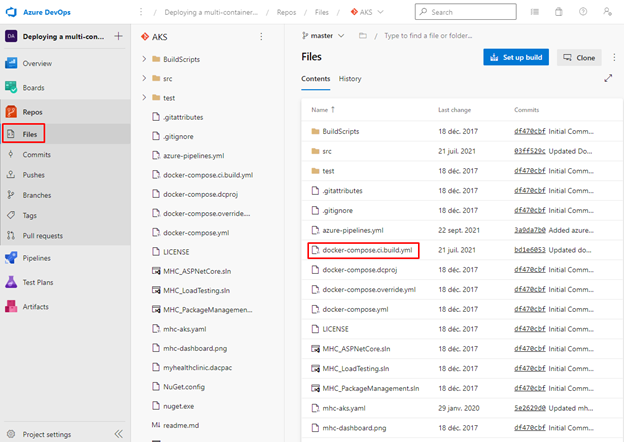
- On the AKS repository pane, in the list of files, select docker-compose.ci.build.yml.
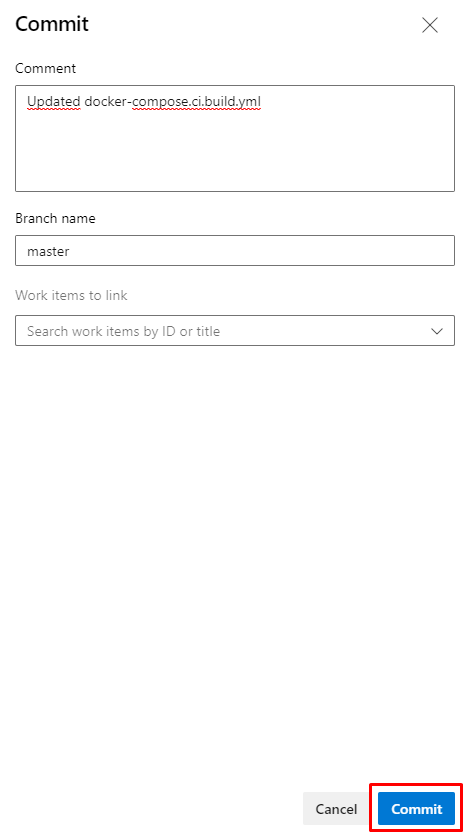
- On the docker-compose.ci.build.yml pane, click Edit, replace line 5 that references the target Docker image with image: az400mp/aspnetcore-build:1.0-2.0, select Commit and, when prompted for confirmation, click Commit again.
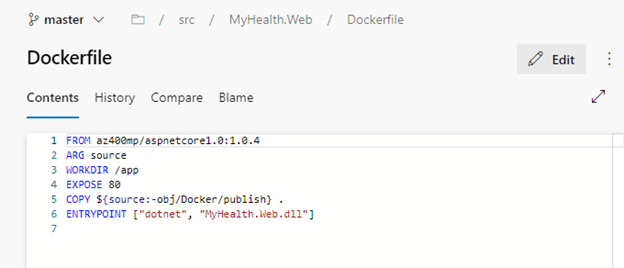
- On the AKS repository pane, in the list of files, navigate to the src/MyHealth.Web folder and select Dockerfile.
- On the Dockerfile pane, click Edit, replace line 1 that references the base Docker image with FROM az400mp/aspnetcore1.0:1.0.4, select Commit and, when prompted for confirmation, click Commit again.
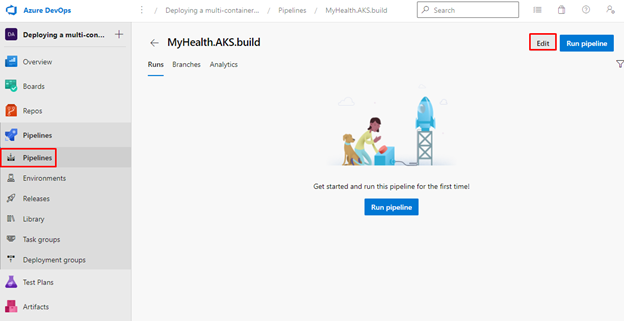
- In the web browser window displaying the Azure DevOps portal with the Deploying a multi-container application to AKS project open, in the vertical menu bar at the far left of the Azure DevOps portal, click Pipelines.
Note: You will now modify the build pipeline.
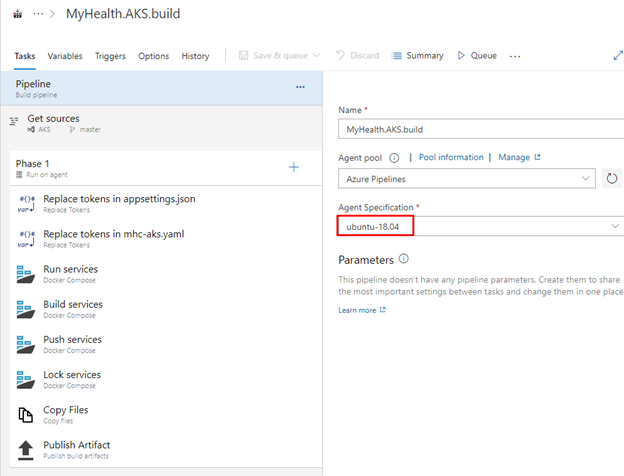
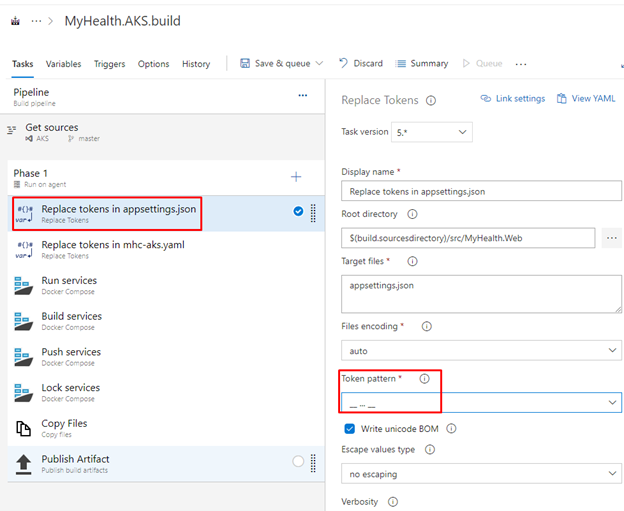
- On the Pipelines pane, under All option, click the entry representing the MyHealth.AKS.build pipeline and, on the MyHealth.AKS.build pane, click Edit.
On the MyHealth.AKS.build pipeline pane, ensure that the Pipeline entry is selected and, in the Agent Specifications drop-down list, select ubuntu-18.04.
In the list of tasks of the pipeline, click the Replace tokens in appsettings.json task, in the Token pattern dropdown list select __…__ .
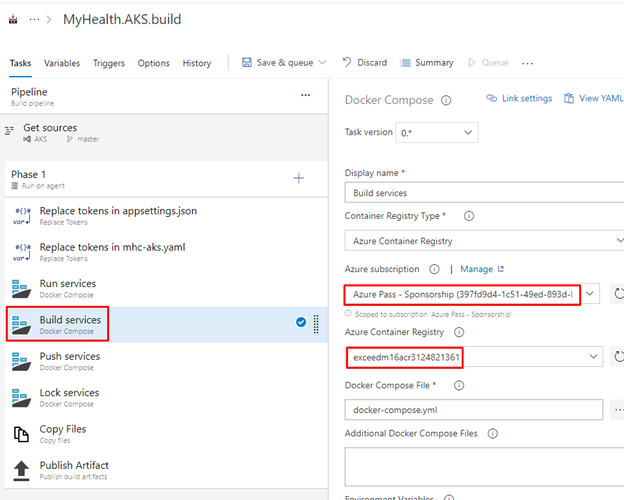
- In the list of tasks of the pipeline, click the Run services task, on the Docker Compose pane on the right side, in the Azure subscription dropdown list, select the entry representing the Azure subscription you are using in this lab, and click Authorize to create the corresponding service connection. When prompted, sign in using the account with the Owner role in the Azure subscription and the Global Administrator role in the Azure AD tenant associated with the Azure subscription.
Note: Wait for the authorization process to complete. This step creates an Azure service connection, which defines and secures a connection to the target Azure subscription, using Service Principal Authentication (SPA).
- In the list of tasks of the pipeline, with the Run services task selected, on the Docker Compose pane on the right side, in the Azure Container Registry dropdown list, select the entry representing the ACR instance you created earlier in this lab.
Note: Refresh the list if needed and choose previously created ACR. If no option is shown, type the full ACR name: ACRNAME.azurecr.io).
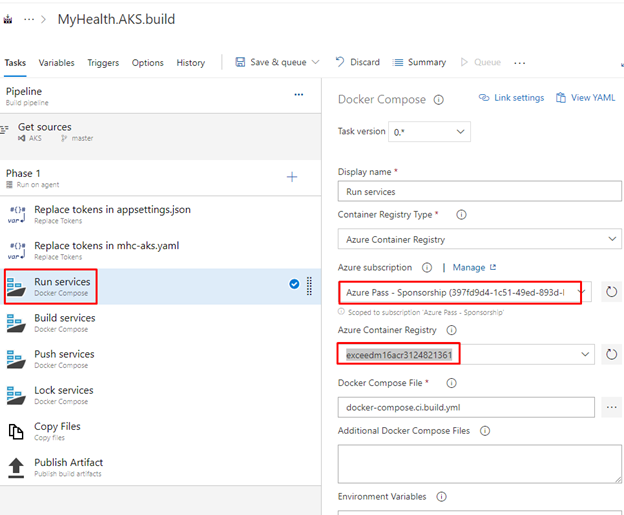
Repeat the previous two steps to configure the Azure subscription (next time do not Authorize again, use the created Available Azure service connections ) and Azure Container Registry settings in the Build services, Push services, and Lock services tasks, but instead of selecting your Azure subscription in this case, select the newly created service connection.
Note: The pipeline consists of the following tasks
| Tasks | Usage |
| Replace tokens | replace a placeholder with the name of the ACR in the database connection string in the appsettings.json file and in the mhc-aks.yaml manifest file |
| Run services | prepares the environment by pulling required images, such as aspnetcore-build:1.0-2.0 and restoring packages referenced in .csproj |
| Build services | builds the Docker images specified in the docker-compose.yml file and tags images with the $(Build.BuildId) and latest tags |
| Push services | pushes the Docker image myhealth.web to Azure Container Registry |
| Publish Build Artifacts | publishes mhc-aks.yaml & myhealth.dacpac files to the artifact drop location in Azure DevOps so that they can be used in the subsequent release |
Note: The appsettings.json file contains details of the database connection string used to connect to the Azure SQL database, which you created earlier in this lab. The mhc-aks.yaml manifest file contains configuration details of deployments, services and pods which will be deployed in Azure Kubernetes Service. For more information regarding deployment manifests, refer to AKS Deployments and YAML manifests
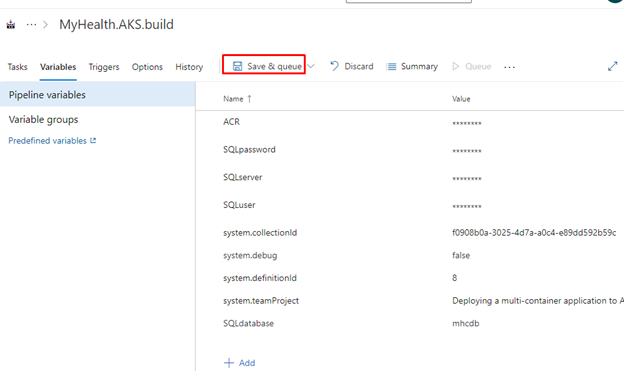
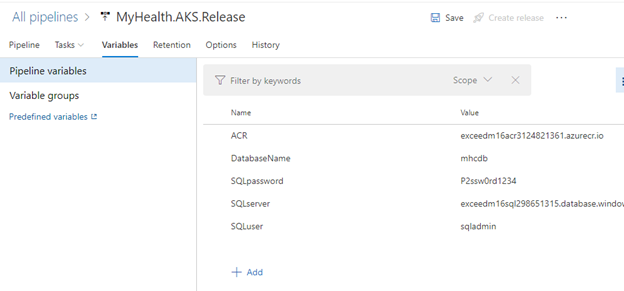
- In the list of the Pipeline variables, update the values of the ACR and SQLserver variables with the values you recorded at the end of the previous task (SQLPassword is P2ssw0rd1234, SQLuser is sqladmin, SQLdatabase is mhcdb), then click the down-facing caret next to the Save & queue button, click Save to save the changes, and, when prompted again, click Save.
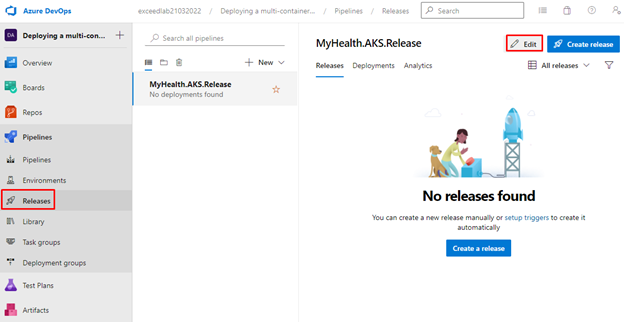
- In the web browser window displaying the Azure DevOps portal, in the vertical menu bar at the far left of the Azure DevOps portal, in the Pipelines section, click Releases.
- On the Pipelines / Releases pane, select the MyHealth.AKS.Release entry and click Edit.
- On the All pipelines / MyHealth.AKS.Release pane, in the rectangle representing the Dev stage of the deployment, click the 2 jobs, 3 tasks link.
- For the DB deployment job and AKS deployment job (by clicking on those names) , choose “Agent Pool” Azure Pipelines –> windows-2019.
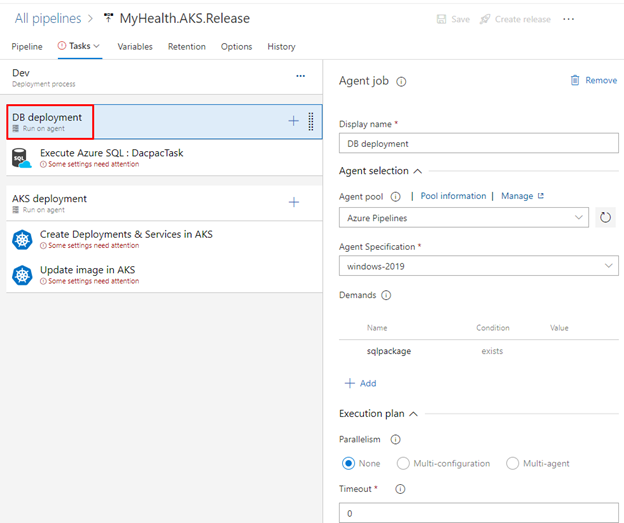
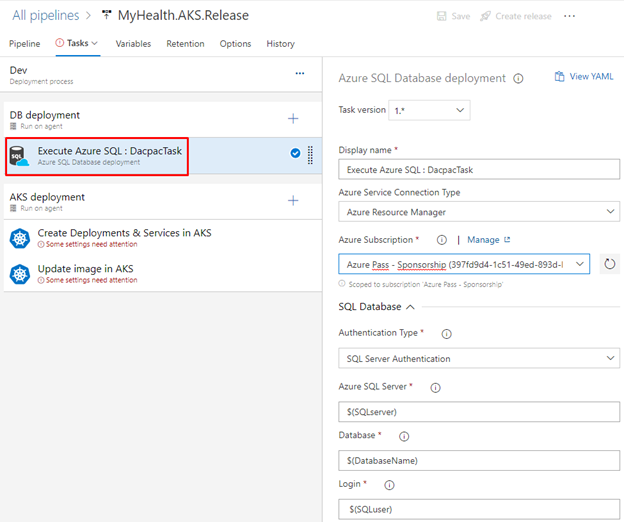
In the list of tasks of the Dev stage, within the DB deployment job section, select the Execute Azure SQL: DacpacTask task and, on the Azure SQL Database deployment pane on the right side, in the Azure Subscription dropdown list, select the entry representing the Azure service connection you created earlier in this task.
- In the list of tasks of the Dev stage, in the AKS deployment job section, select the Create Deployments & Services in AKS task.
- On the Kubectl pane on the right side, in the Azure Subscription dropdown list, select the entry representing the same Azure service connection, in the Resource group dropdown list, select the exceedm16l01a-RG entry, and in the Kubernetes cluster dropdown list, select the entry representing the AKS cluster you deployed earlier in this lab.
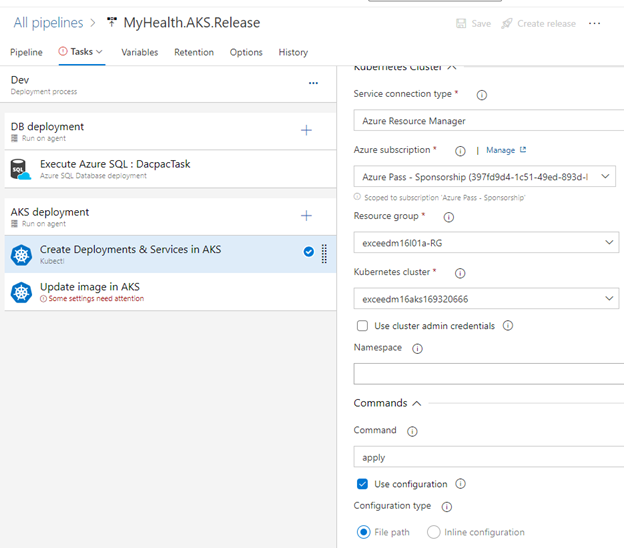
- In the list of tasks of the Dev stage, in the AKS deployment job section, with the Create Deployments & Services in AKS task selected, on the Kubectl pane on the right side, scroll down to and expand the Secrets section, in the Azure subscription dropdown list, select the entry representing the same Azure service connection, and, in the Azure container registry dropdown list, select the entry representing the Azure Container registry you created earlier in this lab.
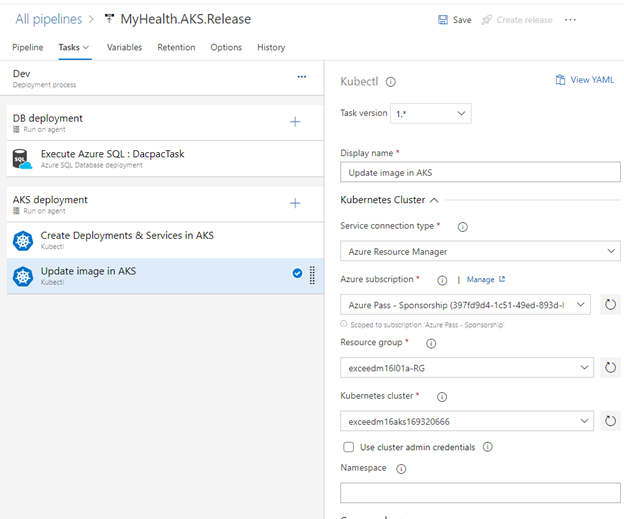
- Repeat the two previous steps for the Update image in AKS task.
Note: The Create Deployments & Services in AKS task will create the required deployments and services in AKS as per the configuration specified in mhc-aks.yaml file. The pod will pull the latest Docker image.
Note: The Update image in AKS task will pull the required image corresponding to the BuildID from the designated repository and deploy that image to the mhc-front pod running in AKS.
Note: A secret called mysecretkey is created in AKS cluster through Azure DevOps by using command kubectl create secret in the background. This secret will be used to authorize access to the Azure Container Registry in order to pull the myhealth.web image.
- On the Tasks pane of the Dev stage of the MyHealth.AKS.Release release pipeline, click the Variables tab.
- In the list of the Pipeline variables, update the value of the ACR variable to the Azure Container Registry name you recorded at the end of the previous task.
- In the list of the Pipeline variables, update the values of the SQLserver variable to the name of the logical server you recorded at the end of the previous task (SQLPassword is P2ssw0rd1234, SQLuser is sqladmin, DatabaseName is mhcdb).
- In the upper right corner of the All pipelines / MyHealth.AKS.Release pane, click Save, and, when prompted, click Save again to save the changes.
Note: In the list of pipeline variables, DatabaseName is set to mhcdb, SQLuser is set to sqladmin, and SQLpassword is set to P2ssw0rd1234. If you entered different values when creating the Azure SQL database earlier in this lab, update the values of the variables accordingly.
Task 3: Trigger the build and release pipelines
In this task, you will trigger the build and release pipelines and validate their completion.
- In the web browser window displaying the Azure DevOps portal, in the vertical menu bar at the far left of the Azure DevOps portal, in the Pipelines section, click Pipelines.
- On the Pipelines pane, All option, select the MyHealth.AKS.build pipeline, on the MyHealth.AKS.build pane, click Run pipeline, and, on the Run pipeline pane, click Run.

On the build pipeline run pane, in the Jobs section, click Phase 1 and monitor the progress of the build process.

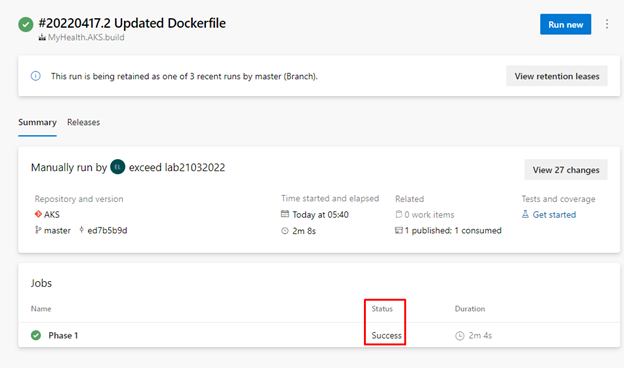
Note: The build will generate and push the Docker image to ACR. After the build completes, you can review the build summary.
- To review the generated images, switch to the web browser window displaying the Azure portal.
- In the Azure portal, search for and select the Container registries resource type and, on the Container registries blade, select the Azure Container registry you created earlier in this lab.
- On the Azure Container registry blade, in the Services section, click Repositories and verify that the list of repositories includes the myhealth.web entry.

- Switch back to the web browser window displaying the Azure DevOps portal.
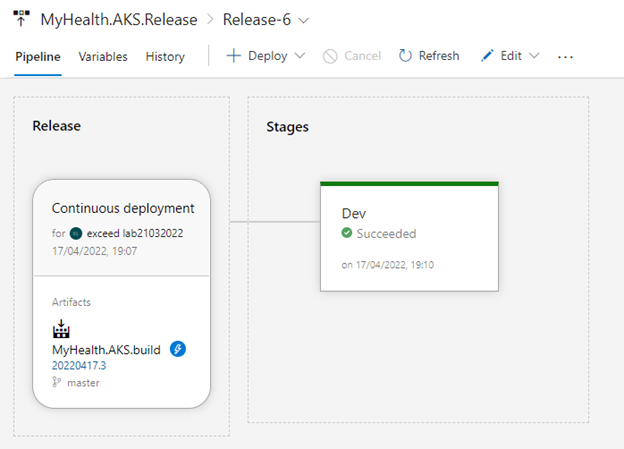
- In the vertical menu bar at the far left of the Azure DevOps portal, in the Pipelines section, click Releases and, on the MyHealth.AKS.Release blade, click the latest release, and select the In progress link to monitor the progress of the release.
- Once the release is complete, switch to the web browser window displaying the Azure portal.
- In the Azure portal, in the toolbar, click the Cloud Shell icon located directly to the right of the search text box.
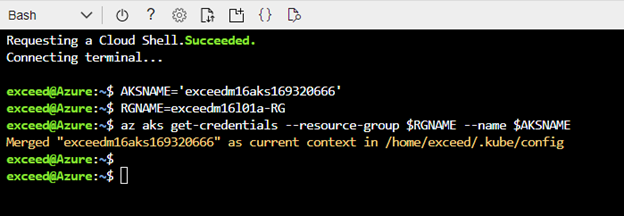
- From the Bash session in the Cloud Shell pane, run the following to gain access to the AKS cluster you deployed earlier in this lab:
CodeCopy
RGNAME=exceedm16l01a-RG
AKSNAME=$(az aks list --resource-group $RGNAME --query '[].name' --output tsv)
az aks get-credentials --resource-group $RGNAME --name $AKSNAME
- From the Bash session in the Cloud Shell pane, run the following to list the pods running in AKS that were deployed by using the release pipeline:
CodeCopy
kubectl get pods- From the Bash session in the Cloud Shell pane, run the following to list the load balancer service that provides an external IP address via which you can access the containerized application:
CodeCopy
kubectl get service mhc-front --watchNote: Our application is designed to be deployed in the pod with the load balancer service providing external connectivity.
- Note the value of the IP address in the External-IP column in the output of the command, open a new web browser tab, browse to that IP address, and verify that the MyHealthClinic application is running.
Note: Kubernetes includes a web dashboard that can be used for basic management operations. This dashboard lets you view basic health status and metrics for your applications, create and deploy services, and edit existing applications. Follow Microsoft Docs to access the Kubernetes web dashboard in Azure Kubernetes Service (AKS).
Review
In this lab, you learned how to use Azure DevOps to deploy a containerized ASP.NET Core web application MyHealthClinic (MHC) to an AKS cluster.
Reminder: Don’t forget to delete or shutdown all unused Azure resources after your labs for cost saving
Leave a Reply