Cloud infrastructure services, known as Infrastructure as a Service (IaaS), are made of highly scalable and automated compute resources. IaaS is fully self-service for accessing and monitoring computers, networking, storage, and other services. IaaS allows businesses to purchase resources on-demand and as-needed instead of having to buy hardware outright.
This labs are a replay of exercises done during my course on AZ-303 Microsoft Azure Architect Technologies and are intended to test a range of highly available IaaS compute deployments, including:
- Availability sets-based deployment of Azure VMs behind an Azure Load Balancer Basic
- Zone-redundant deployment of Azure VMs behind an Azure Load Balancer Standard
- Zone-redundant deployment of Azure VM scale sets behind an Azure Application Gateway
- Automatic horizontal scaling of Azure VM scale sets (autoscaling)
- Manual vertical scaling (compute and storage) of Azure VM scale sets
Prerequisites for this labs : Azure Account / Download Labs Files here
Lab 1: Implement and analyze highly available Azure VM deployments using availability sets and Azure Load Balancer Basic
The main tasks for this lab are as follows:
- Deploy highly available Azure VMs into an availability set behind an Azure Load Balancer Basic by using Azure Resource Manager templates
- Analyze highly available Azure VMs deployed into an availability set behind an Azure Load Balancer Basic
- Remove Azure resources deployed in the exercise
Task 1: Deploy highly available Azure VMs into an availability set behind an Azure Load Balancer Basic by using Azure Resource Manager templates
- From your lab computer, start a web browser, navigate to the Azure portal, and sign in by providing credentials of a user account with the Owner role in the subscription you will be using in this lab.
- In the Azure portal, open the Cloud Shell pane by selecting on the toolbar icon directly to the right of the search textbox.
- If prompted to select either Bash or PowerShell, select Bash.
Note: If this is the first time you are starting Cloud Shell and you are presented with the You have no storage mounted message, select the subscription you are using in this lab, and select Create storage.
- From the Cloud Shell pane, run the following to register the Microsoft.Insights resource provider in preparation for the upcoming exercises in this lab:
Code
az provider register --namespace 'Microsoft.Insights'
- In the toolbar of the Cloud Shell pane, select the Upload/Download files icon, in the drop-down menu select Upload, and upload the file \Azurelabs03\azuredeployexceed30305suba.json into the Cloud Shell home directory.
- From the Cloud Shell pane, run the following to designate the Azure region you will be using in this lab (replace the <Azure region> placeholder with the name of the Azure region that is available for deployment of Azure VMs in your subscription and which is closest to the location of your lab computer):
Code
LOCATION='EastUS'Note: To identify Azure regions where you can provision Azure VMs, refer to https://azure.microsoft.com/en-us/regions/offers/
Note: To identify the names of the Azure regions to use when setting the value of the LOCATION variable, run az account list-locations –query “[].{name:name}” -o table. Make sure to use the notation which does not include a space, e.g. eastus rather than US East.
- From the Cloud Shell pane, run the following to create an instance of Network Watcher in preparation for the upcoming exercises in this lab:
Code
az network watcher configure --resource-group NetworkWatcherRG --locations $LOCATION --enabled -o tableNote: If you receive an error indicating there is no “NetworkWatcherRG” resource group, create a resource group from the portal named NetworkWatcherRG and rerun the command.
- From the Cloud Shell pane, run the following to create a resource group in the designated Azure region.
Code
az deployment sub create --location $LOCATION --template-file azuredeployexceed30305suba.json --parameters rgName=exceed05a-labRG rgLocation=$LOCATION

- From the Cloud Shell pane, upload the Azure Resource Manager template \Azurelabs03\azuredeployexceed30305rga.json.
- From the Cloud Shell pane, upload the Azure Resource Manager parameter file \Azurelabs03\azuredeployexceed30305rga.parameters.json.
- From the Cloud Shell pane, run the following to deploy an Azure Load Balancer Basic with its backend pool consisting of a pair of Azure VMs hosting Windows Server 2019 Datacenter Core into the same availability set (replace the <vm_Size> placeholder with the size of the Azure VM you intend to use for this deployment, such as Standard_D2s_v3):
Code
az deployment group create --resource-group exceed05a-labRG --template-file azuredeployexceed30305rga.json --parameters @azuredeployexceed30305rga.parameters.json vmSize=Standard_D2s_v3
Note: Wait for the deployment to complete before proceeding to the next task. This should take about 10 minutes.
- In the Azure portal, close the Cloud Shell pane.
Task 2: Analyze highly available Azure VMs deployed into an availability set behind an Azure Load Balancer Basic
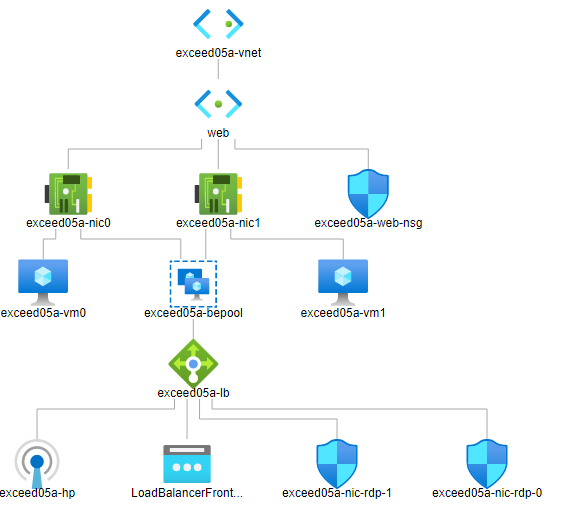
- In the Azure portal, search for and select Network Watcher and, on the Network Watcher blade, select Topology.
- On the Network Watcher | Topology blade, specify the following settings:
| Setting | Value |
| Subscription | the name of the Azure subscription you are using in this lab |
| Resource Group | exceed05a-labRG |
| Virtual Network | exceed05a-vnet |
- Review the resulting topology diagram, noting the connections between the public IP address, load balancer, and the network adapters of Azure VMs in its backend pool.
- On the Network Watcher blade, select Effective security rules.
- On the Network Watcher | Effective security rules blade, specify the following settings:
| Setting | Value |
| Subscription | the name of the Azure subscription you are using in this lab |
| Resource group | exceed05a-labRG |
| Virtual machine | exceed05a-vm0 |
| Network interface | exceed05a-nic0 |
- Review the associated network security group and the effective security rules, including two custom rules that allow inbound connectivity via RDP and HTTP.
Note: Alternatively, you can view Effective security rules from:
- the exceed05a-nic0 network interface blade.
- the exceed05a-web-nsg network security group blade

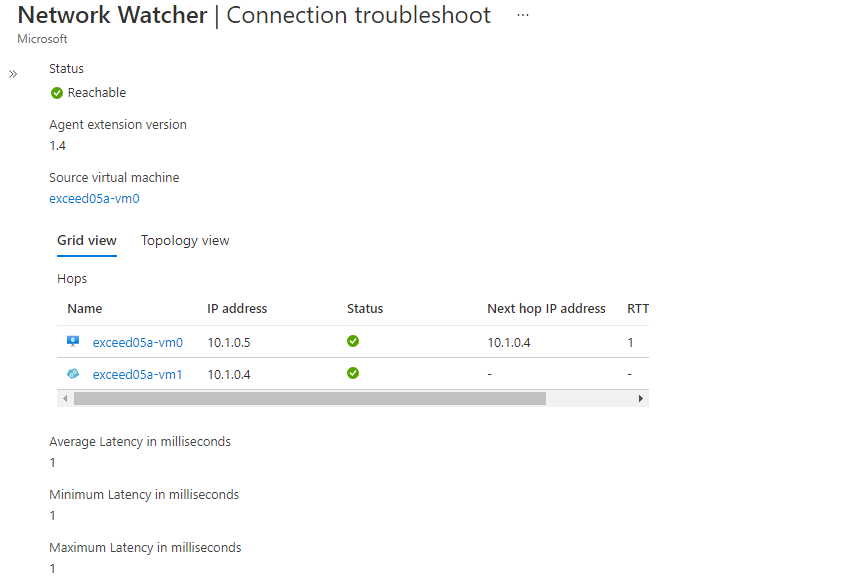
- On the Network Watcher blade, select Connection troubleshoot.
Note: The intention is to verify the proximity (in the networking terms) of the two Azure VMs in the same availability set.
- On the Network Watcher | Connection troubleshoot blade, specify the following settings and select Check :
| Setting | Value |
| Subscription | the name of the Azure subscription you are using in this lab |
| Resource group | exceed05a-labRG |
| Source type | Virtual machine |
| Virtual machine | exceed05a-vm0 |
| Destination | Select a virtual machine |
| Resource group | exceed05a-labRG |
| Virtual machine | exceed05a-vm1 |
| Protocol | TCP |
| Destination port | 80 |
- Note: You will need to wait a few minutes for the results in order for the Azure Network Watcher Agent VM extension to be installed on the Azure VMs.
- Review the results and note the latency of the network connection between the Azure VMs.
Note: The latency should be about 1 millisecond, since both VMs are in the same availability set (within the same Azure datacenter).
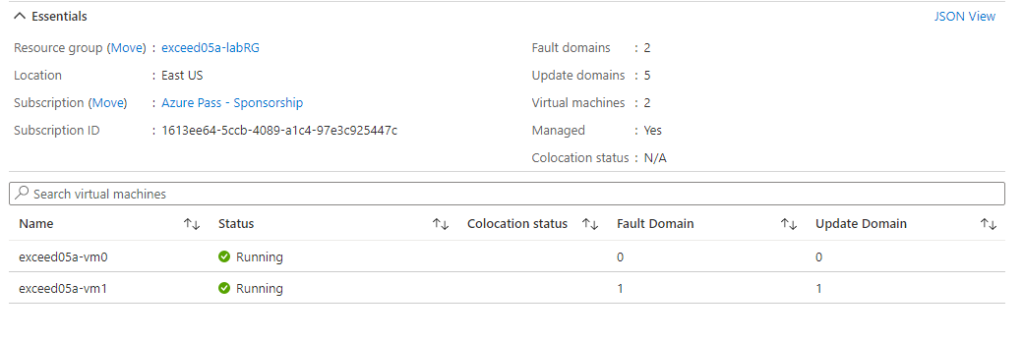
In the Azure portal, navigate to the exceed05a-labRG resource group blade, in the list of resources, select the exceed05a-avset availability set entry, and on the exceed05a-avset blade, note the fault domain and update domain values assigned the two Azure VMs.
- In the Azure portal, navigate back to the exceed05a-labRG resource group blade, in the list of resources, select the exceed05a-lb load balancer entry, and on the exceed05a-lb blade, note the public IP address entry.
- In the Azure portal, start a Bash session in the Cloud Shell pane.
- From the Cloud Shell pane, run the following to test load balancing of HTTP traffic to the Azure VMs in the backend pool of the Azure load balancer (replace the <lb_IP_address> placeholder with the IP address of the front end of the load balancer you identified earlier):
Code
for i in {1..4}; do curl 40.71.66.236; doneNote: Verify that the returned messages indicate that the requests are being delivered in the round robin manner to the backend Azure VMs

- On the exceed05a-lb blade, select the Load balancing rules entry and, on the exceed05a-lb | Load balancing rules blade, select the exceed05a-lbruletcp80 entry representing the load balancing rule handling HTTP traffic.
- On the exceed05a-lbruletcp80 blade, in the Session persistence drop-down list, select Client IP and then select Save.

- Wait for the update to complete and, from the Cloud Shell pane, re-run the following to test load balancing of HTTP traffic to the Azure VMs in the backend pool of the Azure load balancer with session persistence (replace the <lb_IP_address> placeholder with the IP address of the front end of the load balancer you identified earlier):
Code
for i in {1..4}; do curl 40.71.66.236; doneNote: Verify that the returned messages indicate that the requests are being delivered to the same backend Azure VMs

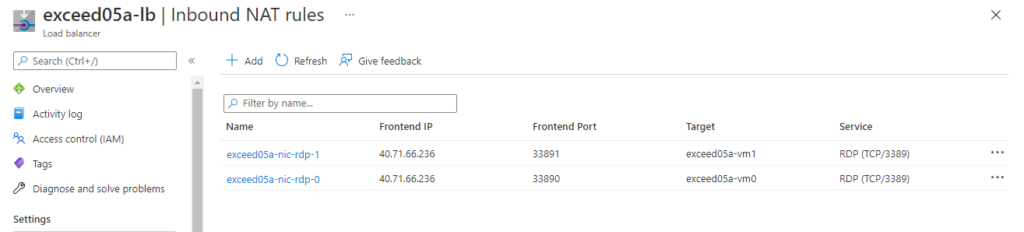
In the Azure portal, navigate back to the exceed05a-lb blade, select the Inbound NAT rules entry and note the two rules that allow for connecting to the first and the second of the backend pool VMs via Remote Desktop over TCP ports 33890 and 33891, respectively.
- From the Cloud Shell pane, run the following to test Remote Desktop connectivity via NAT to the first Azure VM in the backend pool of the Azure load balancer (replace the <lb_IP_address> placeholder with the IP address of the front end of the load balancer you identified earlier):
Code
curl -v telnet://40.71.66.236:33890Note: Verify that the returned message indicates that you are successfully connected.

- Press the Ctrl+C key combination to return to the Bash shell prompt and run the following to test Remote Desktop connectivity via NAT to the second Azure VM in the backend pool of the Azure load balancer (replace the <lb_IP_address> placeholder with the IP address of the front end of the load balancer you identified earlier):
Code
curl -v telnet://40.71.66.236:33891Note: Verify that the returned message indicates that you are successfully connected.

Press the Ctrl+C key combination to return to the Bash shell prompt.
Task 3: Remove Azure resources deployed in the exercise
- From the Cloud Shell pane, run the following to list the resource group you created in this exercise:
Code
az group list --query "[?starts_with(name,'exceed05a-')]".name --output tsvNote: Verify that the output contains only the resource group you created in this lab. This group will be deleted in this task.
- From the Cloud Shell pane, run the following to delete the resource group you created in this lab
Code
az group list --query "[?starts_with(name,'exceed05a-')]".name --output tsv | xargs -L1 bash -c 'az group delete --name $0 --no-wait --yes'
Close the Cloud Shell pane.
Lab 2: Implement and analyze highly available Azure VM deployments using availability zones and Azure Load Balancer Standard
The main tasks for this lab are as follows:
- Deploy highly available Azure VMs into availability zones behind an Azure Load Balancer Standard by using Azure Resource Manager templates
- Analyze highly available Azure VMs deployed across availability zones behind an Azure Load Balancer Standard
- Remove Azure resources deployed in the exercise
Task 1: Deploy highly available Azure VMs into availability zones behind an Azure Load Balancer Standard by using Azure Resource Manager templates
- If needed, in the Azure portal, open Cloud Shell pane by selecting on the toolbar icon directly to the right of the search textbox.
- If prompted to select either Bash or PowerShell, select Bash.
- In the toolbar of the Cloud Shell pane, select the Upload/Download files icon, in the drop-down menu select Upload, and upload the file \Azurelabs03\azuredeployexceed30305subb.json into the Cloud Shell home directory.
- From the Cloud Shell pane, run the following to create a resource groups (replace the <Azure region> placeholder with the name of the Azure region that is available in your subscription and which is closest to the location of your lab computer):
Code
LOCATION='eastus'Code
az deployment sub create --location $LOCATION --template-file azuredeployexceed30305subb.json --parameters rgName=exceed05b-labRG rgLocation=$LOCATION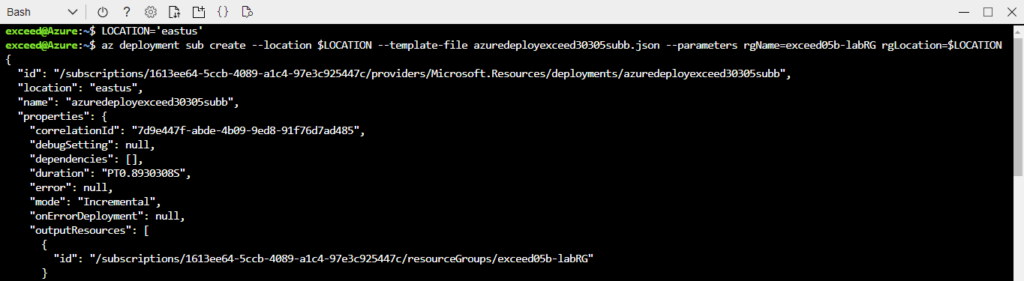
- From the Cloud Shell pane, upload the Azure Resource Manager template \Azurelabs03\azuredeployexceed30305rgb.json.
- From the Cloud Shell pane, upload the Azure Resource Manager parameter file \Azurelabs03\azuredeployexceed30305rgb.parameters.json.
- From the Cloud Shell pane, run the following to deploy an Azure Load Balancer Standard with its backend pool consisting of a pair of Azure VMs hosting Windows Server 2019 Datacenter Core across two availability zones (replace the <vm_Size> placeholder with the size of the Azure VM you intend to use for this deployment, such as Standard_D2s_v3):
Code
az deployment group create --resource-group exceed05b-labRG --template-file azuredeployexceed30305rgb.json --parameters @azuredeployexceed30305rgb.parameters.json vmSize= Standard_D2s_v3Note: Wait for the deployment to complete before proceeding to the next task. This should take about 10 minutes.
- In the Azure portal, close the Cloud Shell pane.
Task 2: Analyze highly available Azure VMs deployed across availability zones behind an Azure Load Balancer Standard
- In the Azure portal, search for and select Network Watcher and, on the Network Watcher blade, select Topology.
- On the Network Watcher | Topology blade, specify the following settings:
| Setting | Value |
| Subscription | the name of the Azure subscription you are using in this lab |
| Resource Group | exceed05b-labRG |
| Virtual Network | exceed05b-vnet |
- Review the resulting topology diagram, noting the connections between the public IP address, load balancer, and the network adapters of Azure VMs in its backend pool.
Note: This diagram is practically identical to the one you viewed in the previous exercise, since, despite being in different zones (and effectively Azure data centers), the Azure VMs reside on the same subnet.

- On the Network Watcher blade, select Effective security rules.
- On the Network Watcher | Effective security rules blade, specify the following settings:
| Setting | Value |
| Subscription | the name of the Azure subscription you are using in this lab |
| Resource group | exceed05b-labRG |
| Virtual machine | exceed05b-vm0 |
| Network interface | exceed05b-nic0 |
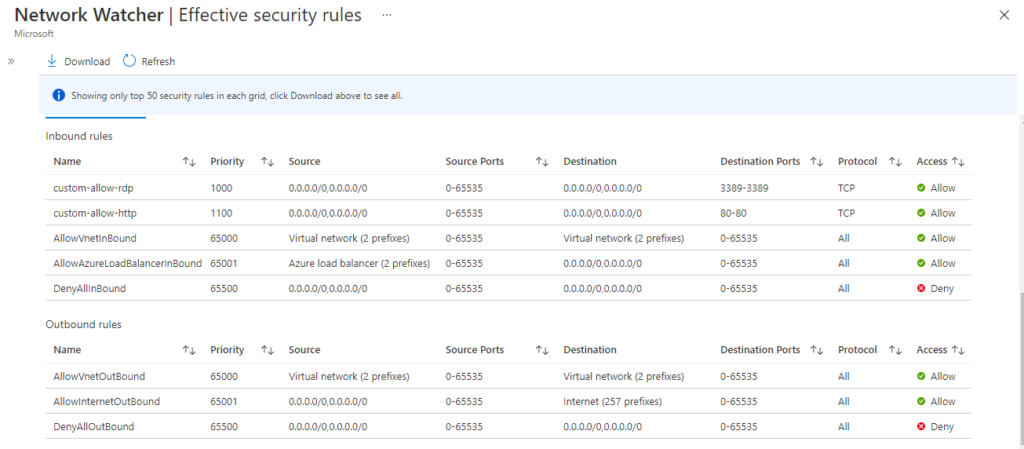
- Review the associated network security group and the effective security rules, including two custom rules that allow inbound connectivity via RDP and HTTP.
Note: This listing is also practically identical to the one you viewed in the previous exercise, with network-level protection implemented by using a network security group associated with the subnet to which both Azure VMs are connected. Keep in mind, however, that the network security group is, in this case, required for the HTTP and RDP traffic to reach the backend pool Azure VMs, due to the usage of the Azure Load Balancer Standard SKU (NSGs are optional when using the Basic SKU).
Note: Alternatively, you can view Effective security rules from:
- the exceed05b-nic0 network interface blade.
- the exceed05b-web-nsg network security group blade
- On the Network Watcher blade, select Connection troubleshoot.
Note: The intention is to verify the proximity (in the networking terms) of the two Azure VMs in different zones (within different Azure datacenters).
- On the Network Watcher | Connection troubleshoot blade, specify the following settings and select Check :
| Setting | Value |
| Subscription | the name of the Azure subscription you are using in this lab |
| Resource group | exceed05b-labRG |
| Source type | Virtual machine |
| Virtual machine | exceed05b-vm0 |
| Destination | Select a virtual machine |
| Resource group | exceed05b-labRG |
| Virtual machine | exceed05b-vm1 |
| Protocol | TCP |
| Destination port | 80 |
- Note: You will need to wait a few minutes for the results in order for the Azure Network Watcher Agent VM extension to be installed on the Azure VMs.
- Review the results and note the latency of the network connection between the Azure VMs.
Note: The latency might be slightly higher than the one you observed in the previous exercise, since the two VMs are in different zones (within different Azure datacenters).

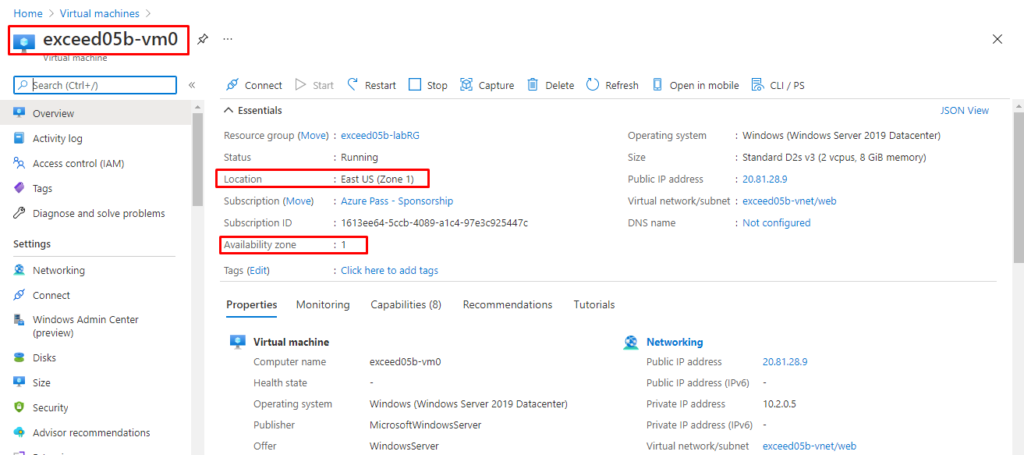
In the Azure portal, navigate to the exceed05b-labRG resource group blade, in the list of resources, select the exceed05b-vm0 virtual machine entry, and on the exceed05b-vm0 blade, note the Location and Availability zone entries.
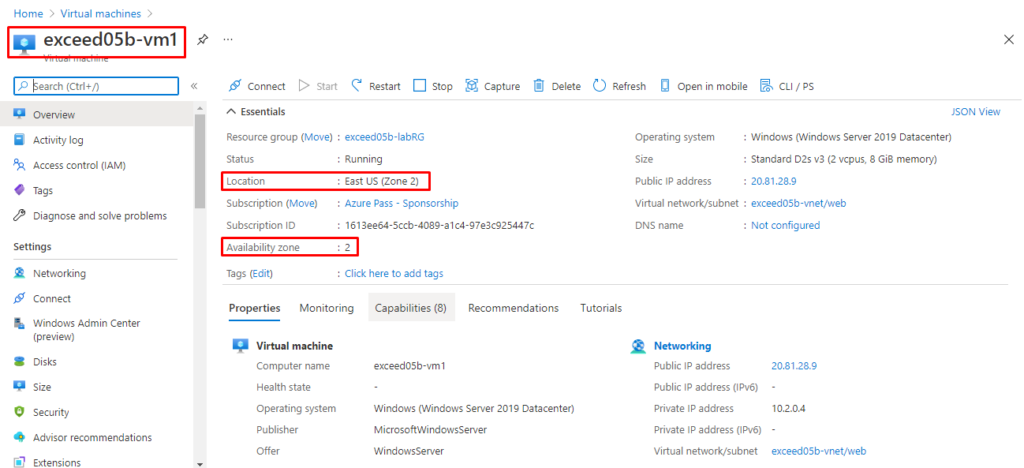
- In the Azure portal, navigate to the exceed05b-labRG resource group blade, in the list of resources, select the exceed05b-vm1 virtual machine entry, and on the exceed05b-vm1 blade, note the Location and Availability zone entries.
Note: The entries you reviewed confirm that each Azure VM resides in a different availability zone.
- In the Azure portal, navigate to the exceed05b-labRG resource group blade and, in the list of resources, select the exceed05b-lb load balancer entry, and on the exceed05b-lb blade, note the public IP address entry.
- In the Azure portal, start a new Bash session in the Cloud Shell pane.
- From the Cloud Shell pane, run the following to test load balancing of HTTP traffic to the Azure VMs in the backend pool of the Azure load balancer (replace the <lb_IP_address> placeholder with the IP address of the front end of the load balancer you identified earlier):
Code
for i in {1..4}; do curl 20.81.28.9; doneNote: Verify that the returned messages indicate that the requests are being delivered in the round robin manner to the backend Azure VMs

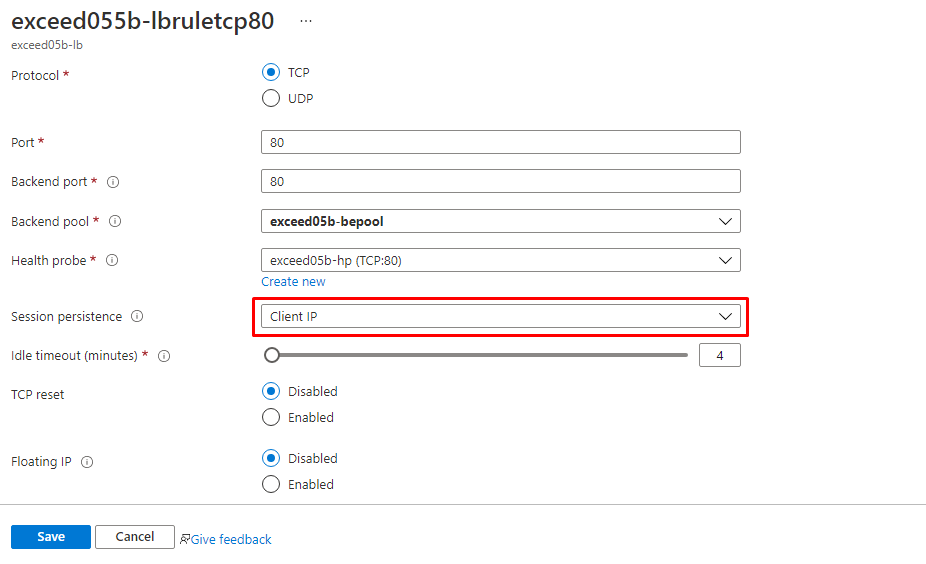
- On the exceed05b-lb blade, select the Load balancing rules entry and, on the exceed05b-lb | Load balancing rules blade, select the exced055b-lbruletcp80 entry representing the load balancing rule handling HTTP traffic.
- On the exceed055b-lbruletcp80 blade, in the Session persistence drop-down list, select Client IP and then select Save.
- Wait for the update to complete and, from the Cloud Shell pane, re-run the following to test load balancing of HTTP traffic to the Azure VMs in the backend pool of the Azure load balancer with session persistence (replace the <lb_IP_address> placeholder with the IP address of the front end of the load balancer you identified earlier):
Code
for i in {1..4}; do curl 20.81.28.9; doneNote: Verify that the returned messages indicate that the requests are being delivered to the same backend Azure VMs

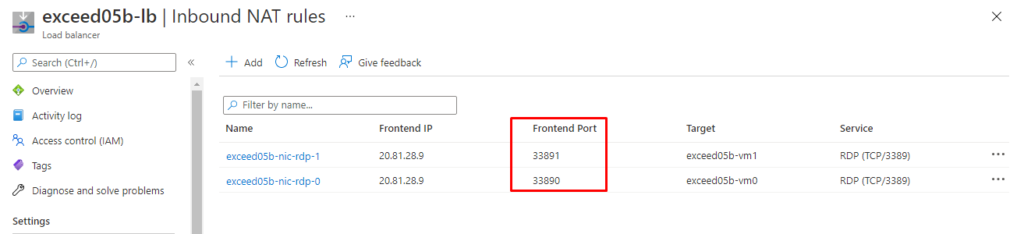
In the Azure portal, navigate back to the exceed05b-lb blade, select the Inbound NAT rules entry and note the two rules that allow for connecting to the first and the second of the backend pool VMs via Remote Desktop over TCP ports 33890 and 33891, respectively.
- From the Cloud Shell pane, run the following to test Remote Desktop connectivity via NAT to the first Azure VM in the backend pool of the Azure load balancer (replace the <lb_IP_address> placeholder with the IP address of the front end of the load balancer you identified earlier):
Code
curl -v telnet://20.81.28.9:33890Note: Verify that the returned message indicates that you are successfully connected.

- Press the Ctrl+C key combination to return to the Bash shell prompt and run the following to test Remote Desktop connectivity via NAT to the second Azure VM in the backend pool of the Azure load balancer (replace the <lb_IP_address> placeholder with the IP address of the front end of the load balancer you identified earlier):
Code
curl -v telnet://20.81.28.9:33891Note: Verify that the returned message indicates that you are successfully connected.

- Press the Ctrl+C key combination to return to the Bash shell prompt and close the Cloud Shell pane.
- On the exceed05b-lb blade, select the Load balancing rules entry and, on the exceed05b-lb | Load balancing rules blade, select the exceeed055b-lbruletcp80 entry representing the load balancing rule handling HTTP traffic.
- On the exceed055b-lbruletcp80 blade, in the Outbound source network address translation (SNAT) section, select (Recommended) Use outbound rules to provide backend pool members access to the internet, and then select Save.

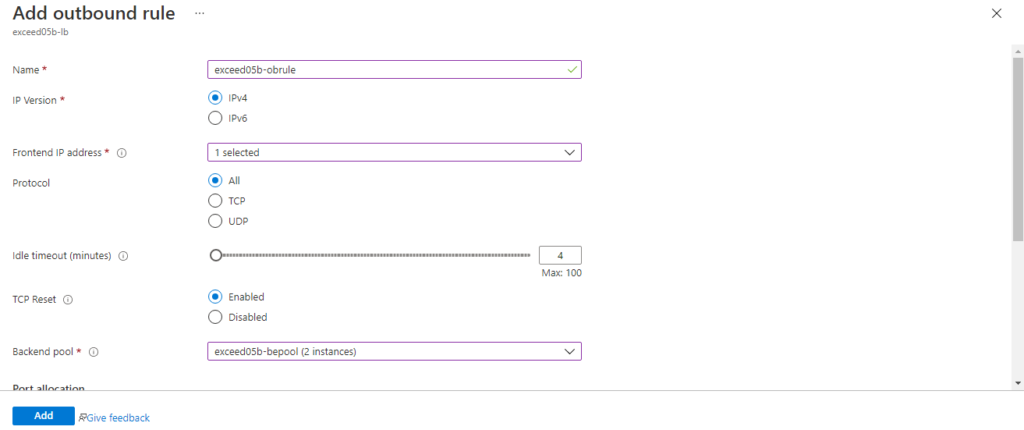
- Navigate back to the exceed05b-lb blade, select the Outbound rules entry, and on the exceed05b-lb | Outbound rules blade, select + Add.
- On the Add outbound rule blade, specify the following settings and select Add (leave all other settings with their default values):
| Setting | Value |
| Name | exceed05b-obrule |
| Frontend IP address | the name of the existing frontend IP address of the exceed05b-lb load balancer |
| Backend pool | exceed05b-bepool |
| Port allocation | Manually choose number of outbound ports |
| Choose by | Maximum number of backend instances |
| Maximum number of backend instances | 3 |
- Note: Azure Load Balancer Standard allows you to designate a dedicated frontend IP address for outbound traffic (in cases where multiple frontend IP addresses are assigned).
- In the Azure portal, navigate to the exceed05b-labRG resource group blade, in the list of resources, select the exceed05b-vm0 virtual machine entry, and on the exceed05b-vm0 blade, in the Operations blade, select Run command.
- On the exceed05b-vm0 | Run command blade, select RunPowerShellScript.
- On the Run Command Script blade, in the PowerShell Script text box, type the following and select Run.
Code
(Invoke-RestMethod -Uri "http://ipinfo.io").IPNote: This command returns the public IP address from which the web request originates.
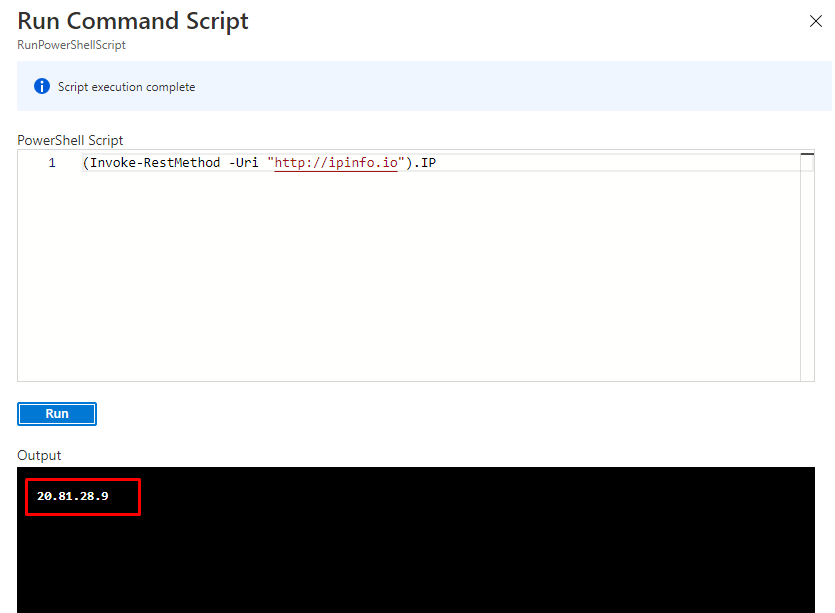
Review the output and verify that it matches the public IP address assigned to the frontend of the Azure Load Balancer Standard, which you assigned to the outbound load balancing rule.
Task 3: Remove Azure resources deployed in the exercise
- In the Azure portal, start a new Bash session in the Cloud Shell pane.
- From the Cloud Shell pane, run the following to list the resource group you created in this exercise:
Code
az group list --query "[?starts_with(name,'exceed05b-')]".name --output tsvNote: Verify that the output contains only the resource group you created in this lab. This group will be deleted in this task.
- From the Cloud Shell pane, run the following to delete the resource group you created in this lab
Code
az group list --query "[?starts_with(name,'exceed05b-')]".name --output tsv | xargs -L1 bash -c 'az group delete --name $0 --no-wait --yes'
Close the Cloud Shell pane.
Lab 3: Implement and analyze highly available Azure VM Scale Set deployments using availability zones and Azure Application Gateway.
The main tasks for this lab are as follows:
- Deploy a highly available Azure VM Scale Set into availability zones behind an Azure Application Gateway by using Azure Resource Manager templates
- Analyze a highly available Azure VM Scale Set deployed across availability zones behind an Azure Application Gateway
- Remove Azure resources deployed in the exercise
Task 1: Deploy a highly available Azure VM Scale Set into availability zones behind an Azure Application Gateway by using Azure Resource Manager templates
- If needed, in the Azure portal, open Cloud Shell pane by selecting on the toolbar icon directly to the right of the search textbox.
- If prompted to select either Bash or PowerShell, select Bash.
- In the toolbar of the Cloud Shell pane, select the Upload/Download files icon, in the drop-down menu select Upload, and upload the file \Azurelabs03\azuredeployexceed30305subc.json into the Cloud Shell home directory.
- From the Cloud Shell pane, run the following to create a resource groups (replace the <Azure region> placeholder with the name of the Azure region that is available in your subscription and which is closest to the location of your lab computer):
Code
az deployment sub create --location 'eastus' --template-file azuredeployexceed30305subc.json --parameters rgName=exceed05c-labRG rgLocation='eastus'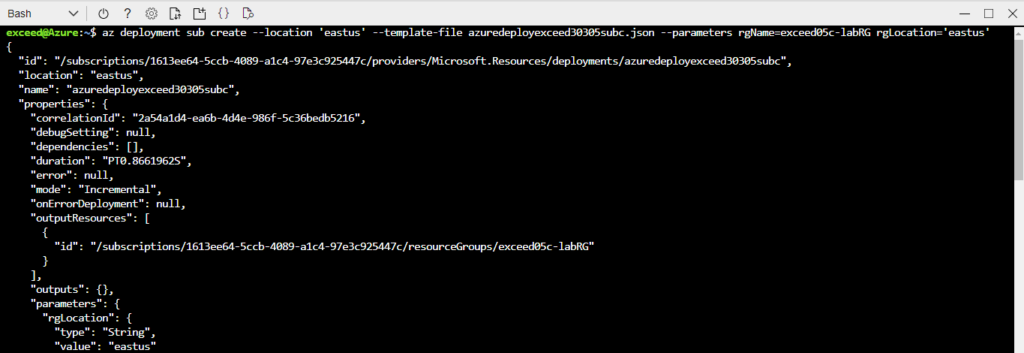
- From the Cloud Shell pane, upload the Azure Resource Manager template \Azurelabs03\azuredeployexceed30305rgc.json.
- From the Cloud Shell pane, upload the Azure Resource Manager parameter file \Azurelabs03\azuredeployexceed30305rgc.parameters.json.
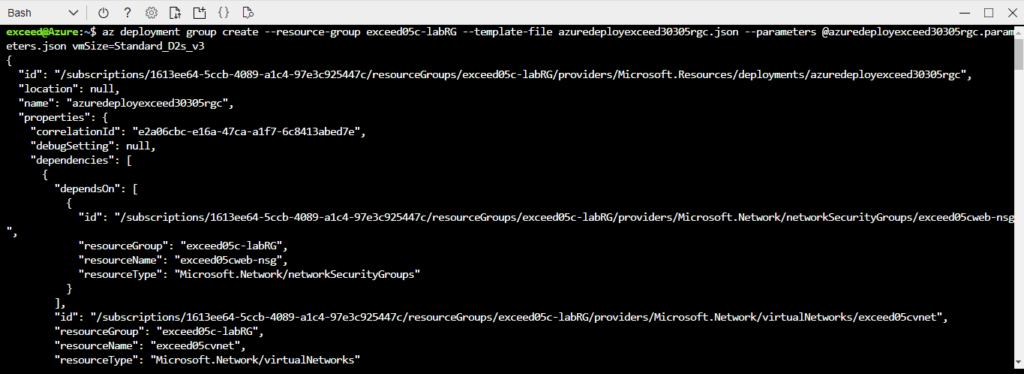
- From the Cloud Shell pane, run the following to deploy an Azure Application Gateway with its backend pool consisting of a pair of Azure VMs hosting Windows Server 2019 Datacenter Core across different availability zones (replace the <vm_Size> placeholder with the size of the Azure VM you intend to use for this deployment, such as Standard_D2s_v3):
Code
az deployment group create --resource-group exceed05c-labRG --template-file azuredeployexceed30305rgc.json --parameters @azuredeployexceed30305rgc.parameters.json vmSize=Standard_D2s_v3Note: Wait for the deployment to complete before proceeding to the next task. This should take about 10 minutes.
In the Azure portal, close the Cloud Shell pane.
Task 2: Analyze a highly available Azure VM Scale Set deployed across availability zones behind an Azure Application Gateway
- In the Azure portal, search for and select Network Watcher and, on the Network Watcher blade, select Topology.
- On the Network Watcher | Topology blade, specify the following settings:
| Setting | Value |
| Subscription | the name of the Azure subscription you are using in this lab |
| Resource Group | exceed05c-labRG |
| Virtual Network | exceed05c-vnet |
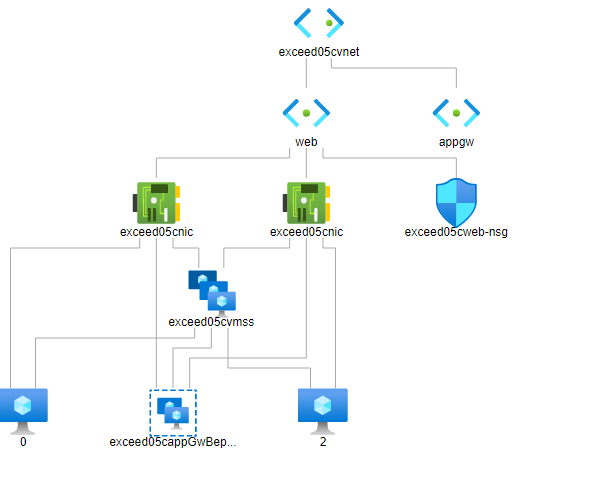
- Review the resulting topology diagram, noting the connections between the public IP address, load balancer, and the network adapters of Azure VM instances in the Azure Virtual Machine Scale Set in its backend pool.
Note: In addition, deployment of an Azure Application Gateway requires a dedicated subnet, included in the diagram (although the gateway is not displayed).
Note: In this configuration, it is not possible to use Network Watcher to view the effective network security rules (that is one of distinctions between Azure VMs and instances of an Azure VM Scale Set). Similarly, you cannot rely on using Connection troubleshoot to test network connectivity from Azure VM Scale Set instances, although it is possible to use it to test connectivity from the Azure Application Gateway.
- In the Azure portal, navigate to the exceed05c-labRG resource group blade, in the list of resources, and select the exceed05c-vmss virtual machine scale set entry.
- On the exceed05c-vmss blade, note the Location and Fault domains entries.
Note: Unlike Azure VMs, individual instances of Azure VM scale sets deploy into separate fault domains, including instances deployed into the same zone. In addition, they support 5 fault domains (unlike Azure VMs, which can use up to 3 fault domains).

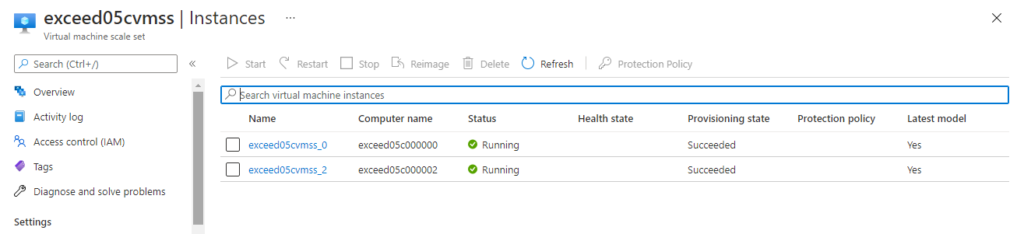
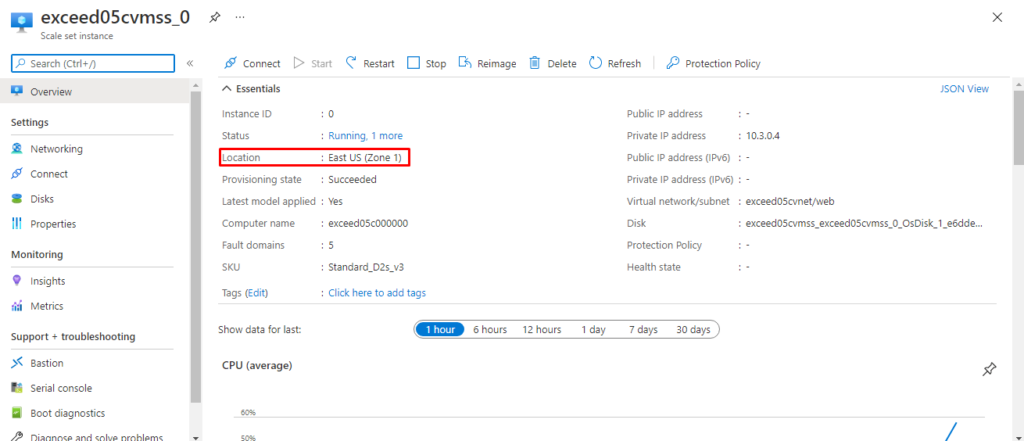
- On the exceed05c-vmss blade, select Instances, on the exceed05c-vmss | Instances blade, select the first instance, and identify its availability zone by reviewing the value of the Location property.
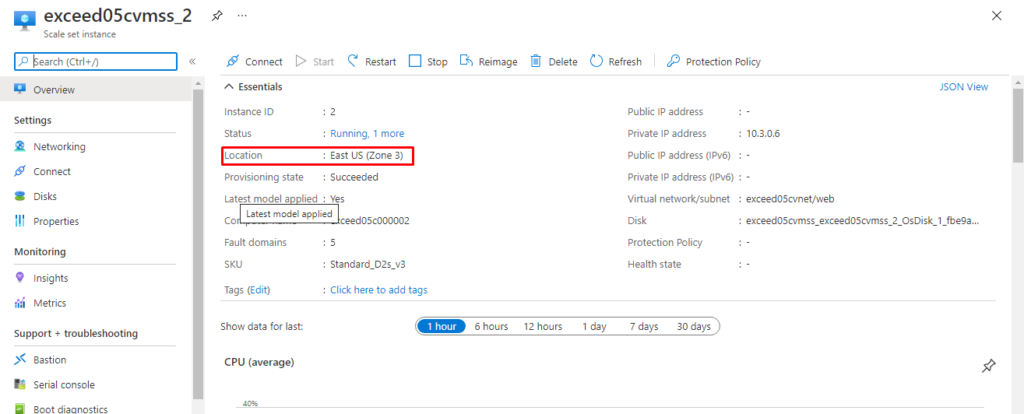
- Navigate back to the exceed05c-vmss | Instances blade, select the second instance, and identify its availability zone by reviewing the value of the Location property.
Note: Verify that each instance resides in a different availability zone.
In the Azure portal, navigate to the exceed05c-labRG resource group blade and, in the list of resources, select the exceed05c-appgw load balancer entry, and on the exceed05c-appgw blade, note the public IP address entry.

- In the Azure portal, start a new Bash session in the Cloud Shell pane.
- From the Cloud Shell pane, run the following to test load balancing of HTTP traffic to the Azure VM Scale Set instances in the backend pool of the Azure Application Gateway (replace the <lb_IP_address> placeholder with the IP address of the front end of the gateway you identified earlier):
Code
for i in {1..4}; do curl 20.81.66.172; doneNote: Verify that the returned messages indicate that the requests are being delivered in the round robin manner to the backend Azure VMs

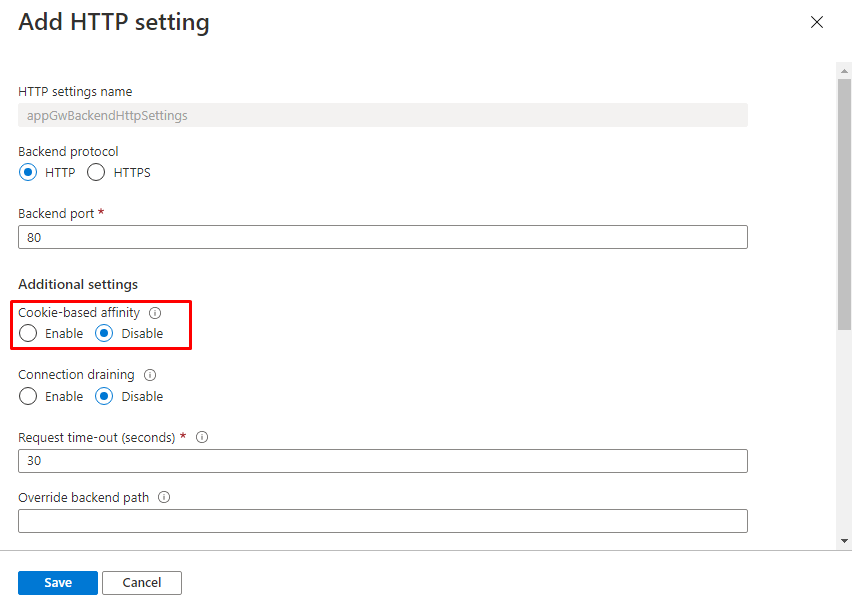
- On the exceed05c-appgw blade, select the HTTP settings entry and, on the exceed05c-appgw | HTTP settings blade, select the appGwBackentHttpSettings entry representing the load balancing rule handling HTTP traffic.
- On the appGwBackentHttpSettings blade, review the existing settings without making any changes and note that you can enable Cookie-based affinity.
Note: This feature requires that the client supports the use of cookies.
Note: You cannot use Azure Application Gateway to implement NAT for RDP connectivity to instances of an Azure VM Scale Set. Azure Application Gateway supports only HTTP/HTTPS traffic.
Lab 4: Implementing autoscaling of Azure VM Scale Sets using availability zones and Azure Application Gateway.
The main tasks for this lab are as follows:
- Configuring autoscaling of an Azure VM Scale Set
- Testing autoscaling of an Azure VM Scale Set
Task 1: Configure autoscaling of an Azure VM Scale Set
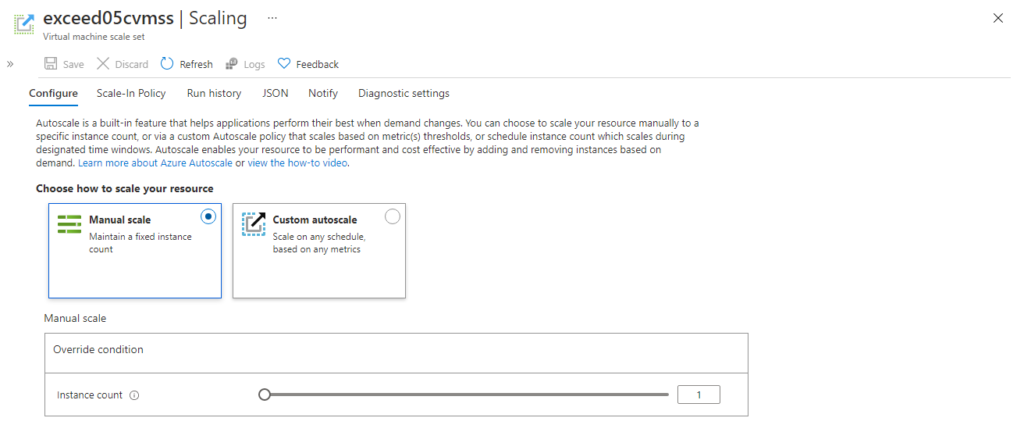
- In the Azure portal, navigate to the exceed05c-labRG resource group blade, in the list of resources, select the exceed05c-vmss virtual machine scale set entry, and on the exceed05c-vmss blade, select Scaling.
- On the exceed05c-vmss | Scaling blade, select the Custom autoscale option.
- In the Custom autoscale section, specify the following settings (leave others with their default values):
| Setting | Value |
| Scaling mode | Scale based on a metric |
| Instance limits Minimum | 1 |
| Instance limits Maximum | 3 |
| Instance limits Default | 1 |
- Select + Add a rule.
- On the Scale rule blade, specify the following settings and select Add (leave others with their default values):
| Setting | Value |
| Time aggregation | Maximum |
| Metric namespace | Virtual Machine Host |
| Metric name | Percentage CPU |
| VMName Operator | = |
| Dimension values | exceed05c-vmss_0 |
| Enable metric divide by instance count | Enabled |
| Operator | Greater than |
| Metric threshold to trigger scale action | 1 |
| Duration (in minutes) | 1 |
| Time grain statistics | Maximum |
| Operation | Increase count by |
| Instance count | 1 |
| Cool down (minutes) | 5 |
- Note: These values are selected strictly for lab purposes to trigger scaling as soon as possible. For guidance regarding Azure VM Scale Set scaling, refer to Microsoft Docs .
- Back on the exceed05c-vmss | Scaling blade, select + Add a rule.
- On the Scale rule blade, specify the following settings and select Add (leave others with their default values):
| Setting | Value |
| Time aggregation | Average |
| Metric namespace | Virtual Machine Host |
| Metric name | Percentage CPU |
| VMName Operator | = |
| Dimension values | 2 selected |
| Enable metric divide by instance count | Enabled |
| Operator | Less than |
| Metric threshold to trigger scale action | 1 |
| Duration (in minutes) | 1 |
| Time grain statistics | Minimum |
| Operation | Decrease count by |
| Instance count | 1 |
| Cool down (minutes) | 5 |
| Back on the **exceed05c-vmss | Scaling** blade, select Save. |

Task 2: Test autoscaling of an Azure VM Scale Set
- In the Azure portal, start a new Bash session in the Cloud Shell pane.
- From the Cloud Shell pane, run the following to trigger autoscaling of the Azure VM Scale Set instances in the backend pool of the Azure Application Gateway (replace the <lb_IP_address> placeholder with the IP address of the front end of the gateway you identified earlier):
Code
for (( ; ; )); do curl -s 20.81.66.172?[1-10]; done
- In the Azure portal, on the exceed05c-vmss Overview blade, on the Monitoring tab, review the CPU (average) chart and verify that the CPU utilization of the Application Gateway increased sufficiently to trigger scaling out.
Note: You might need to wait a few minutes.
- On the exceed05c-vmss blade, select the Instances entry and verify that the number of instances has increased.
Note: You might need to refresh the exceed05c-vmss | Instances blade.
Note: You might see the number of instances increasing by 2 (rather than 1). This is expected as long as the final number of running instances is 3.
- In the Azure portal, close the Cloud Shell pane.
- In the Azure portal, on the exceed05c-vmss blade, review the CPU (average) chart and verify that the CPU utilization of the Application Gateway decreased sufficiently to trigger scaling in.
Note: You might need to wait a few minutes.
- On the exceed05c-vmss blade, select the Instances entry and verify that the number of instances has decreased to 2.
Note: You might need to refresh the exceed05c-vmss | Instances blade.
- On the exceed05c-vmss blade, select Scaling.
- On the exceed05c-vmss | Scaling blade, select the Manual scale option and select Save.
Note: This will prevent any undesired autoscaling during the next exercise.
Lab 5: Implementing vertical scaling of Azure VM Scale Sets
The main tasks for this lab are as follows:
- Scaling compute resources of Azure virtual machine scale set instances.
- Scaling storage resources of Azure virtual machine scale sets instances.
Task 1: Scale compute resources of Azure virtual machine scale set instances.
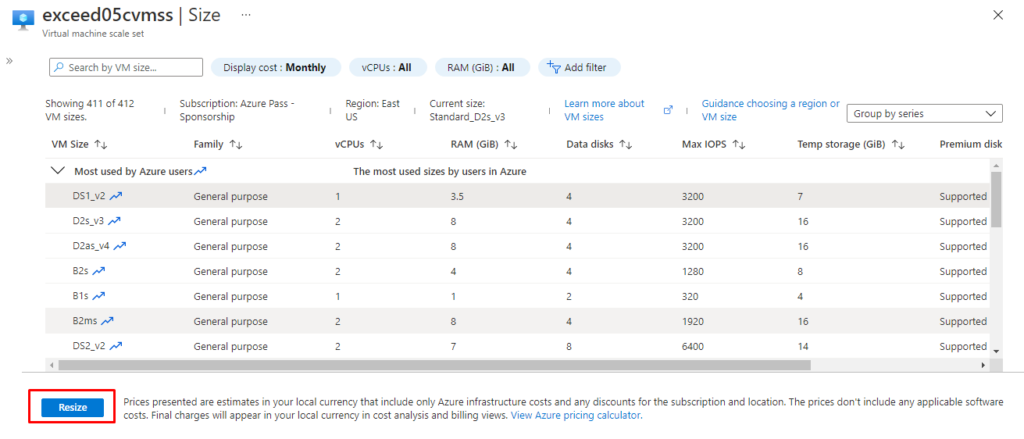
- In the Azure Portal, on the exceed05c-vmss blade, select Size.
- In the list of available sizes, select any available size other than currently configured and select Resize.
- On the exceed05c-vmss blade, select the Instances entry and, on the exceed05c-vmss | Instances blade, observe the process of replacing existing instances with new ones of the desired size.
Note: You might need to refresh the exceed05c-vmss | Instances blade.
- Wait until the instances are updated and running.
Task 2: Scale storage resources of Azure virtual machine scale sets instances.
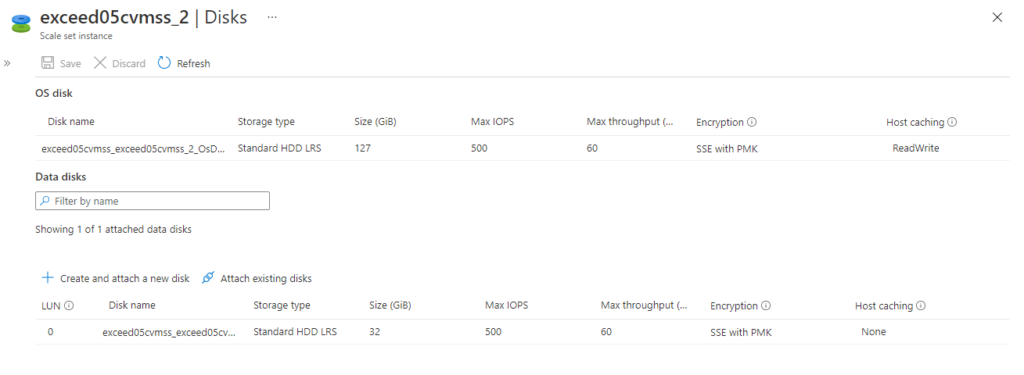
- On the exceed05c-vmss blade, select Disks, select + Create and attach a new disk, attach a new managed disk with the following settings (leave others with their default values), and select Save:
| Setting | Value |
| LUN | 0 |
| Size | 32 |
| Storage account type | Standard HDD |
- On the exceed05c-vmss blade, select the Instances entry and, on the exceed05c-vmss | Instances blade, observe the process of updating the existing instances.
Note: The disk attached in the previous step is a raw disk. Before it can be used, it is necessary to create a partition, format it, and mount it. To accomplish this, you will deploy a PowerShell script to Azure VM scale set instances via the Custom Script extension. First, however, you will need to remove it.
- On the exceed05c-vmss blade, select Extensions, on the exceed05c-vmss | Extensions blade, select the customScriptExtension entry, and then, on the Extensions blade, select Uninstall.
Note: Wait for uninstallation to complete.
- In the Azure portal, navigate to the exceed05c-labRG resource group blade, in the list of resources, select the storage account resource.
- On the storage account blade, select Containers and then select + Container.
- On the New container blade, specify the following settings (leave others with their default values) and select Create:
| Setting | Value |
| Name | scripts |
| Public access level | Private (no anonymous access) |
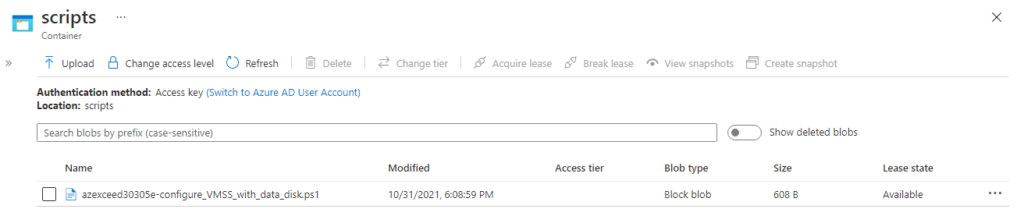
- Back on the storage account blade displaying the list of containers, select scripts.
- On the scripts blade, select Upload.
- On the Upload blob blade, select the folder icon, in the Open dialog box, navigate to the \Azurelabs03 folder, select exceed05e-configure_VMSS_with_data_disk.ps1, select Open, and back on the Upload blob blade, select Upload.
- In the Azure portal, navigate back to the exceed05c-vmss virtual machine scale set blade.
- On the exceed05c-vmss blade, select Extensions, on the exceed05c-vmss | Extensions blade, select + Add and then, select the customScriptExtension entry on the Extensions blade.
- On the New resource blade, select Custom Script Extension and then select Create.

- From the Install extension blade, select Browse.
- On the Storage accounts blade, select the name of the storage account into which you uploaded the exceed05e-configure_VMSS_with_data_disk.ps1 script, on the Containers blade, select scripts, on the scripts blade, select exceed05e-configure_VMSS_with_data_disk.ps1, and then select Select.
- Back on the Install extension blade, select OK.
| On the exceed05c-vmss blade, select the Instances entry and, on the **exceed05c-vmss | Instances** blade, observe the process of updating existing instances. |
- Note: You might need to refresh the exceed05c-vmss | Instances blade.
Task 3: Remove Azure resources deployed in the exercise
- From the Cloud Shell pane, run the following to list the resource group you created in this exercise:
Code
az group list --query "[?starts_with(name,'exceed05c-')]".name --output tsvNote: Verify that the output contains only the resource group you created in this lab. This group will be deleted in this task.
- From the Cloud Shell pane, run the following to delete the resource group you created in this lab
Code
az group list --query "[?starts_with(name,'exceed05c-')]".name --output tsv | xargs -L1 bash -c 'az group delete --name $0 --no-wait --yes'
Close the Cloud Shell pane.
Reminder: Don’t forget to delete or shutdown all unused Azure resources after your labs for cost saving
Leave a Reply